Step-by-Step Guide
Here are illustrated step-by-step instructions for various functions of GUDe:
- Submit Data
- Create a New Version of a Research Dataset
- Request a Correction of a Research Dataset
- Create a New Organisation
- Create a New Project
- Modify Personal Dataset
Submit Data
1. Navigate to 'MyGUDe'
1.1. Click on the Profile Icon at the top right
To access 'MyGUDe,' first, the profile icon at the top right must be clicked upon.
1.2. Select 'MyGUDe'
After clicking on the profile icon, a menu will appear. Here, one must click on 'MyGUDe'.

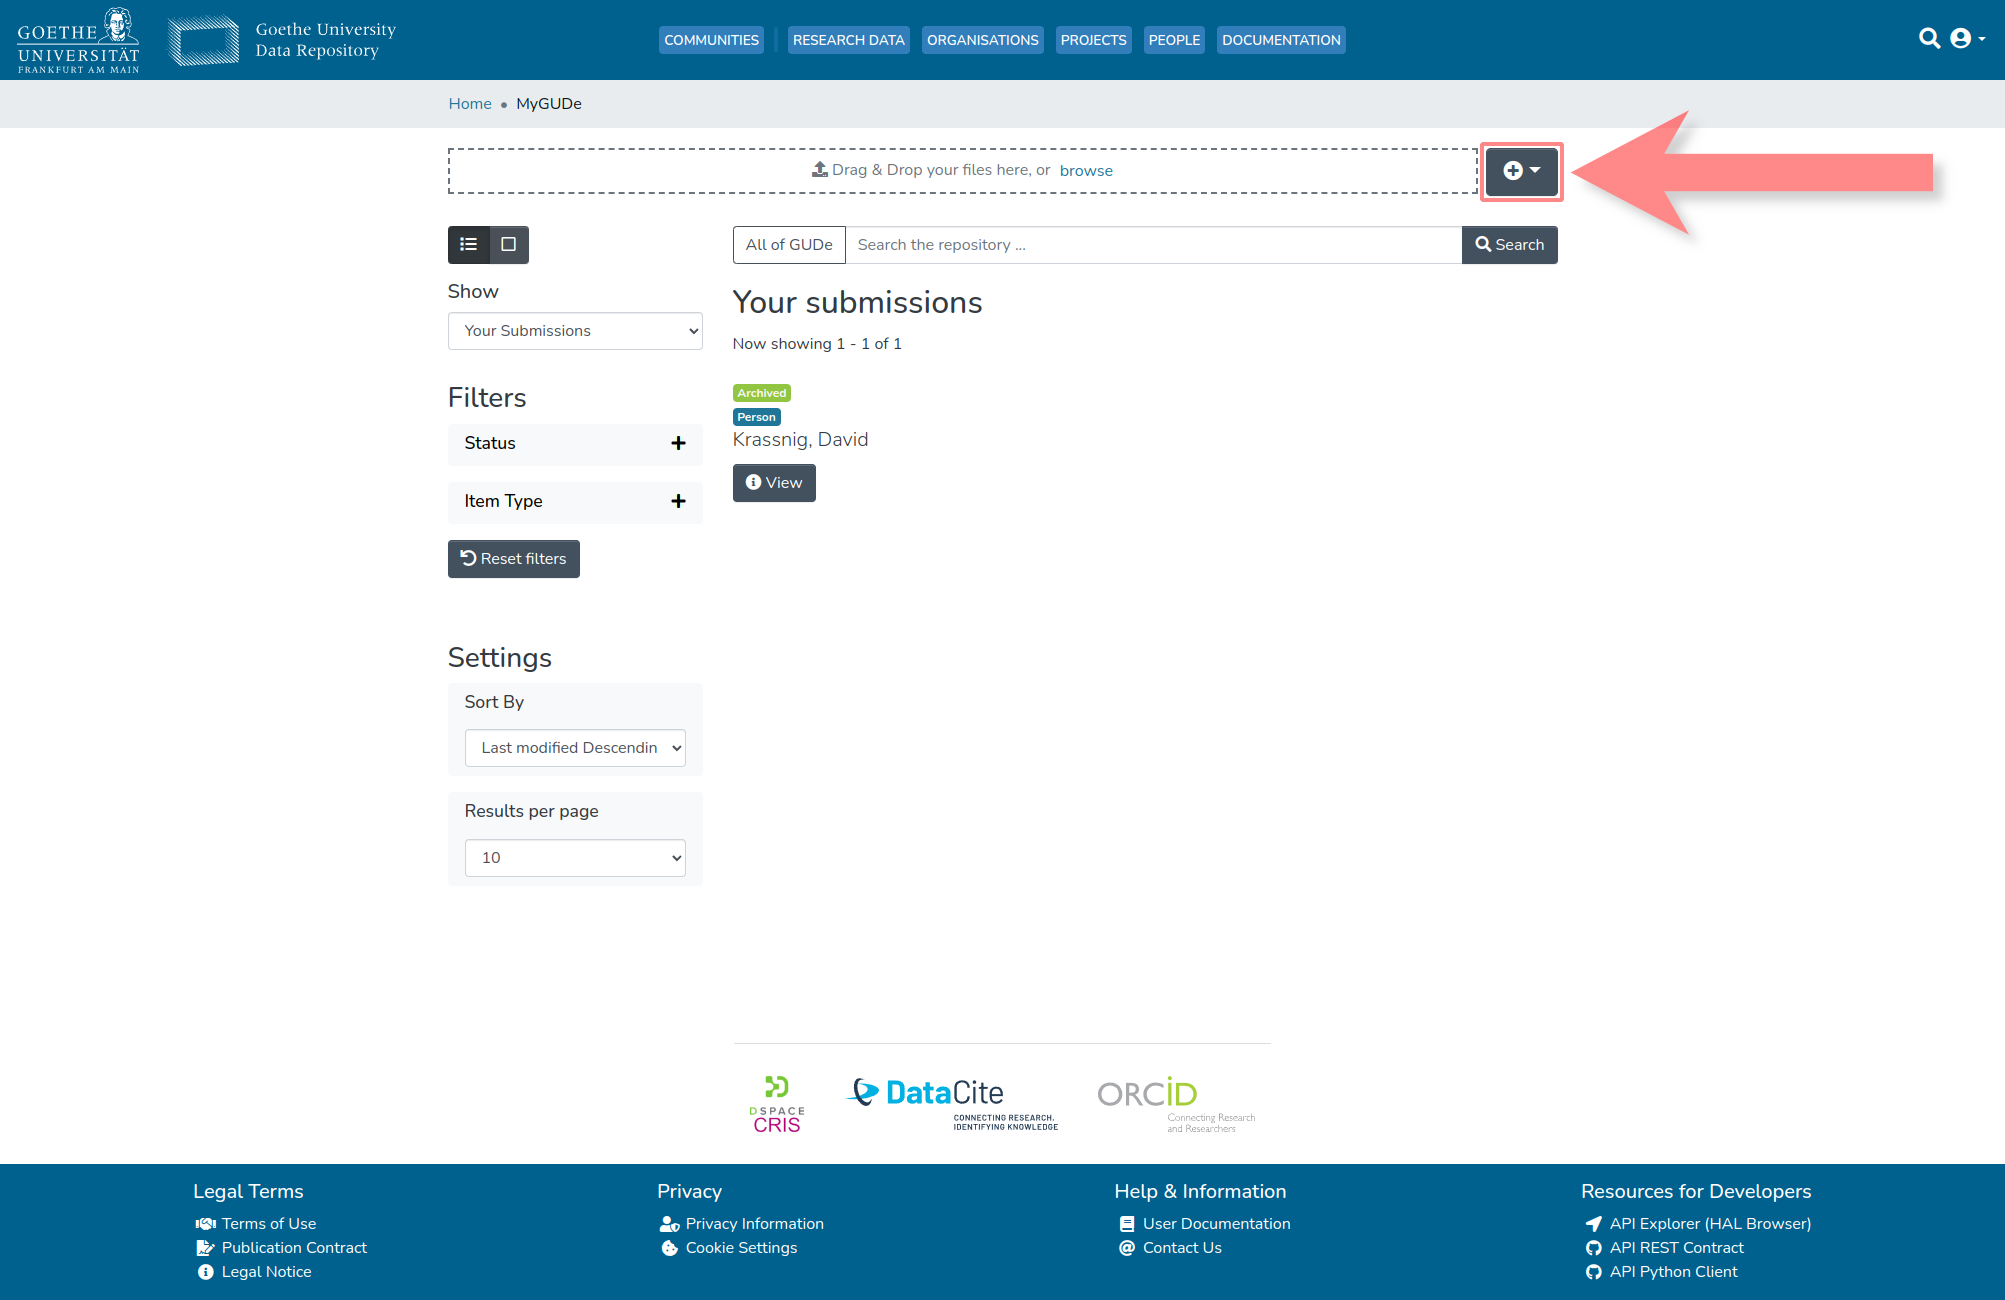
2. Create New Submission
2.1. Click on the Plus Icon (⊕) at the top right
To create a new submission of any type, one starts by clicking on the highlighted plus icon.
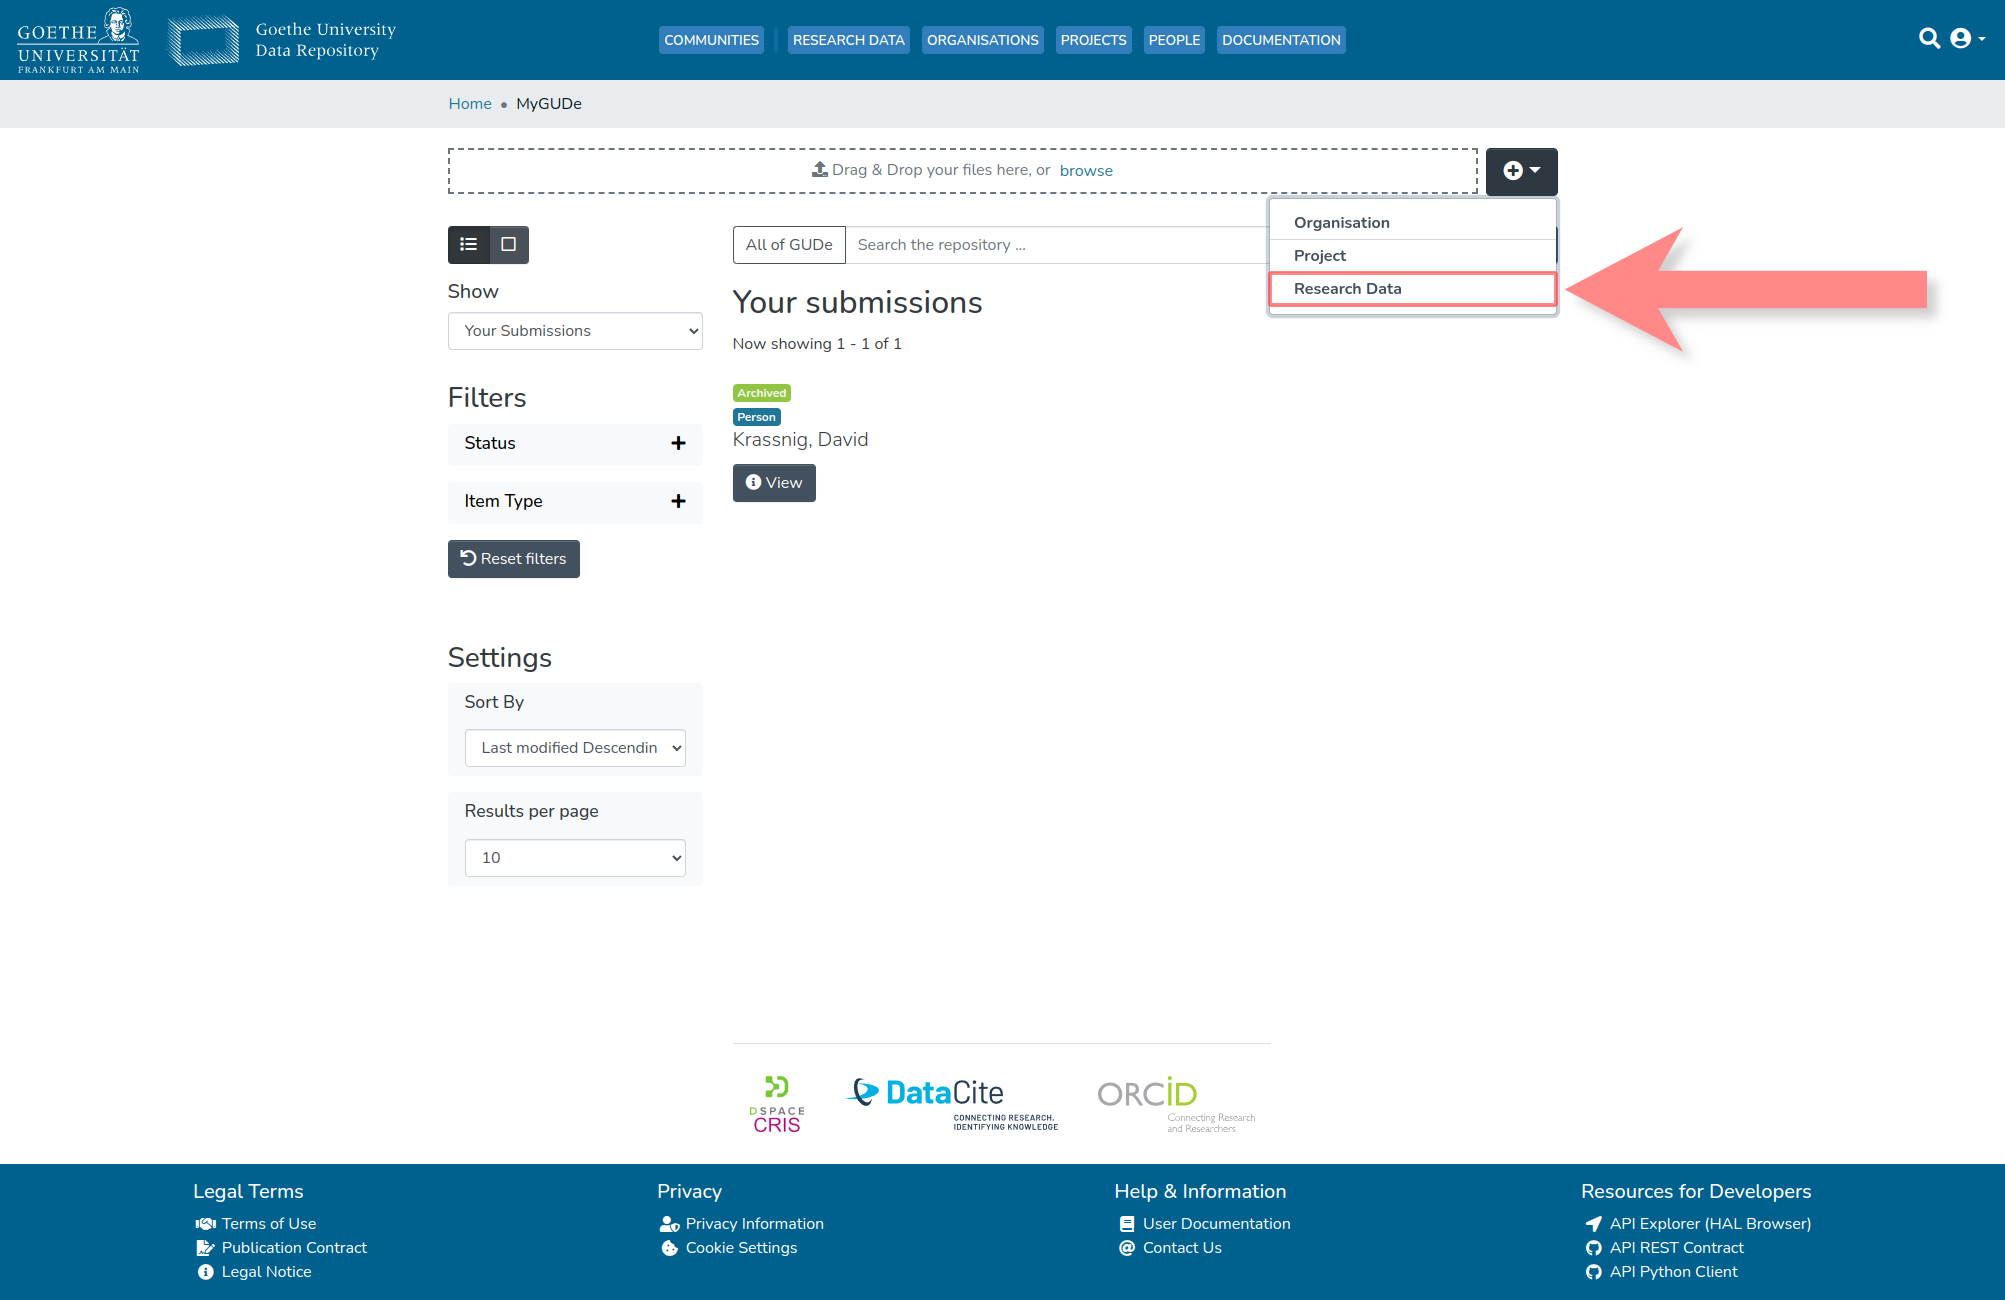
2.2. Select 'Research Data'
After clicking on the plus icon, a menu will appear. 'Research Data' must be selected here.
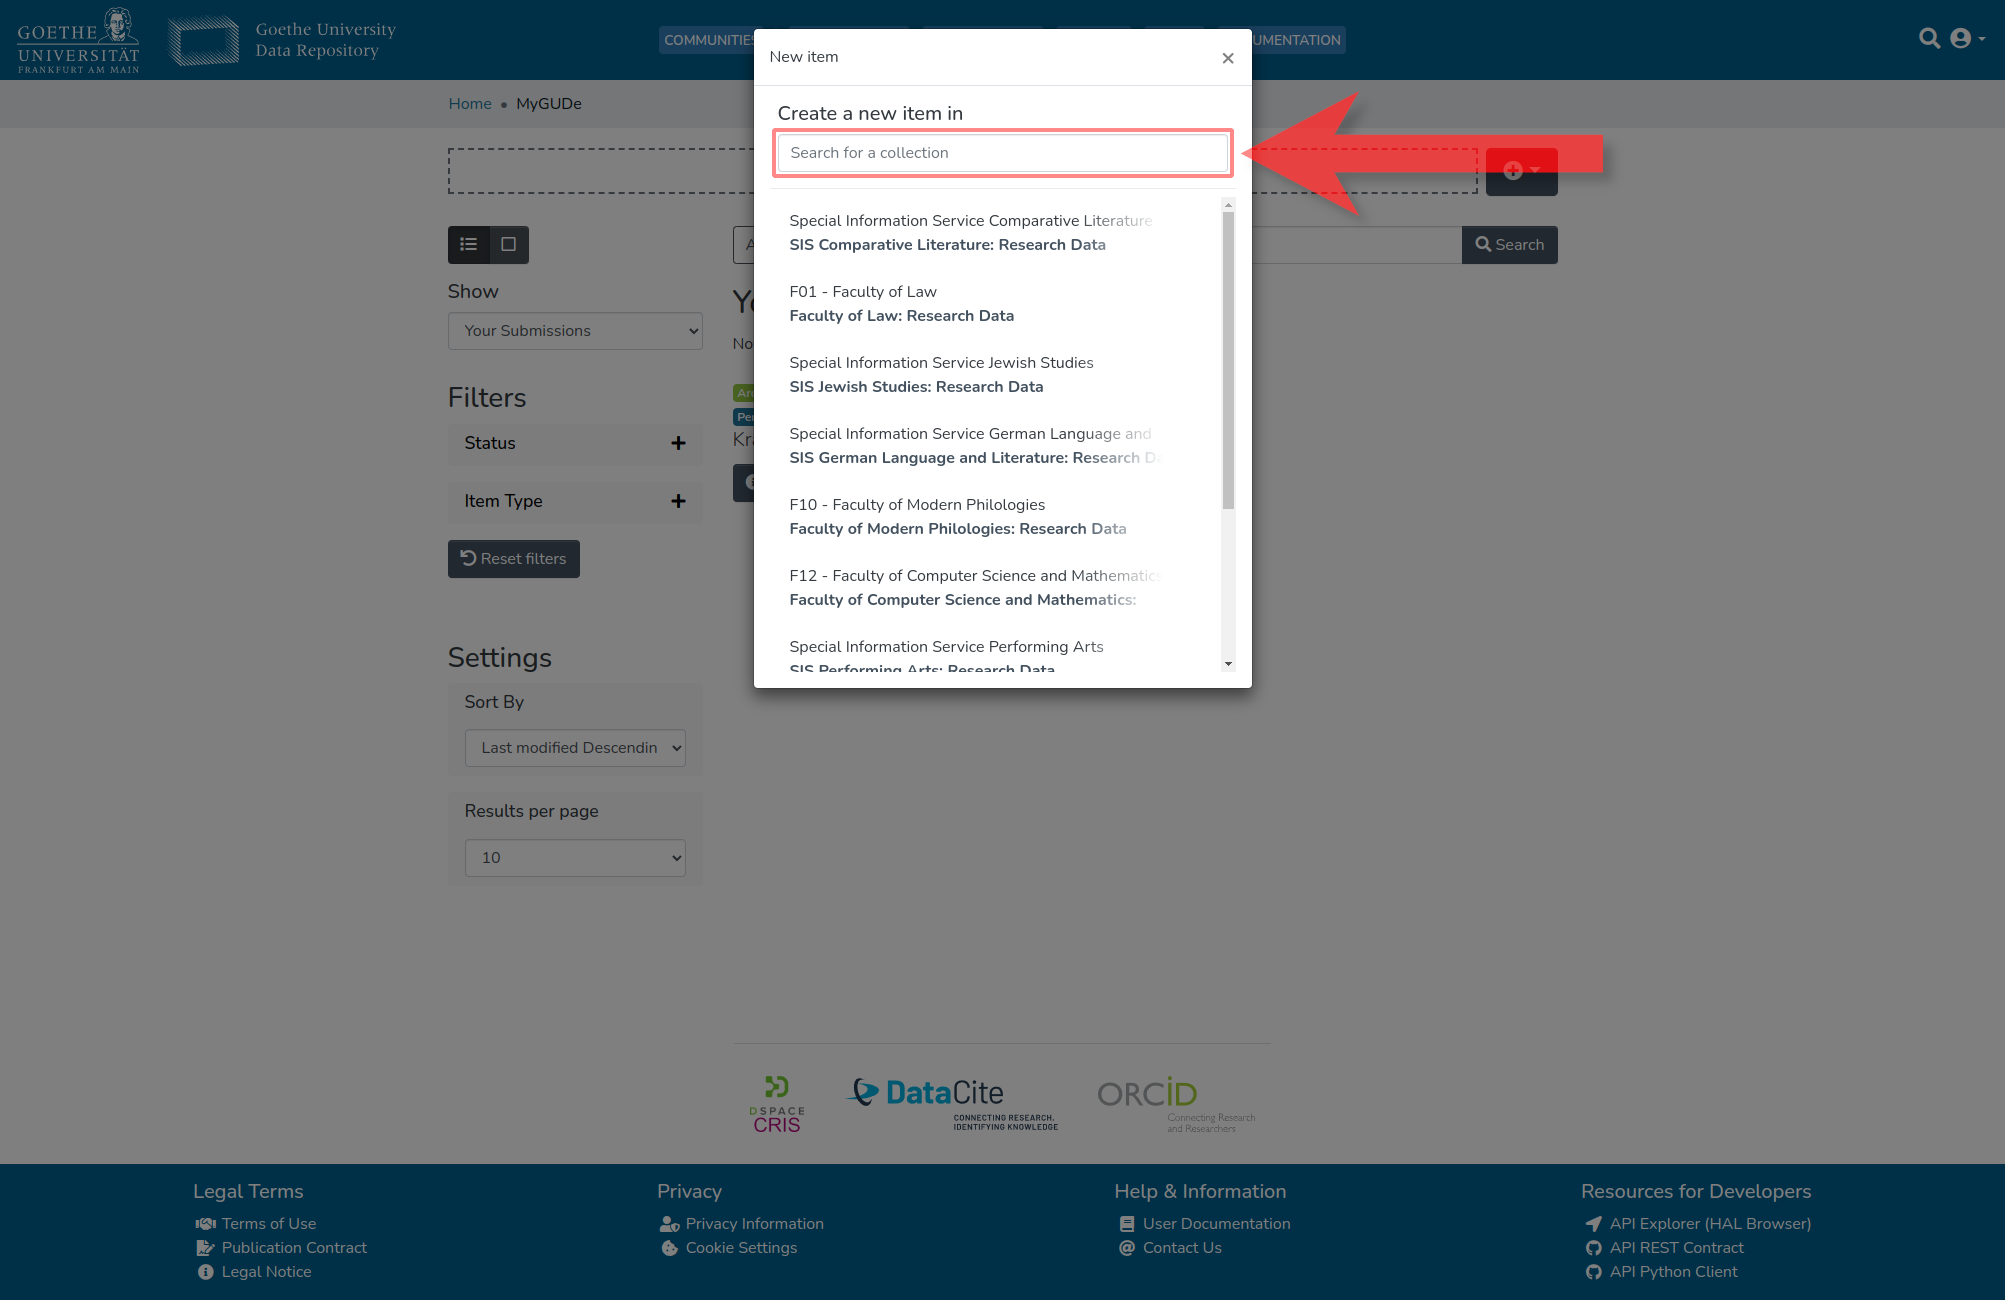
2.3. (OPTIONAL) Search for the desired collection
If the submission needs to be associated with a collection that is not shown directly, one can search for the name of the desired collection in the highlighted area to display it.
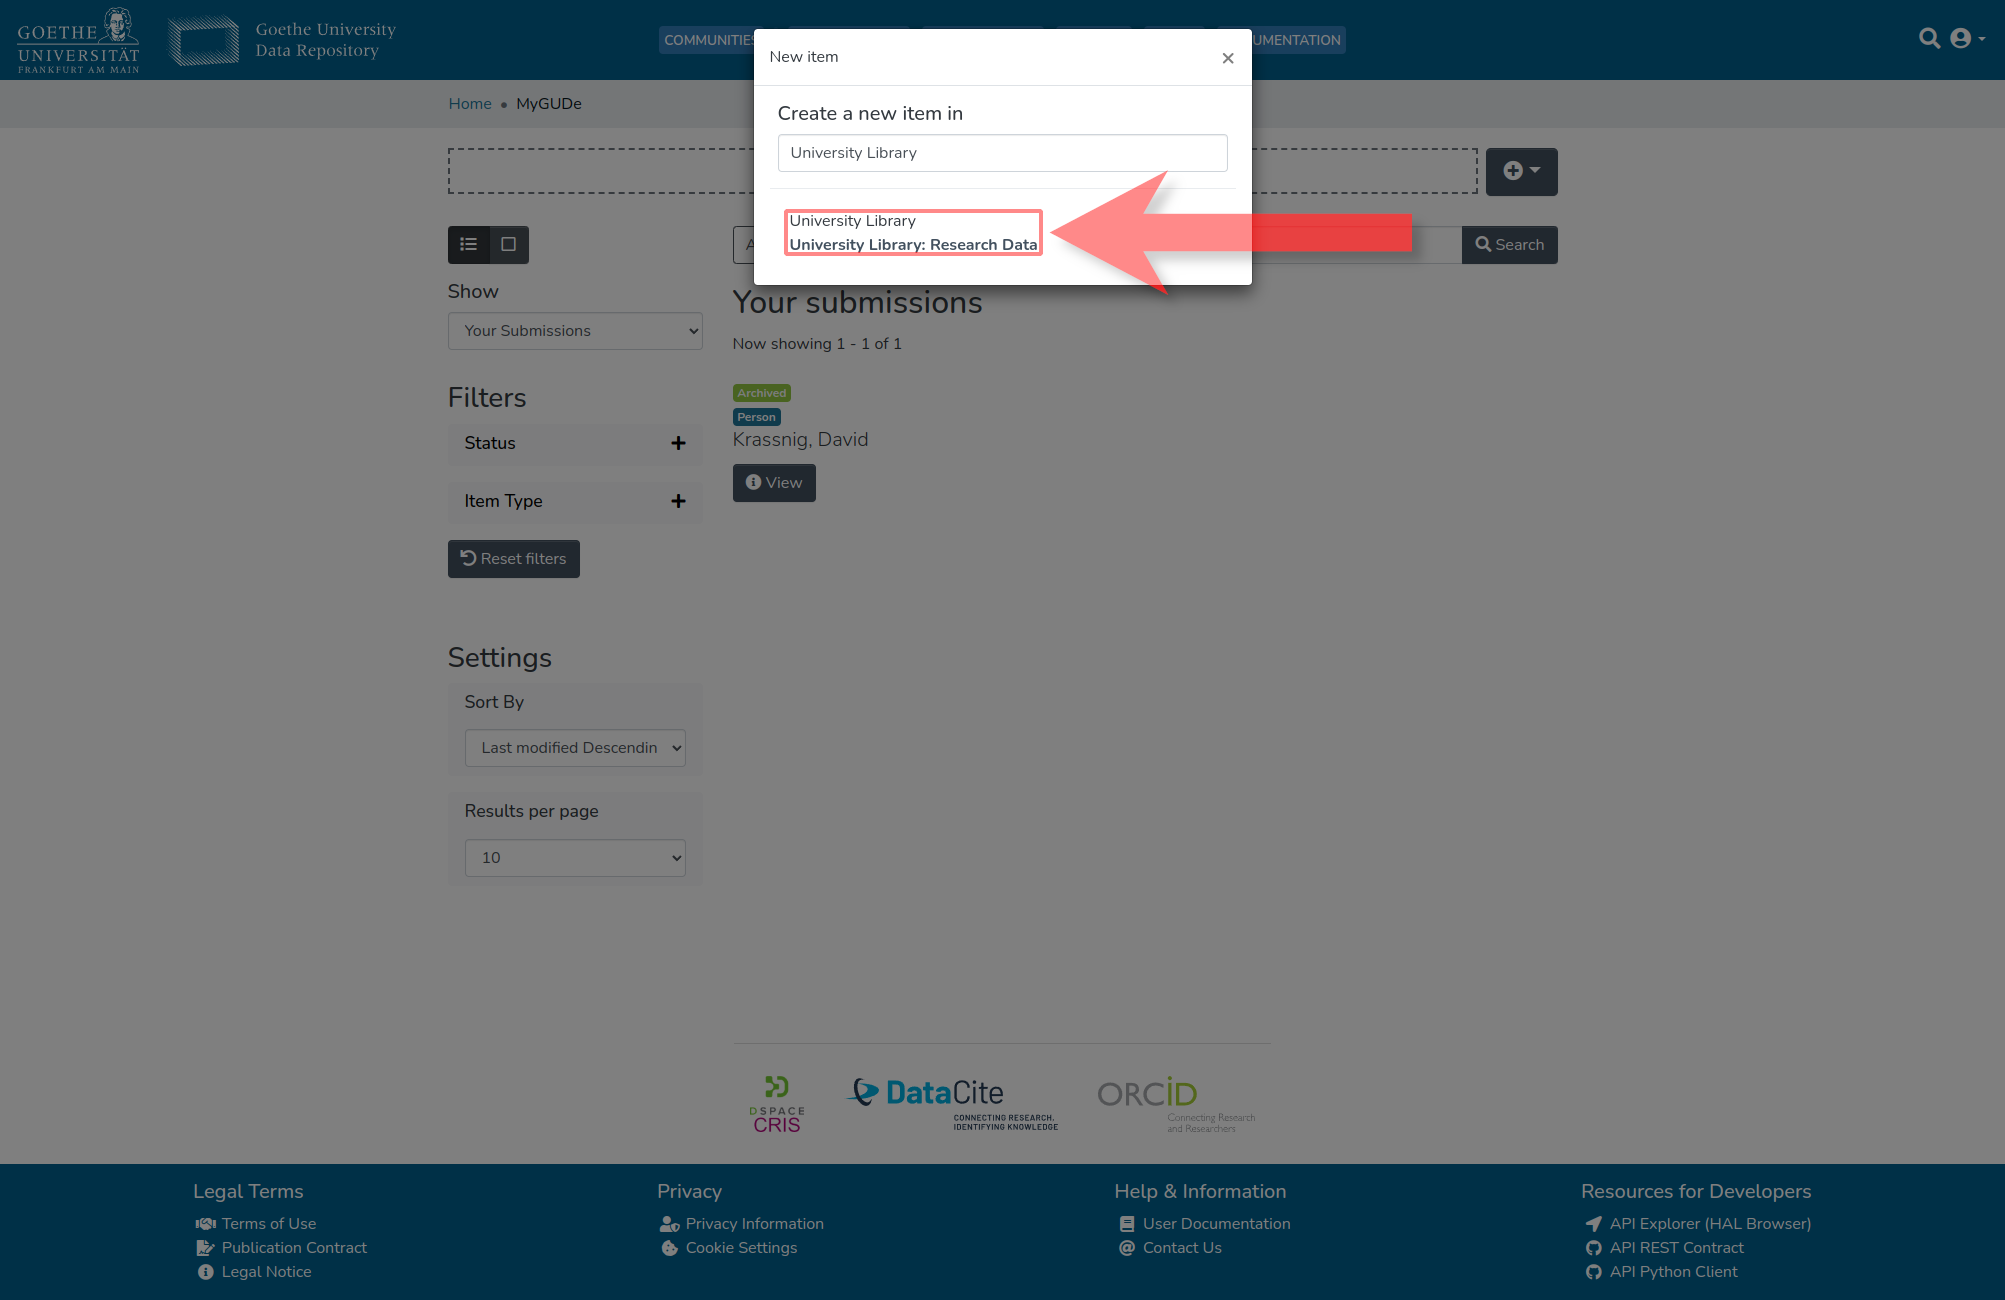
2.4. Select the desired collection
Once the desired collection is displayed, one can click on it to create a new submission within that collection.
3. Set Submission Access Conditions
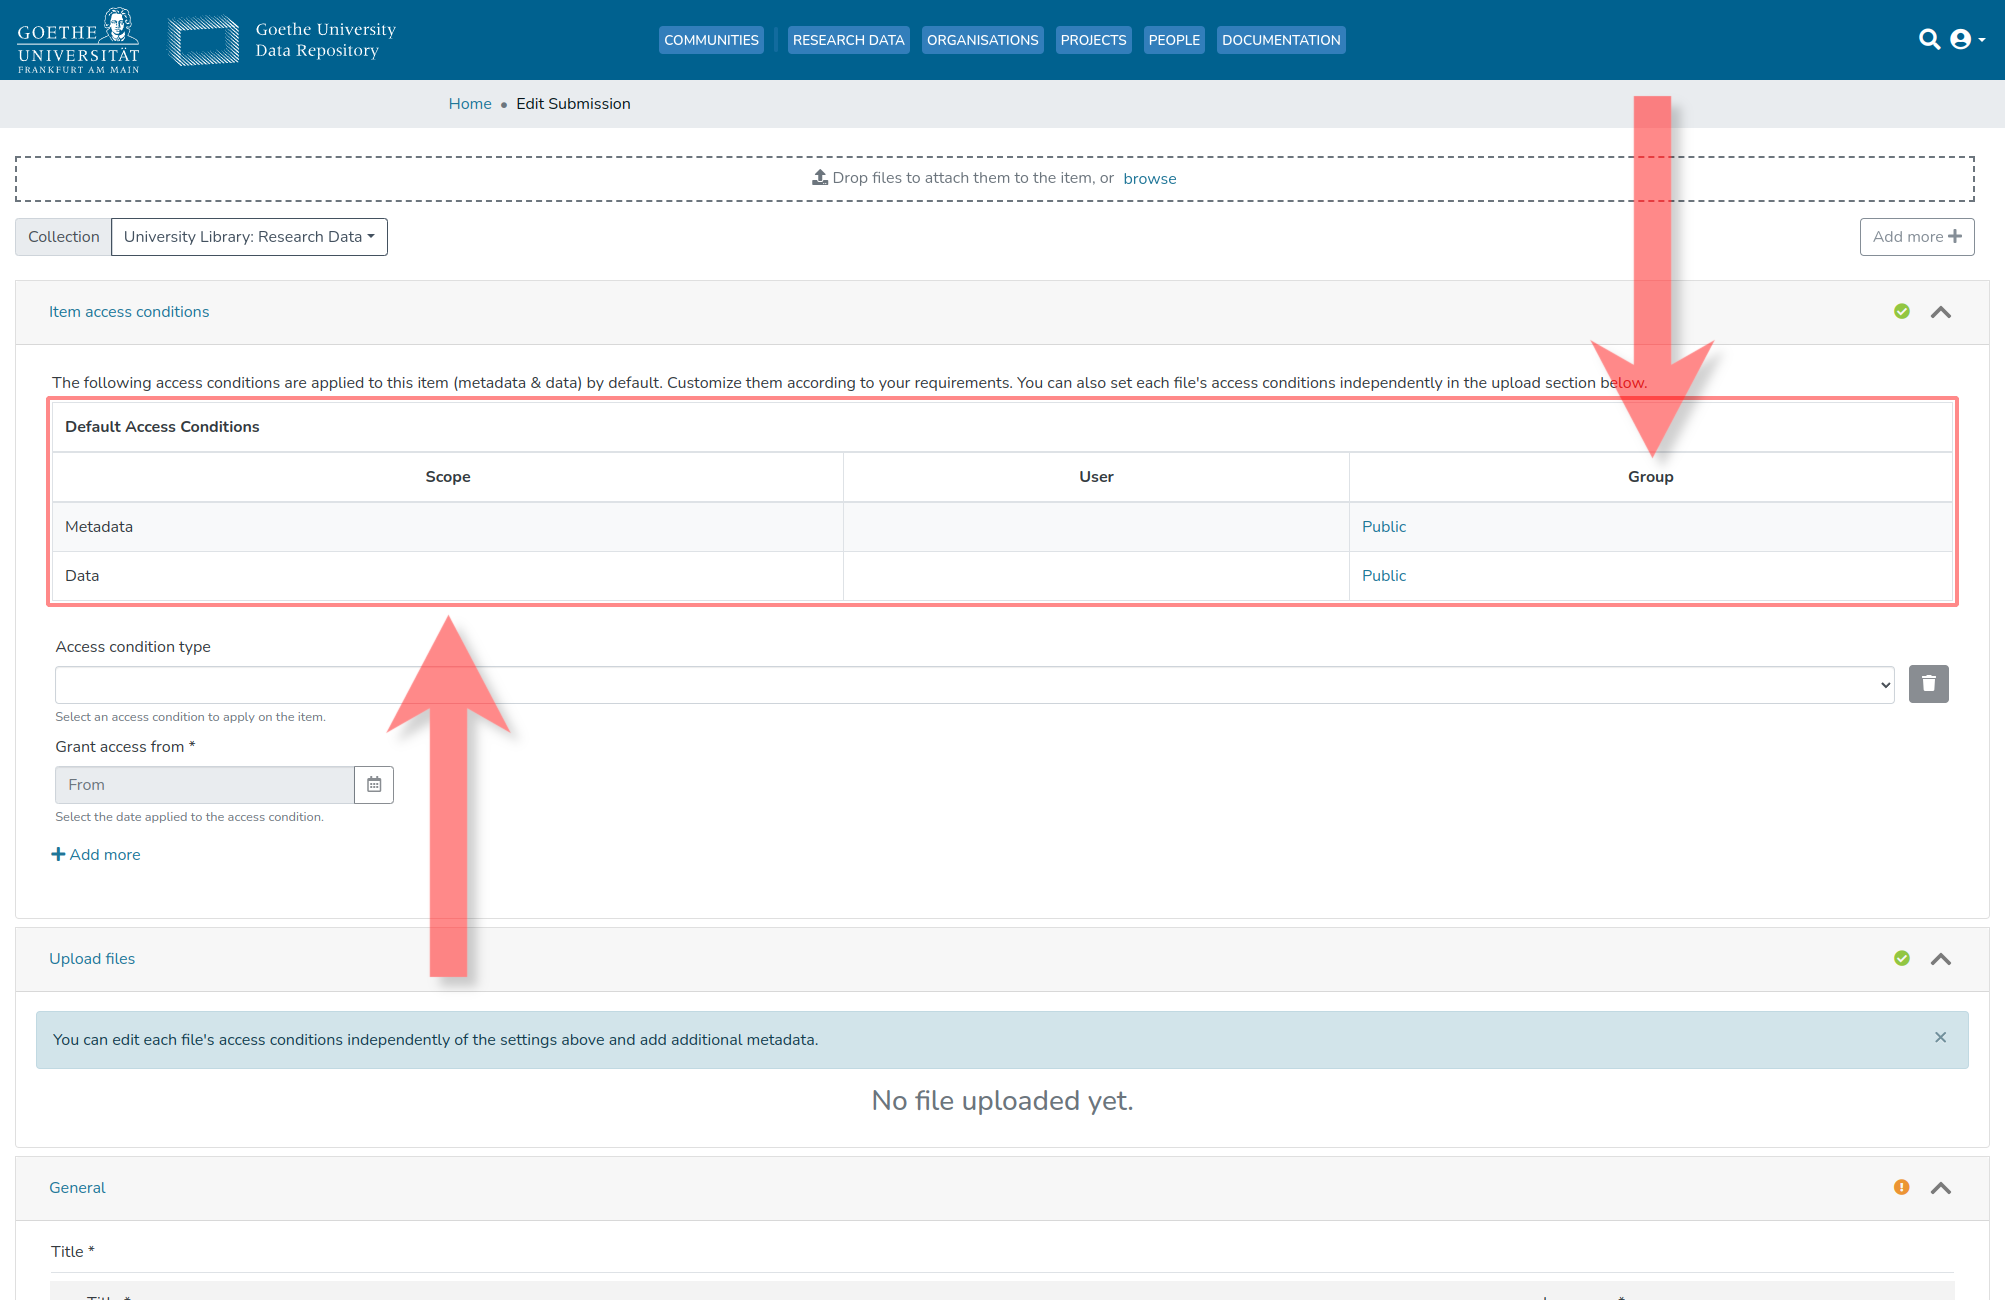
3.1. Evaluate default access conditions of the collection
The default access permissions of the selected collection will be displayed in the highlighted area. This will indicate whether the metadata and research data are publicly accessible or not.
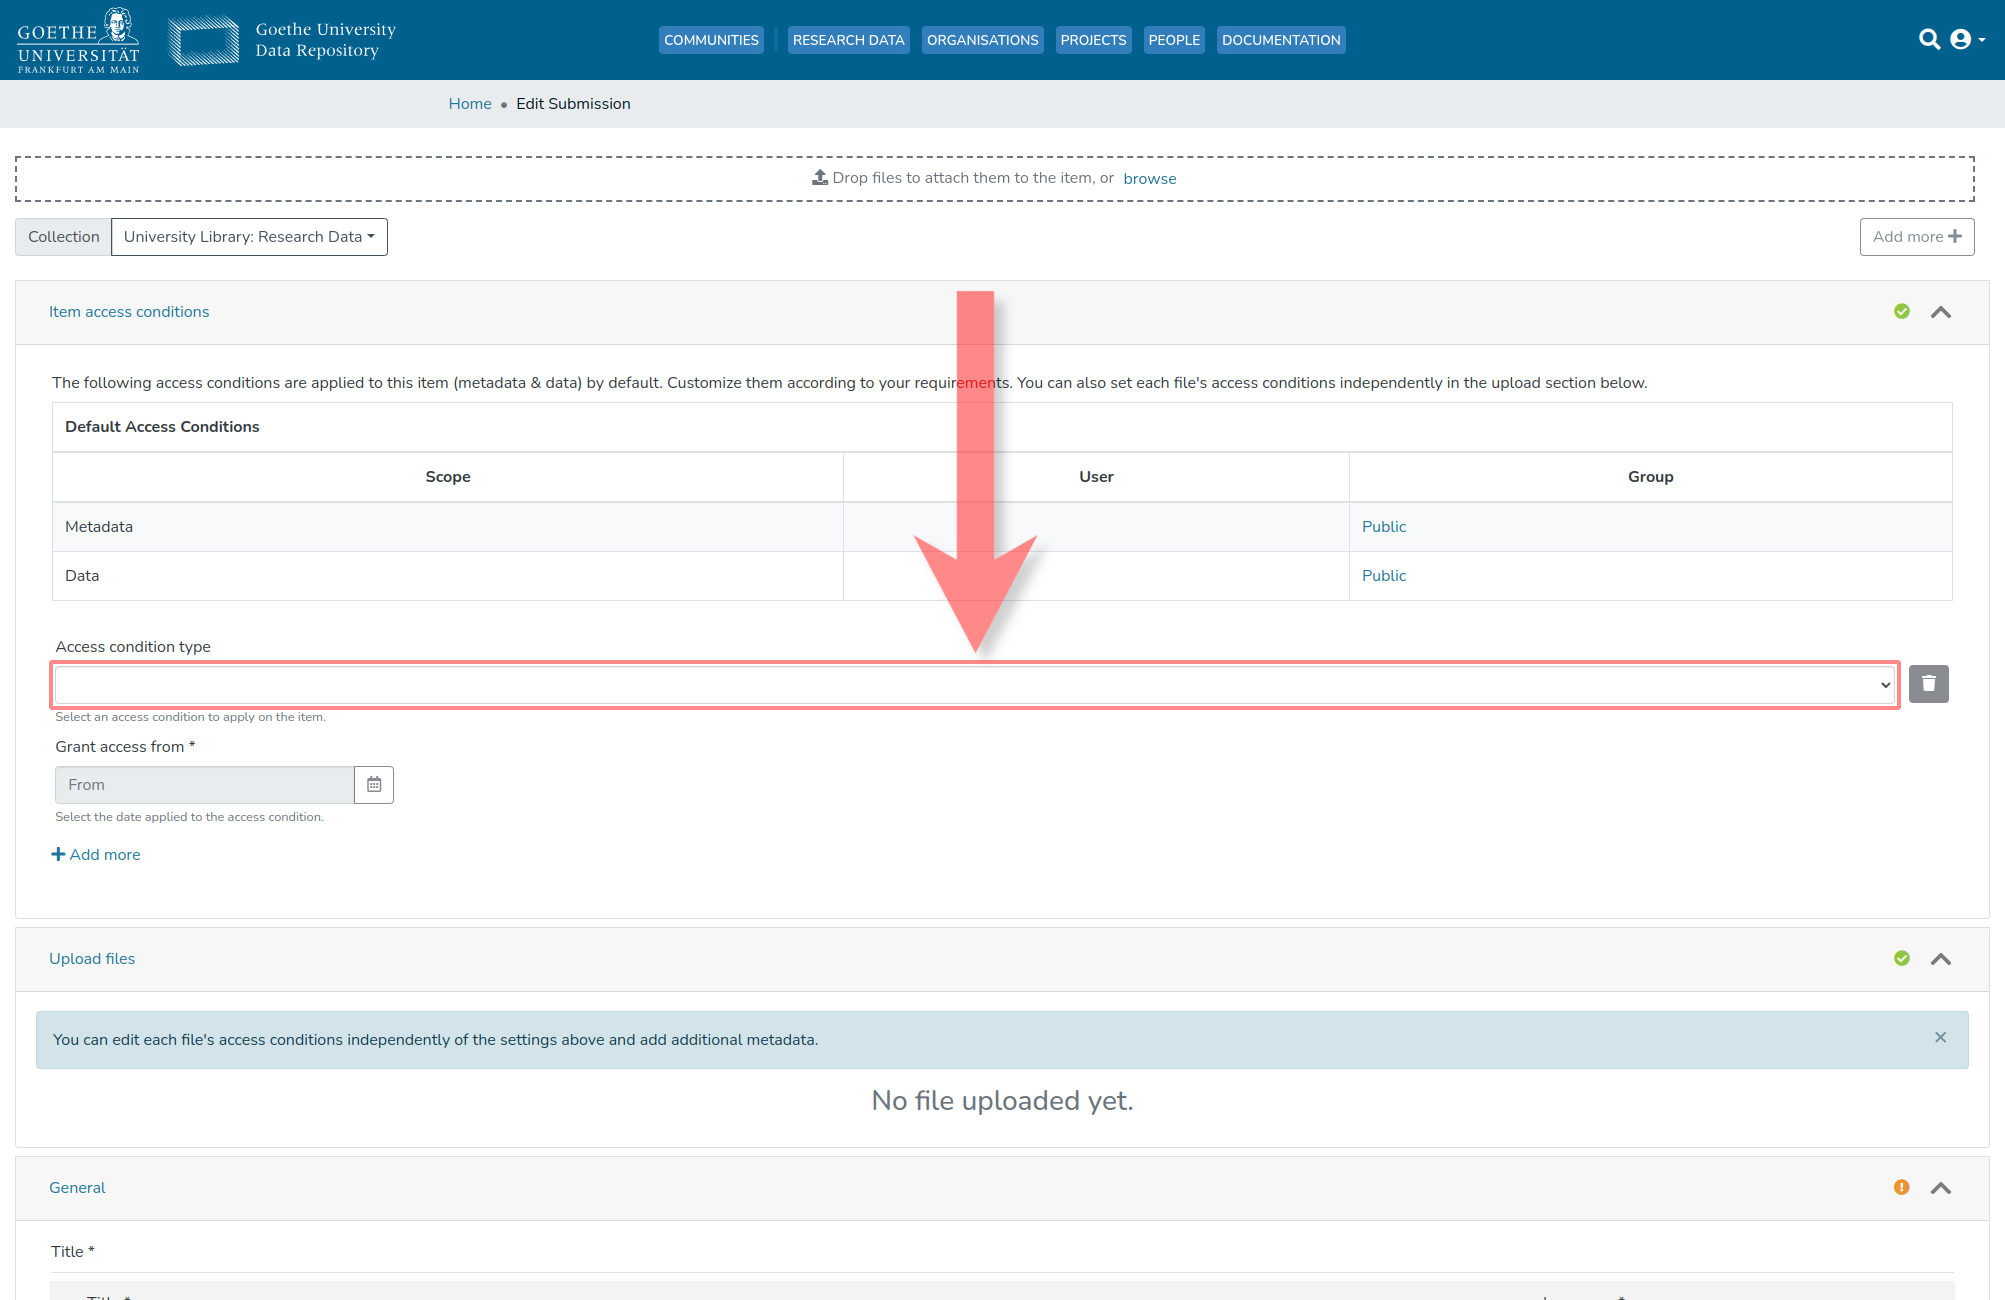
3.2. (OPTIONAL) Set different access conditions
If desired, different access conditions that deviate from the default permissions can be selected in the highlighted field for research and metadata.
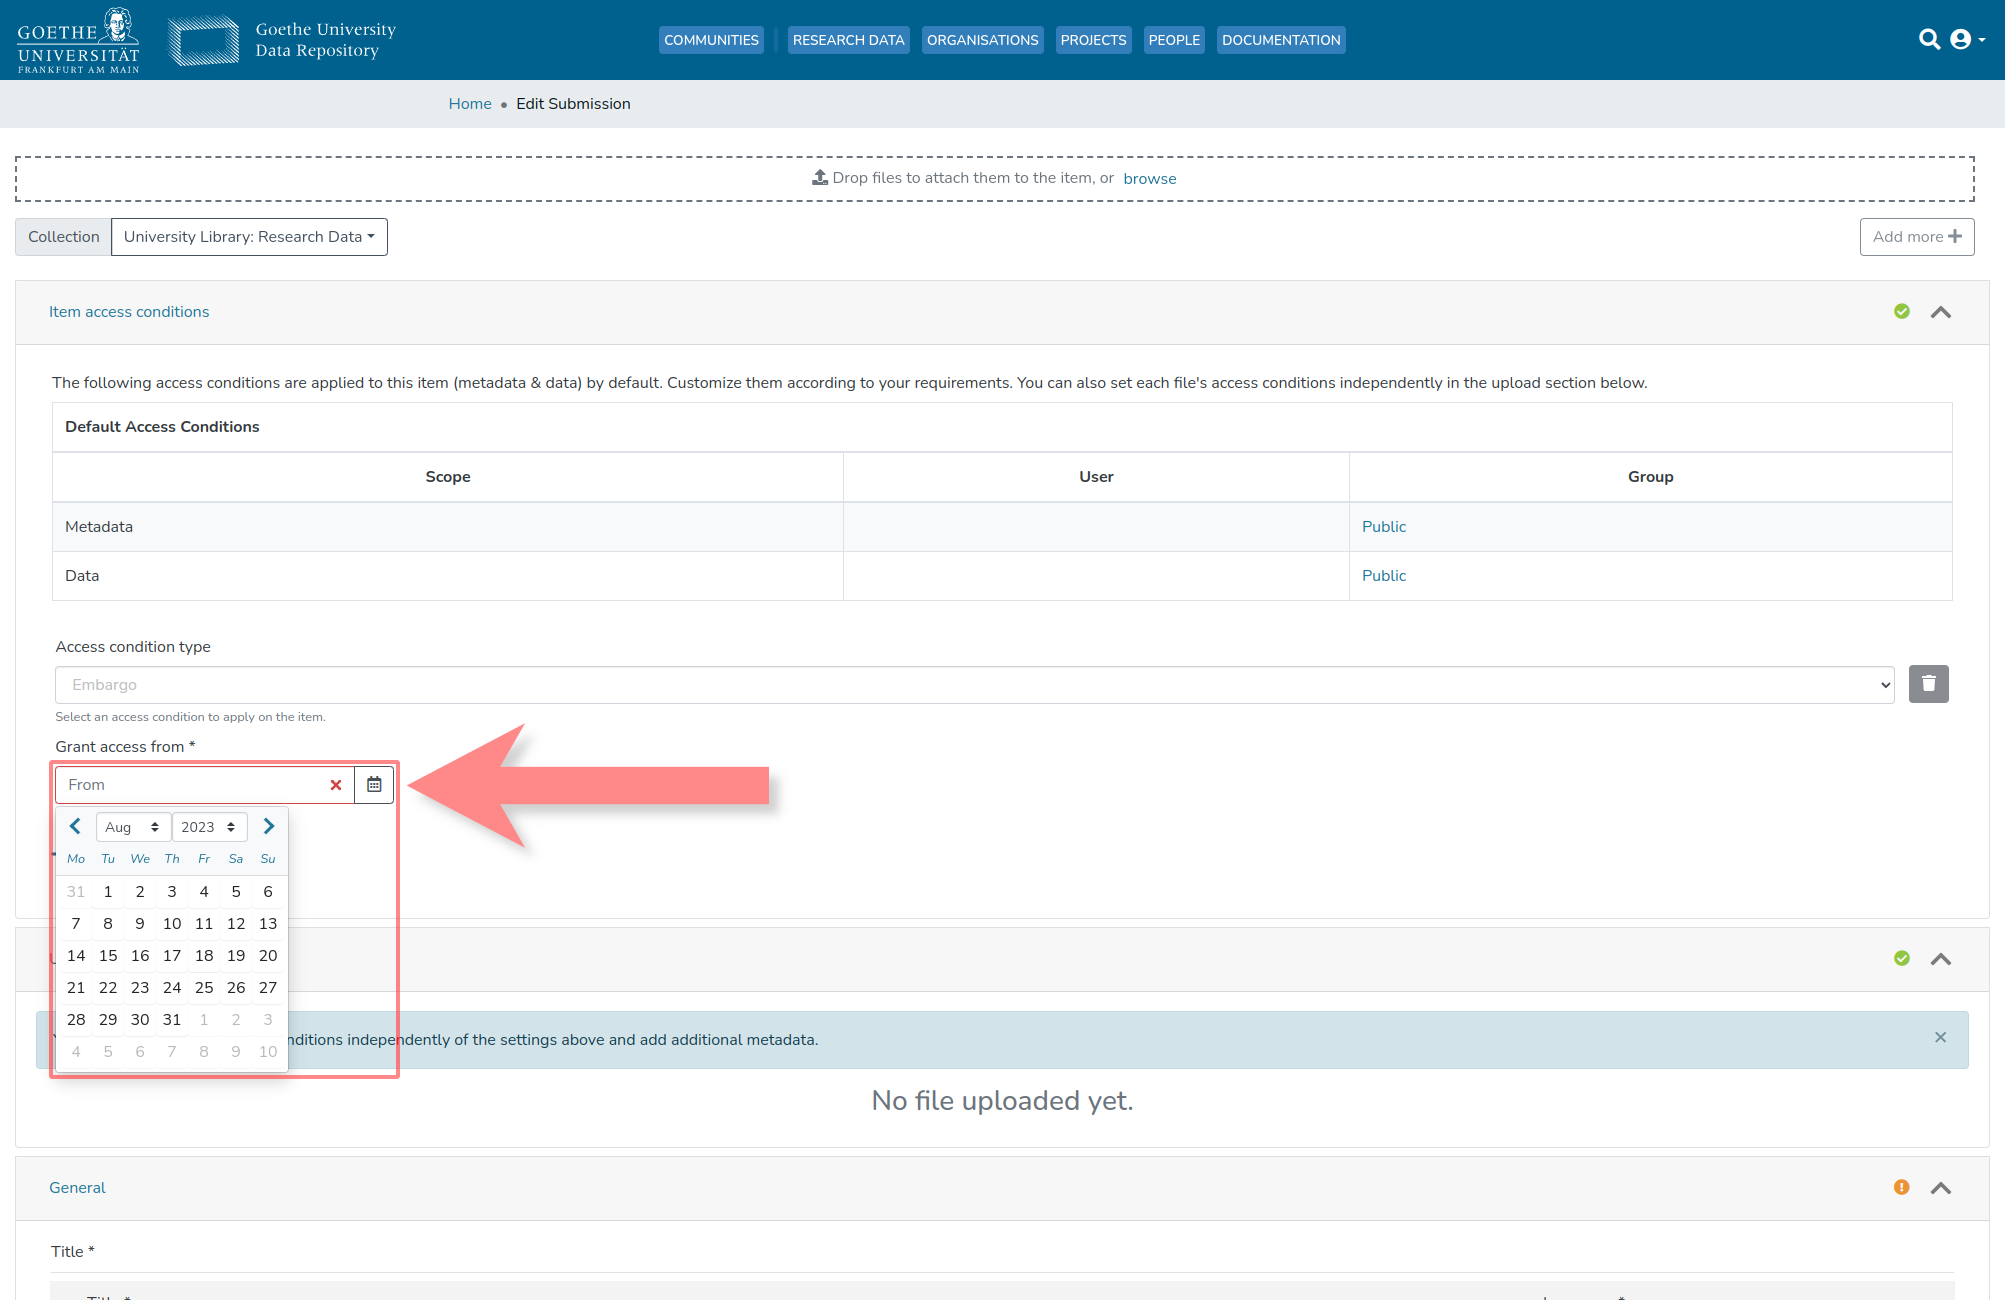
3.3. (OPTIONAL) Set embargo expiration date
If an embargo is selected as the access condition, a date for the expiration of that embargo must be chosen in the highlighted field.
4. Upload Research Data
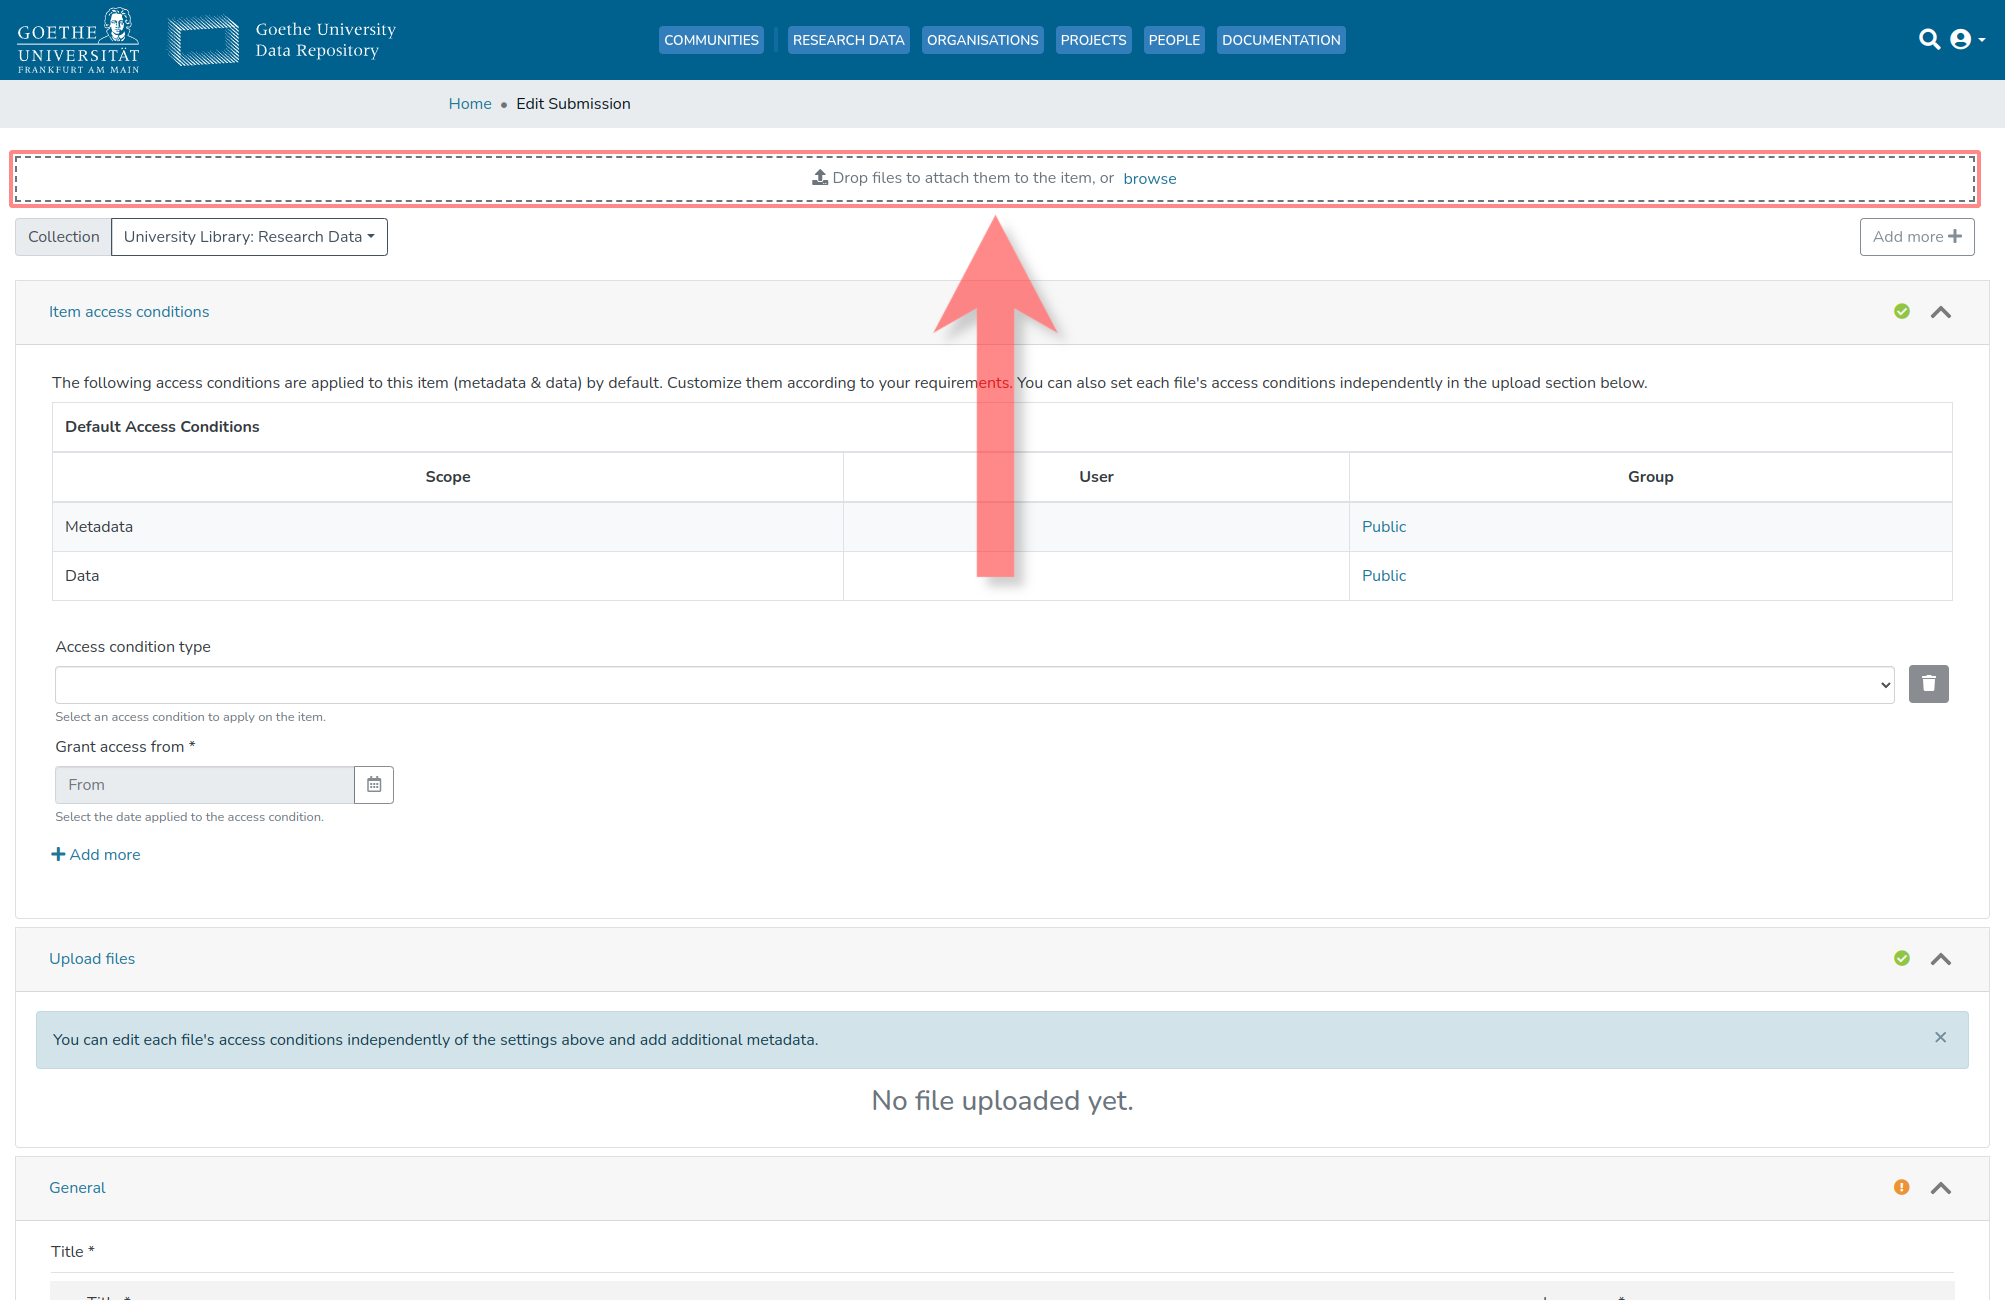
4.1. Select files to upload or drag into this field
To upload research data, there are two options: Either to drag&drop the files directly onto the highlighted field or to select them via 'Browse.'
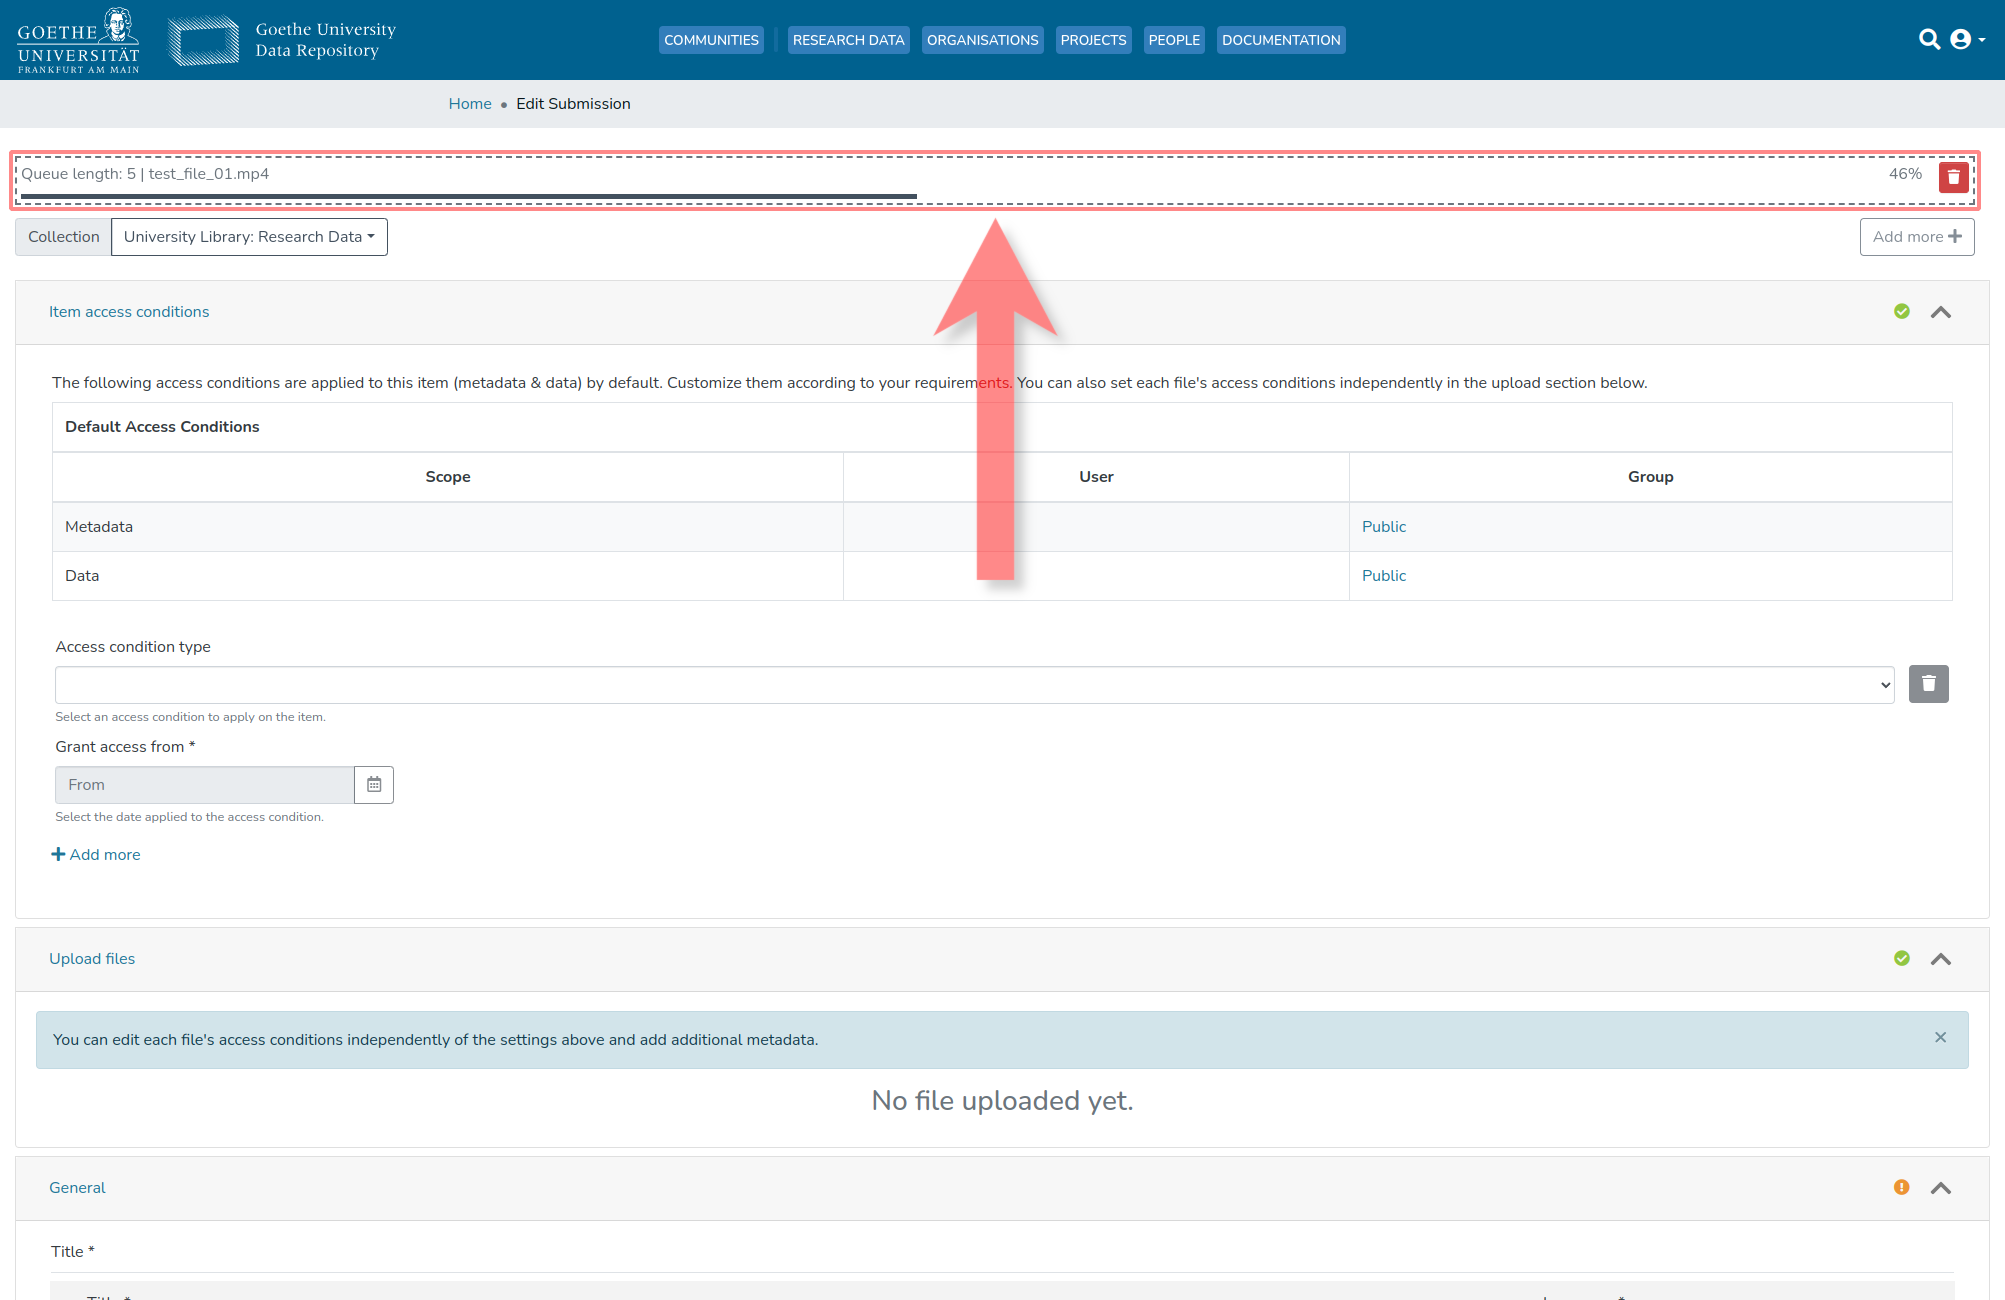
4.2. Progress bar indicates upload progress
After selecting files or dragging them onto the upload field, the highlighted field will display the progress of the upload. The bar indicates how much of the currently uploading file has been uploaded. The 'Queue Length' indicates how many files still need to be uploaded in total. One can continue working while the files are being uploaded.
4.3. (OPTIONAL) Select individual file(s) for editing
Once the files have been successfully uploaded, one can now select individual files for editing.
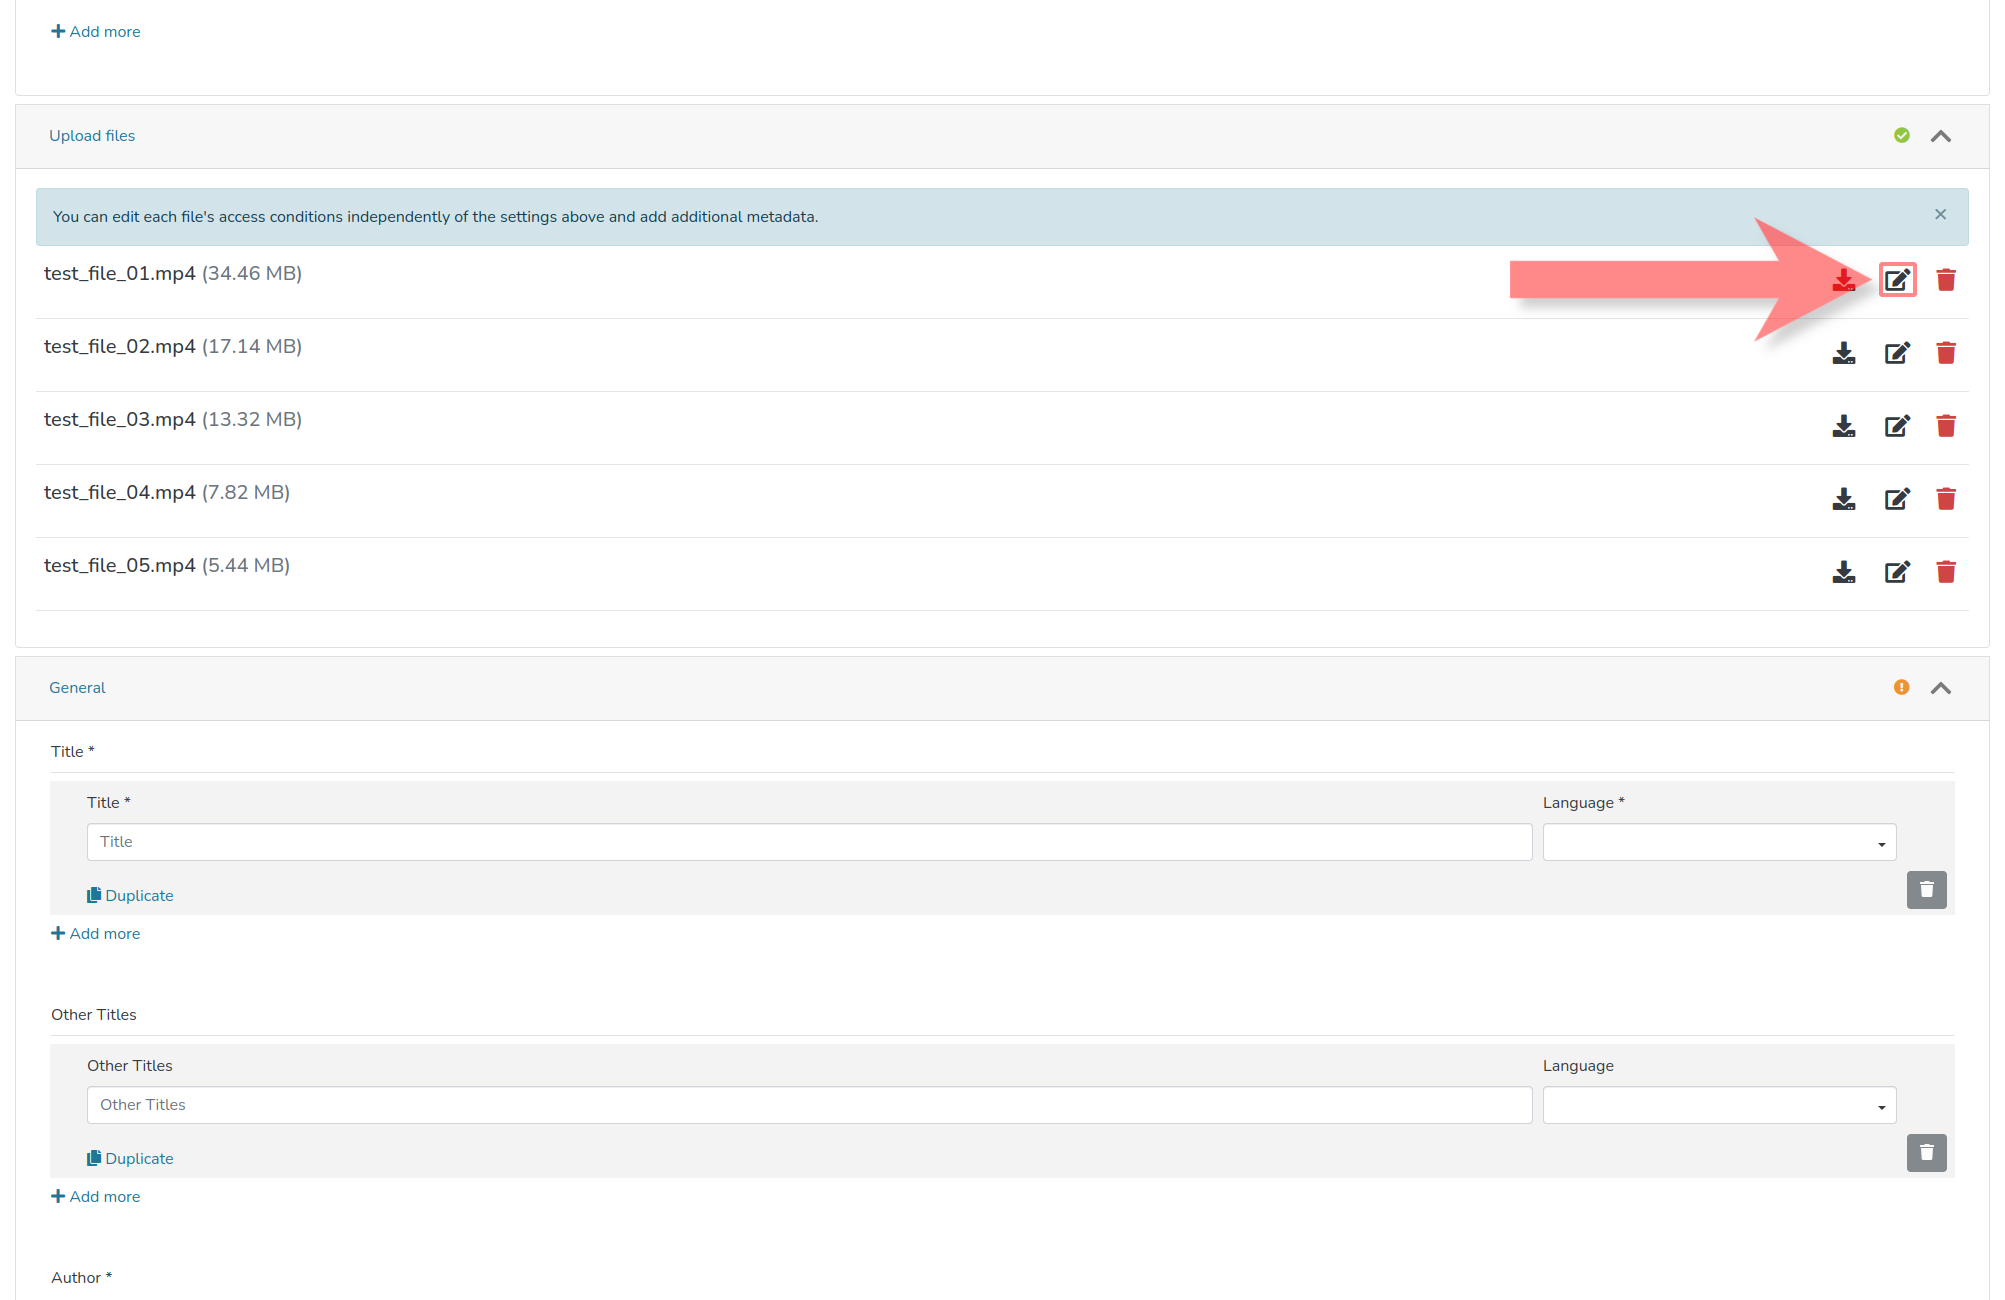
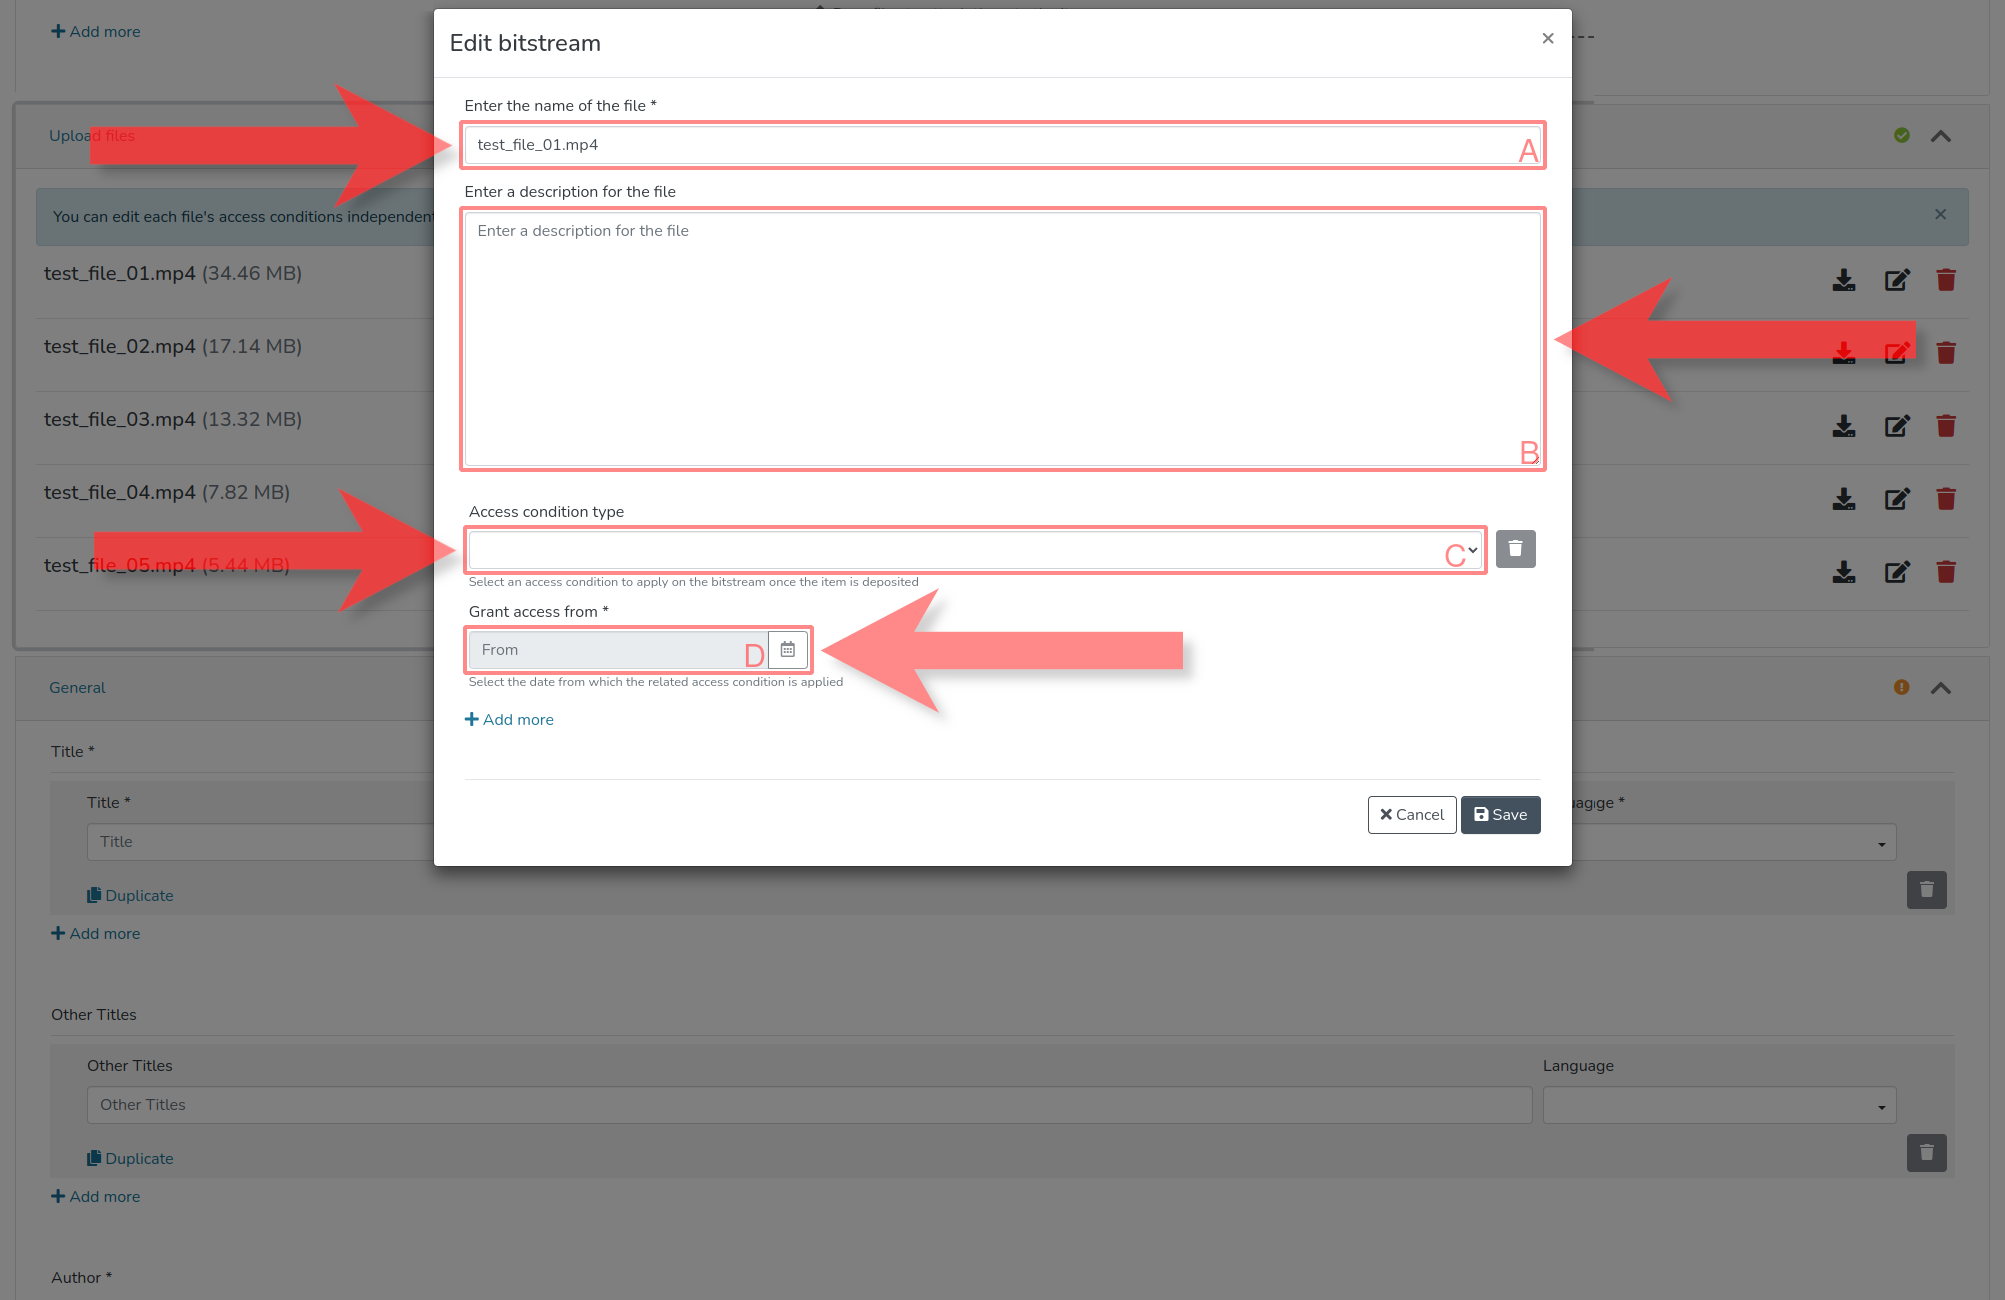
4.4. (OPTIONAL) Edit properties of a file
If a file is selected for editing, one can change the file name with extension under (A). A description for this file can be added under (B). An access restriction that deviates from the previously specified submission access can be set specifically for this file under (C). If an embargo has been set, the corresponding date must be specified under (D).
5. Add General Metadata
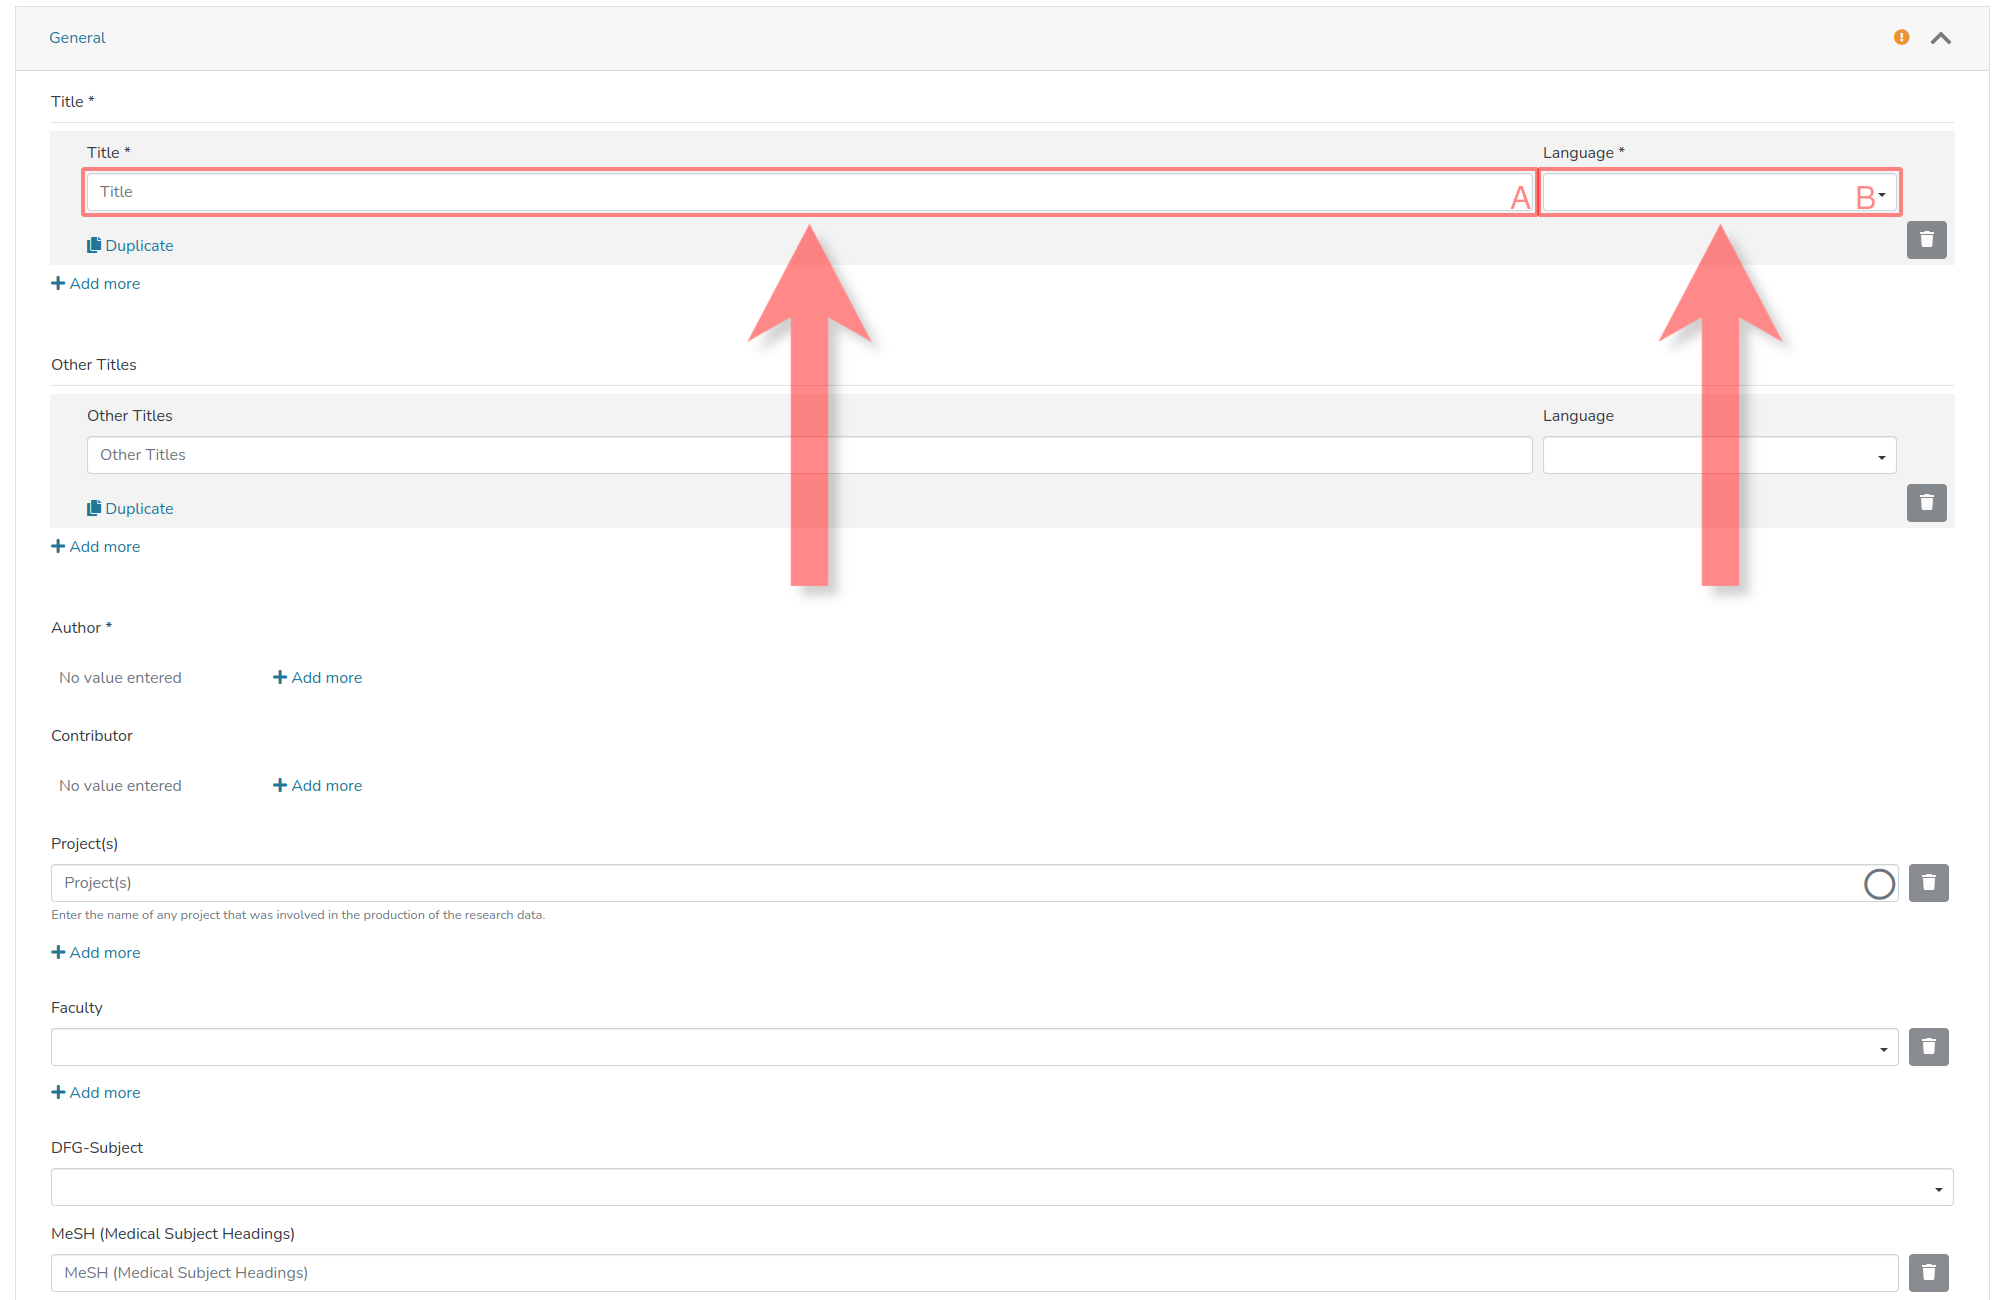
5.1. Set Submission Title
The title of the submission must be set in (A). In (B), one indicates the language in which the title is written.
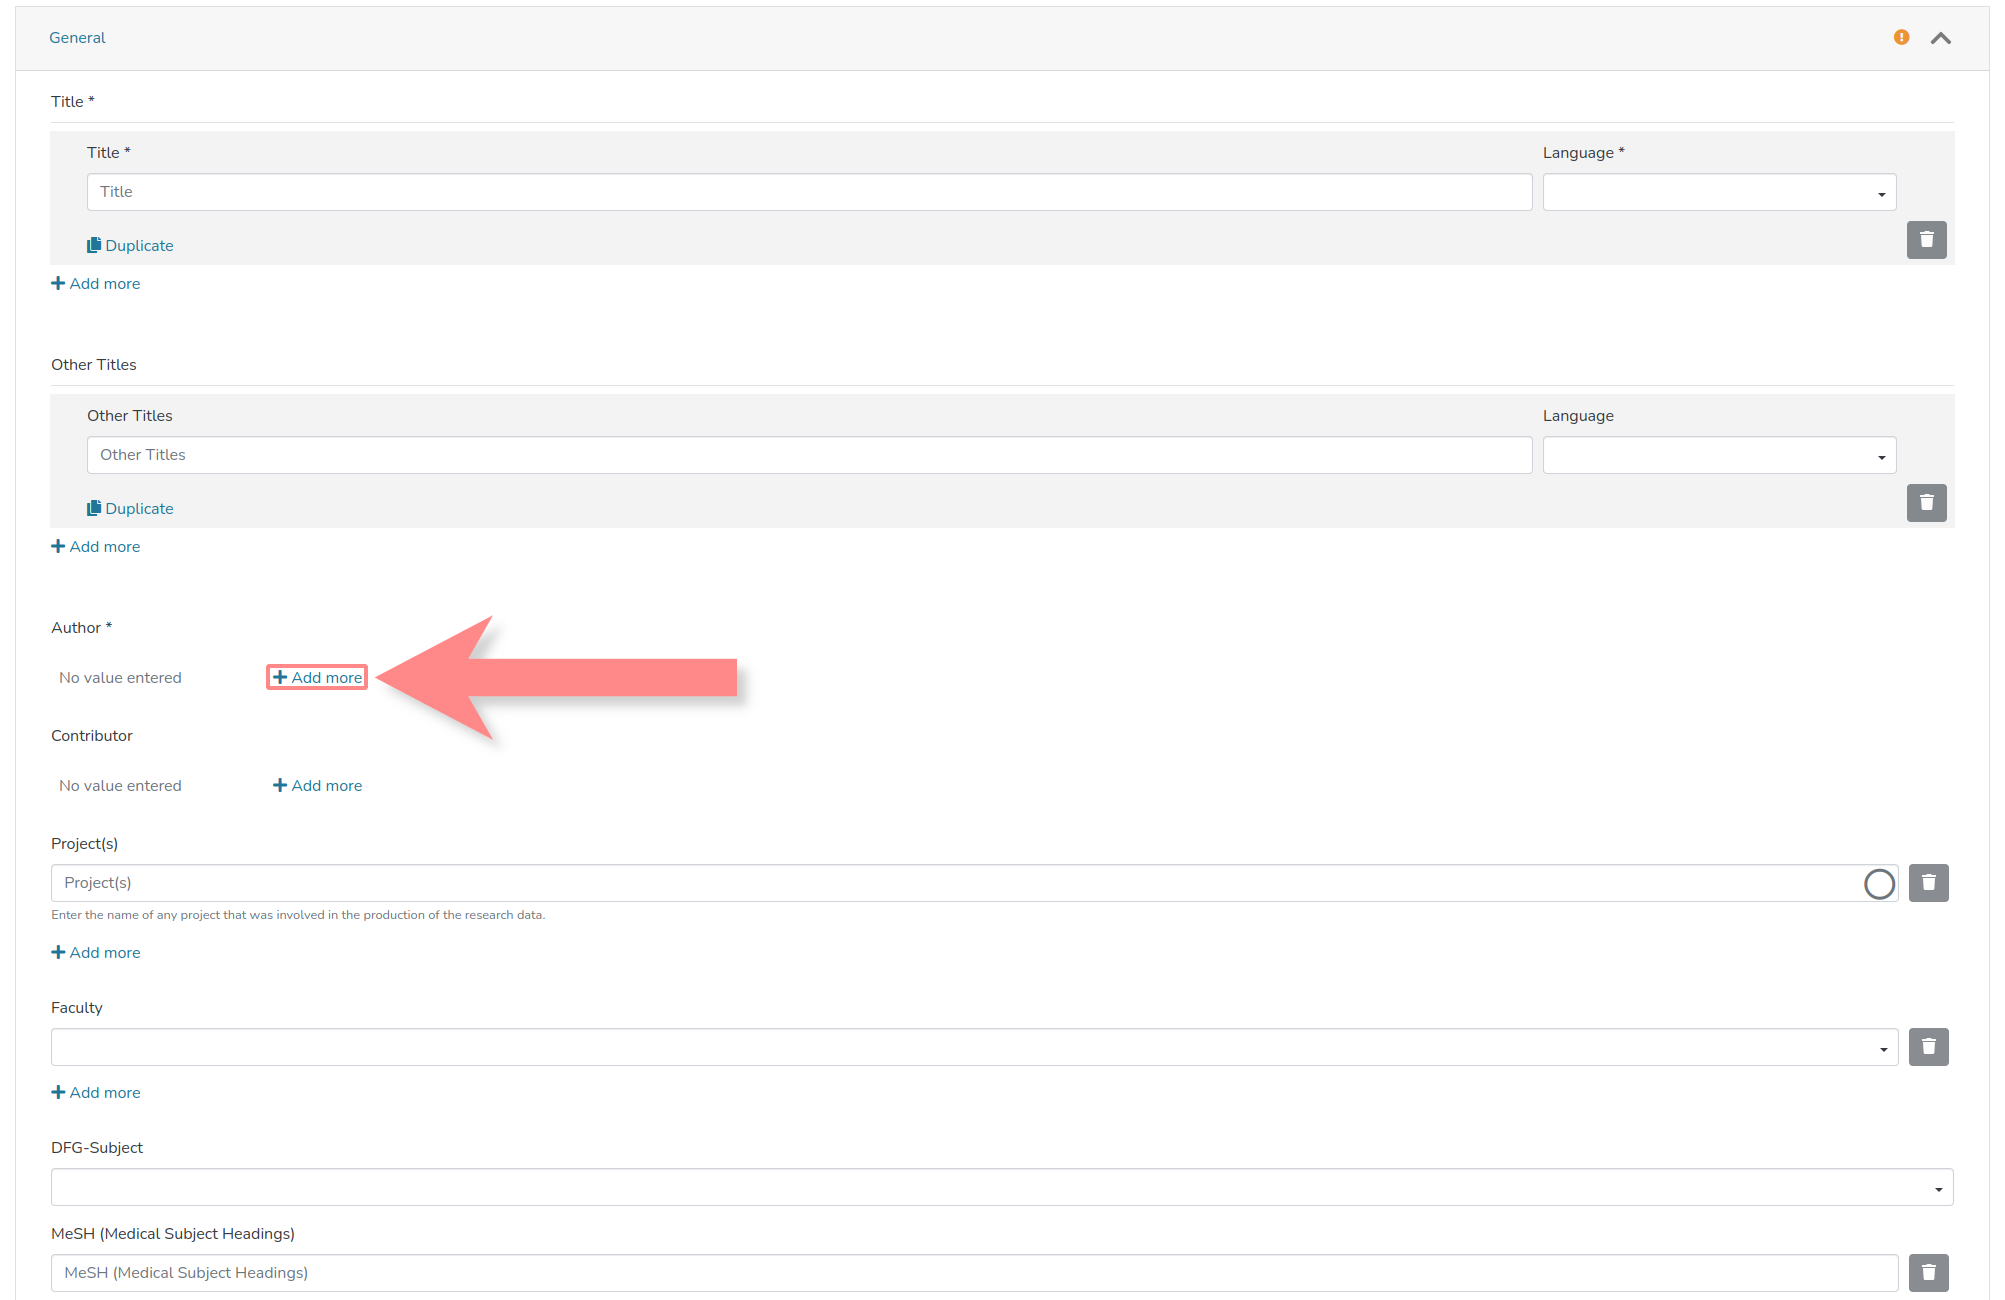
5.2. Add Author(s) of the Submission
The author(s) of the submission must be added here. Each submission must have at least one entry.
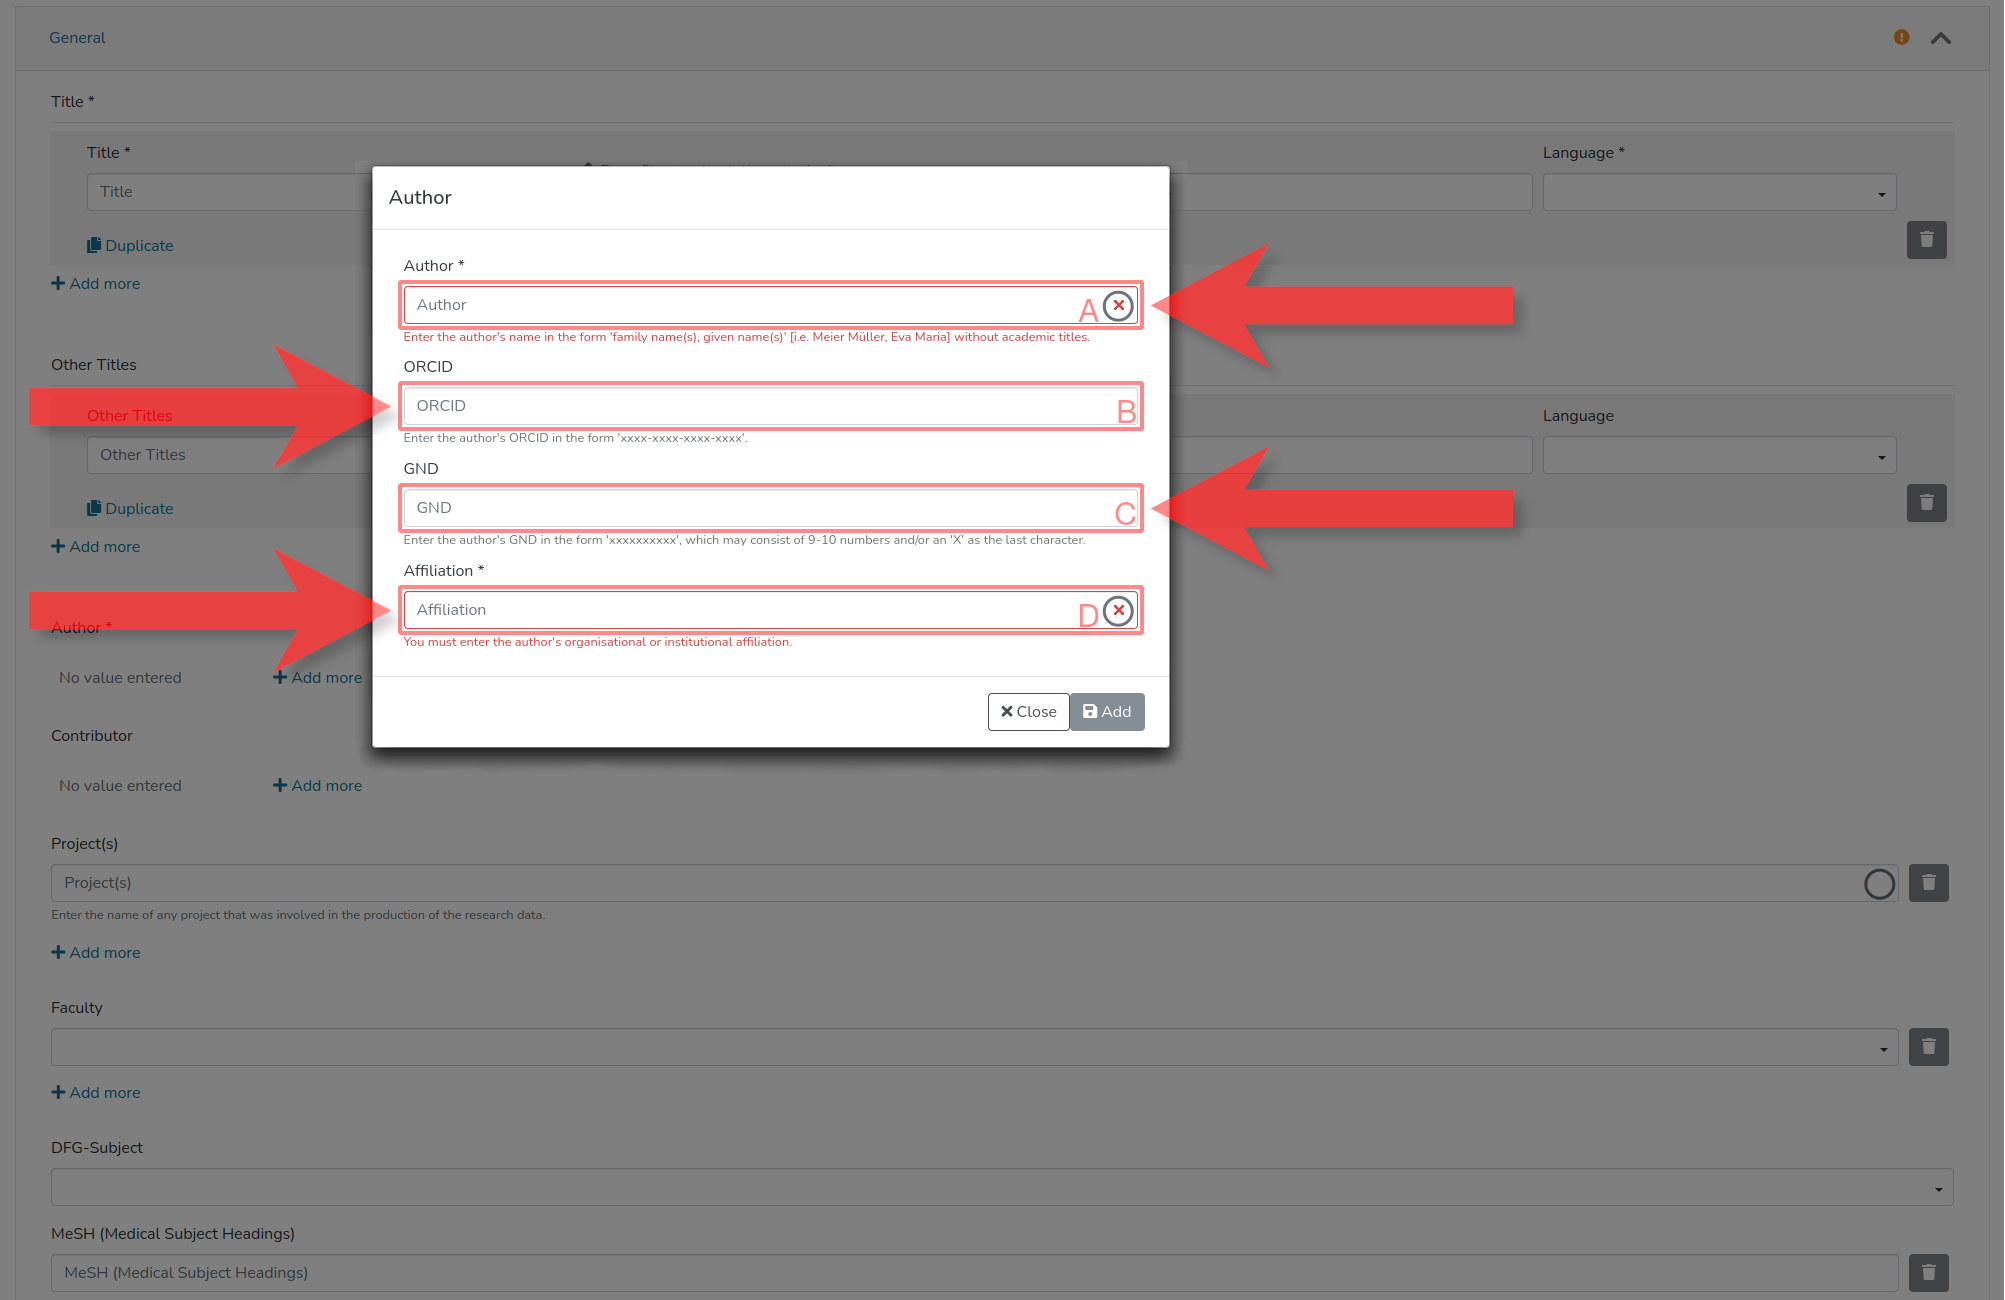
5.3. Specify Identification Information of the Author(s)
The identification information of the author(s) should be provided in the marked fields. In (A), the name should be provided in the format 'Family Name(s), Given Name(s)'. If an author has a dataset in GUDe, a successful link to that dataset will be displayed here with a green circle on the right, which would also automatically fill in the remaining fields (where a value is present). In (B), the ORCID iD of the person can be entered. In (C), the GND-ID of the person can be entered. In (D), the affiliation of the person must be selected (the guidelines of Goethe University apply: 'the more specific, the better'). If a dataset exists in GUDe for the specified organisational entity, a successful link with that dataset will also be marked here with a green circle on the right.
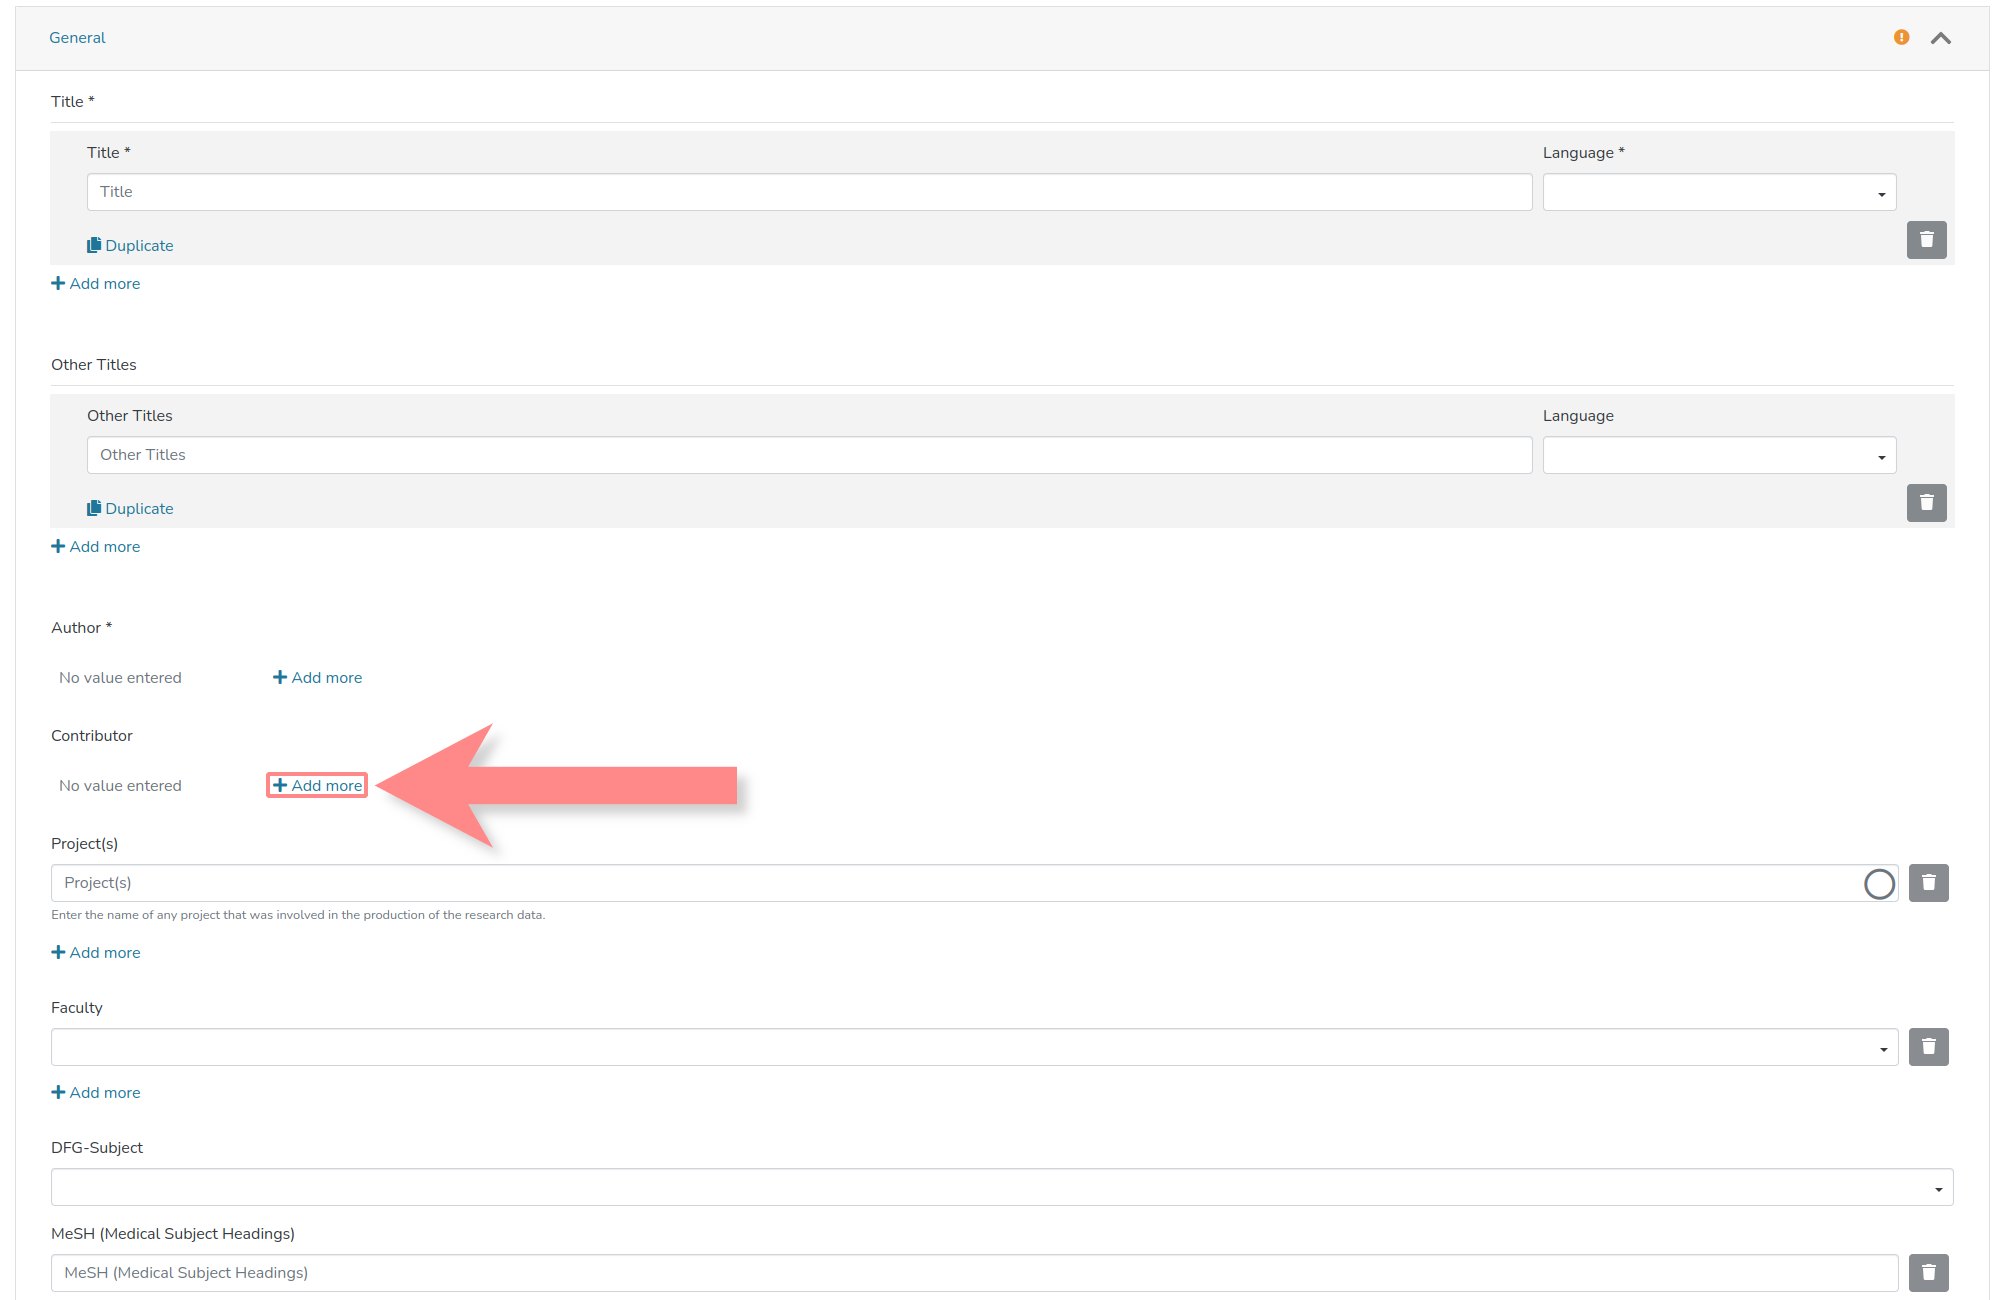
5.4. (OPTIONAL) Add Contributing Person(s)
Contributing persons can be added here.
5.5. (OPTIONAL) Specify Identification Information of the Contributor(s)
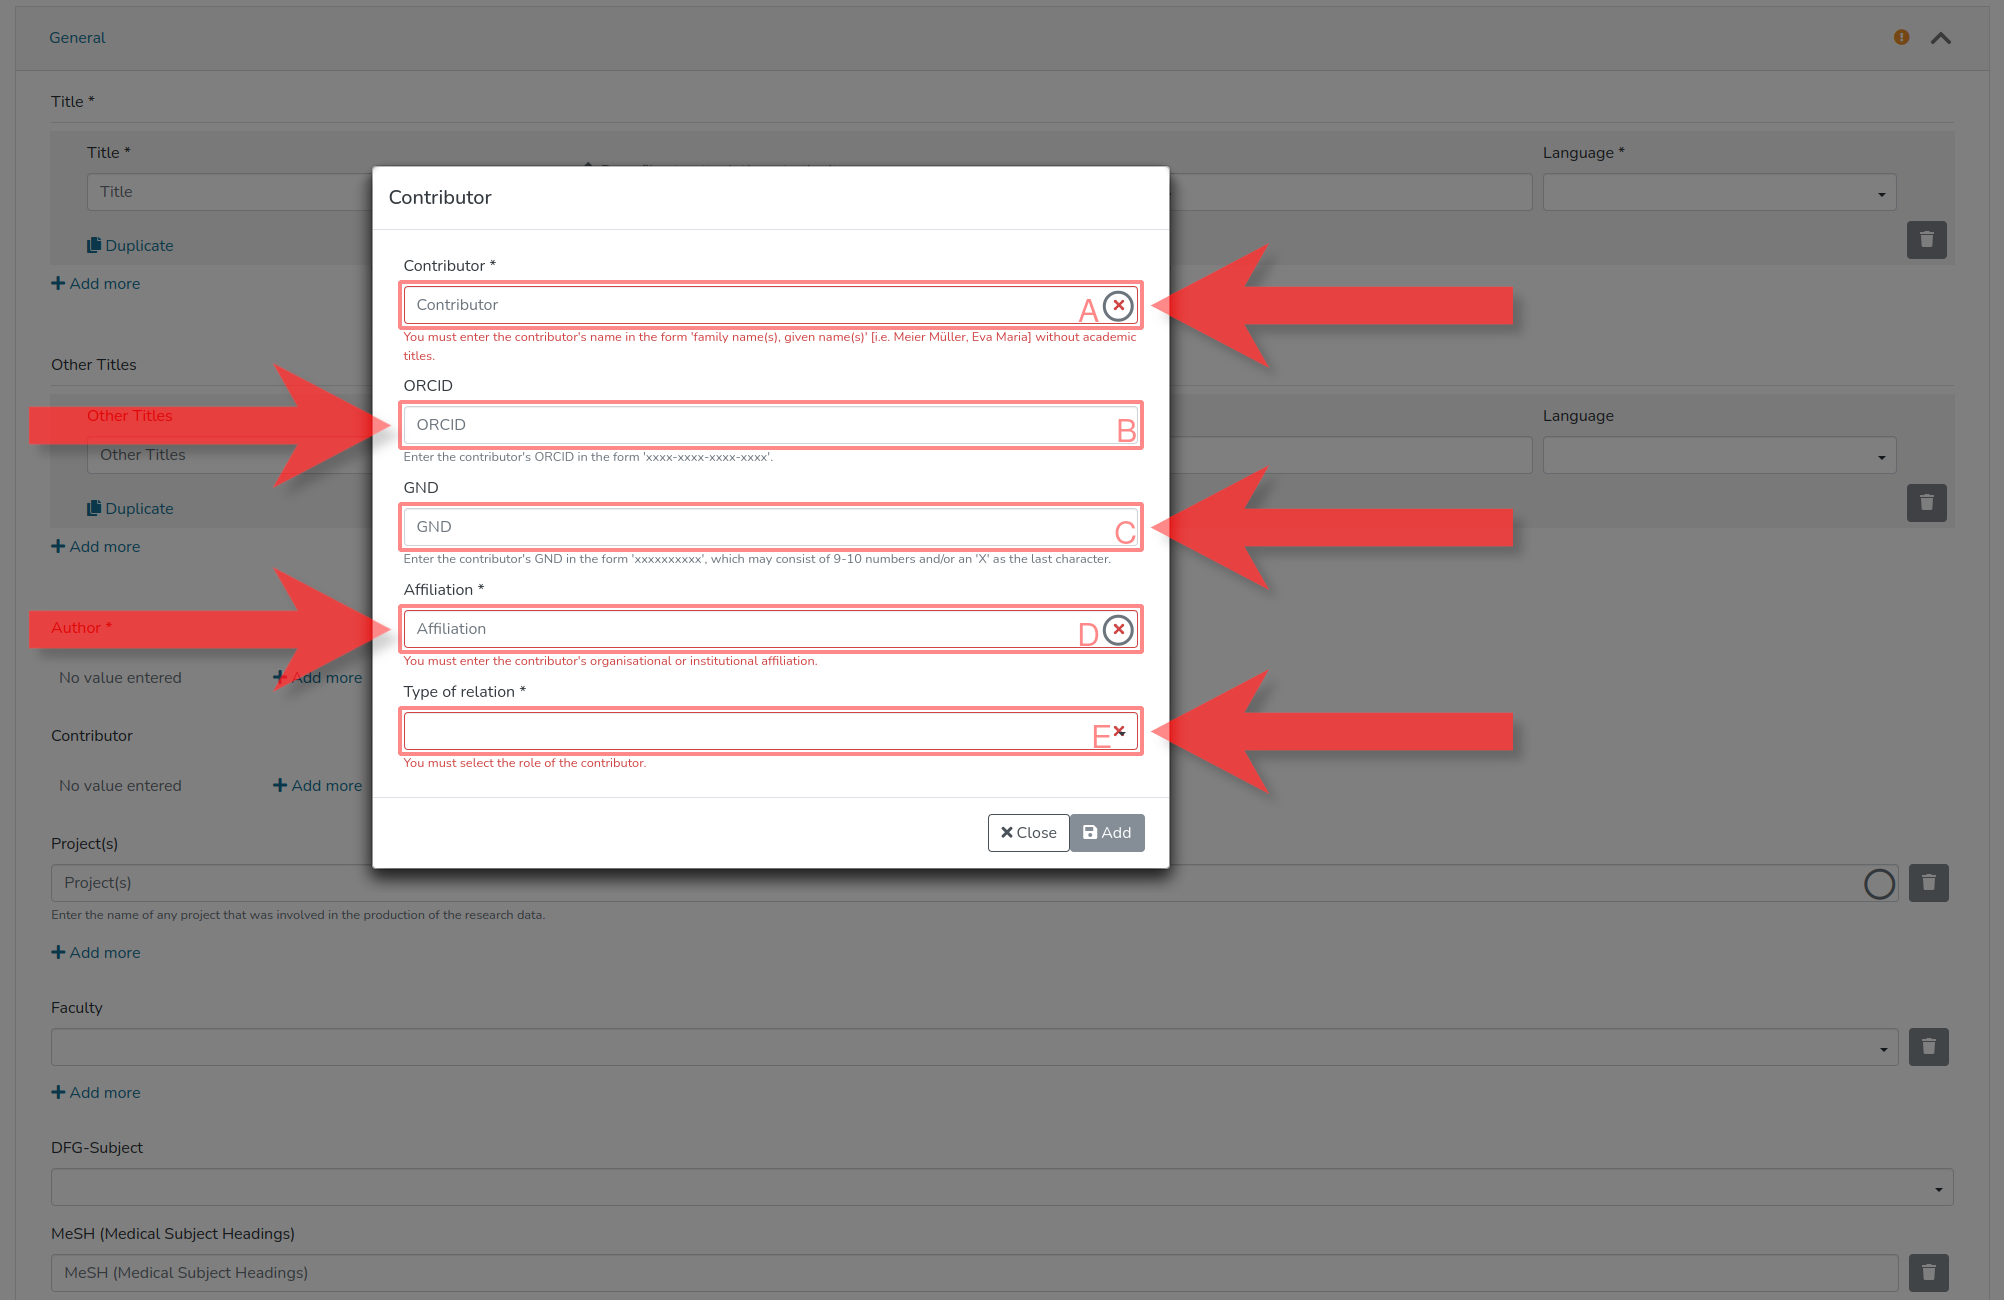
If a contributing person is added, the identification information of the person should be entered in the marked fields. In (A), the name should be provided in the format 'Family Name(s), Given Name(s)'. If a contributor has a dataset in GUDe, a successful link to that dataset will be displayed here with a green circle on the right, which would also automatically fill in the remaining fields (where a value is present). In (B), the ORCID iD of the person can be entered. In (C), the GND-ID of the person can be entered. In (D), the affiliation of the person must be selected (the guidelines of Goethe University apply: 'the more specific, the better'). If a dataset exists in GUDe for the specified organisational entity, a successful link with that dataset will also be marked here with a green circle on the right. In (E), the type of contribution must be specified.
5.6. (OPTIONAL) Specify Affiliation(s) of the Submission
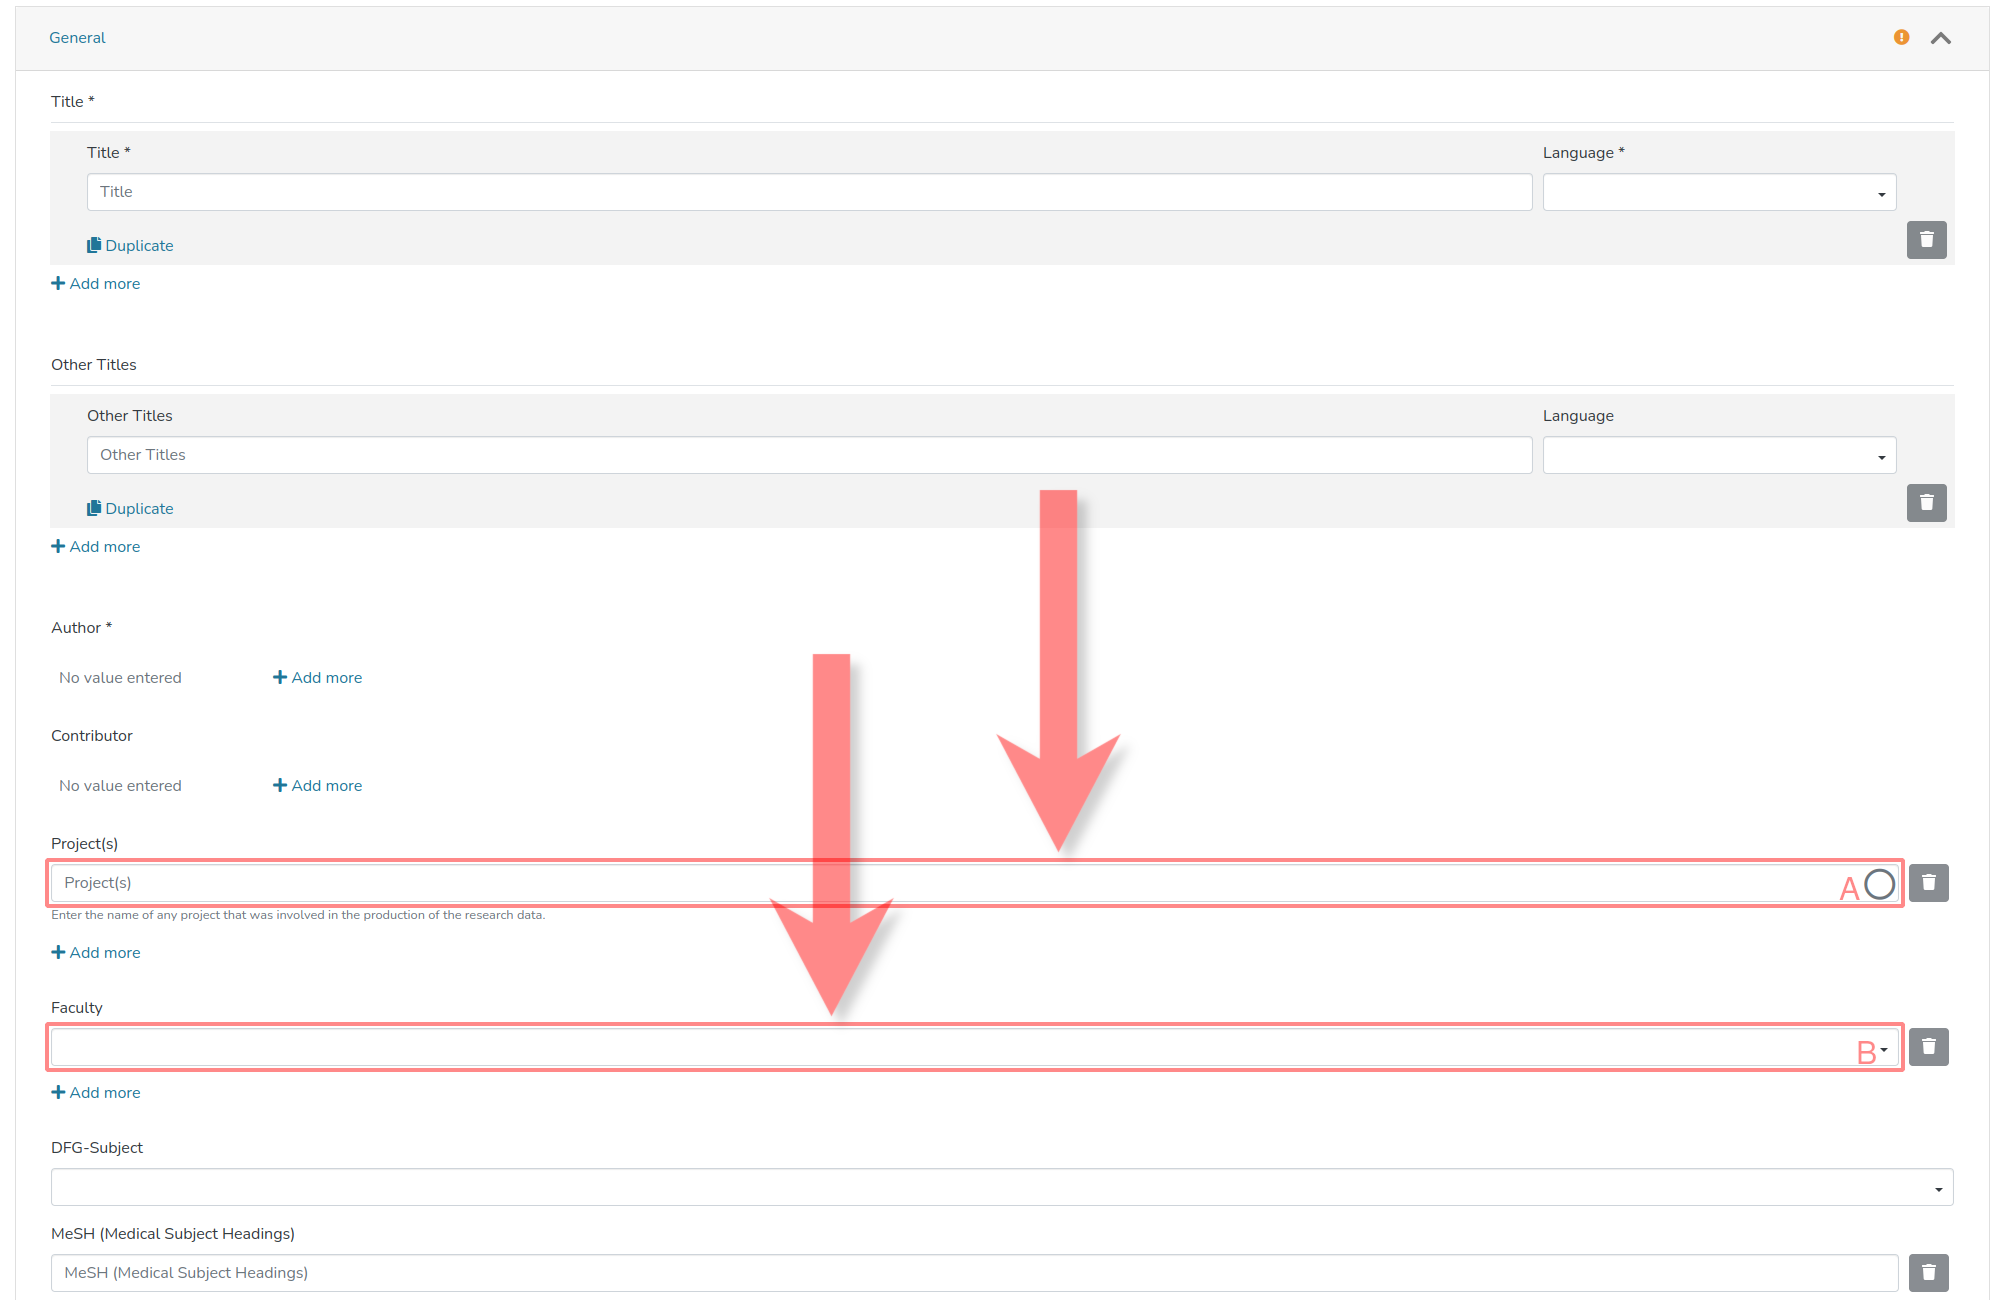
The affiliations of the submission can be specified in the marked fields here. In (A), the submission can be connected to one or more projects. If the project has a dataset in GUDe, a successful link to that dataset will be displayed here with a green circle. In (B), the submission can be associated with one or more faculties of Goethe University.
5.7. (OPTIONAL) Specify Subject Areas of the Submission
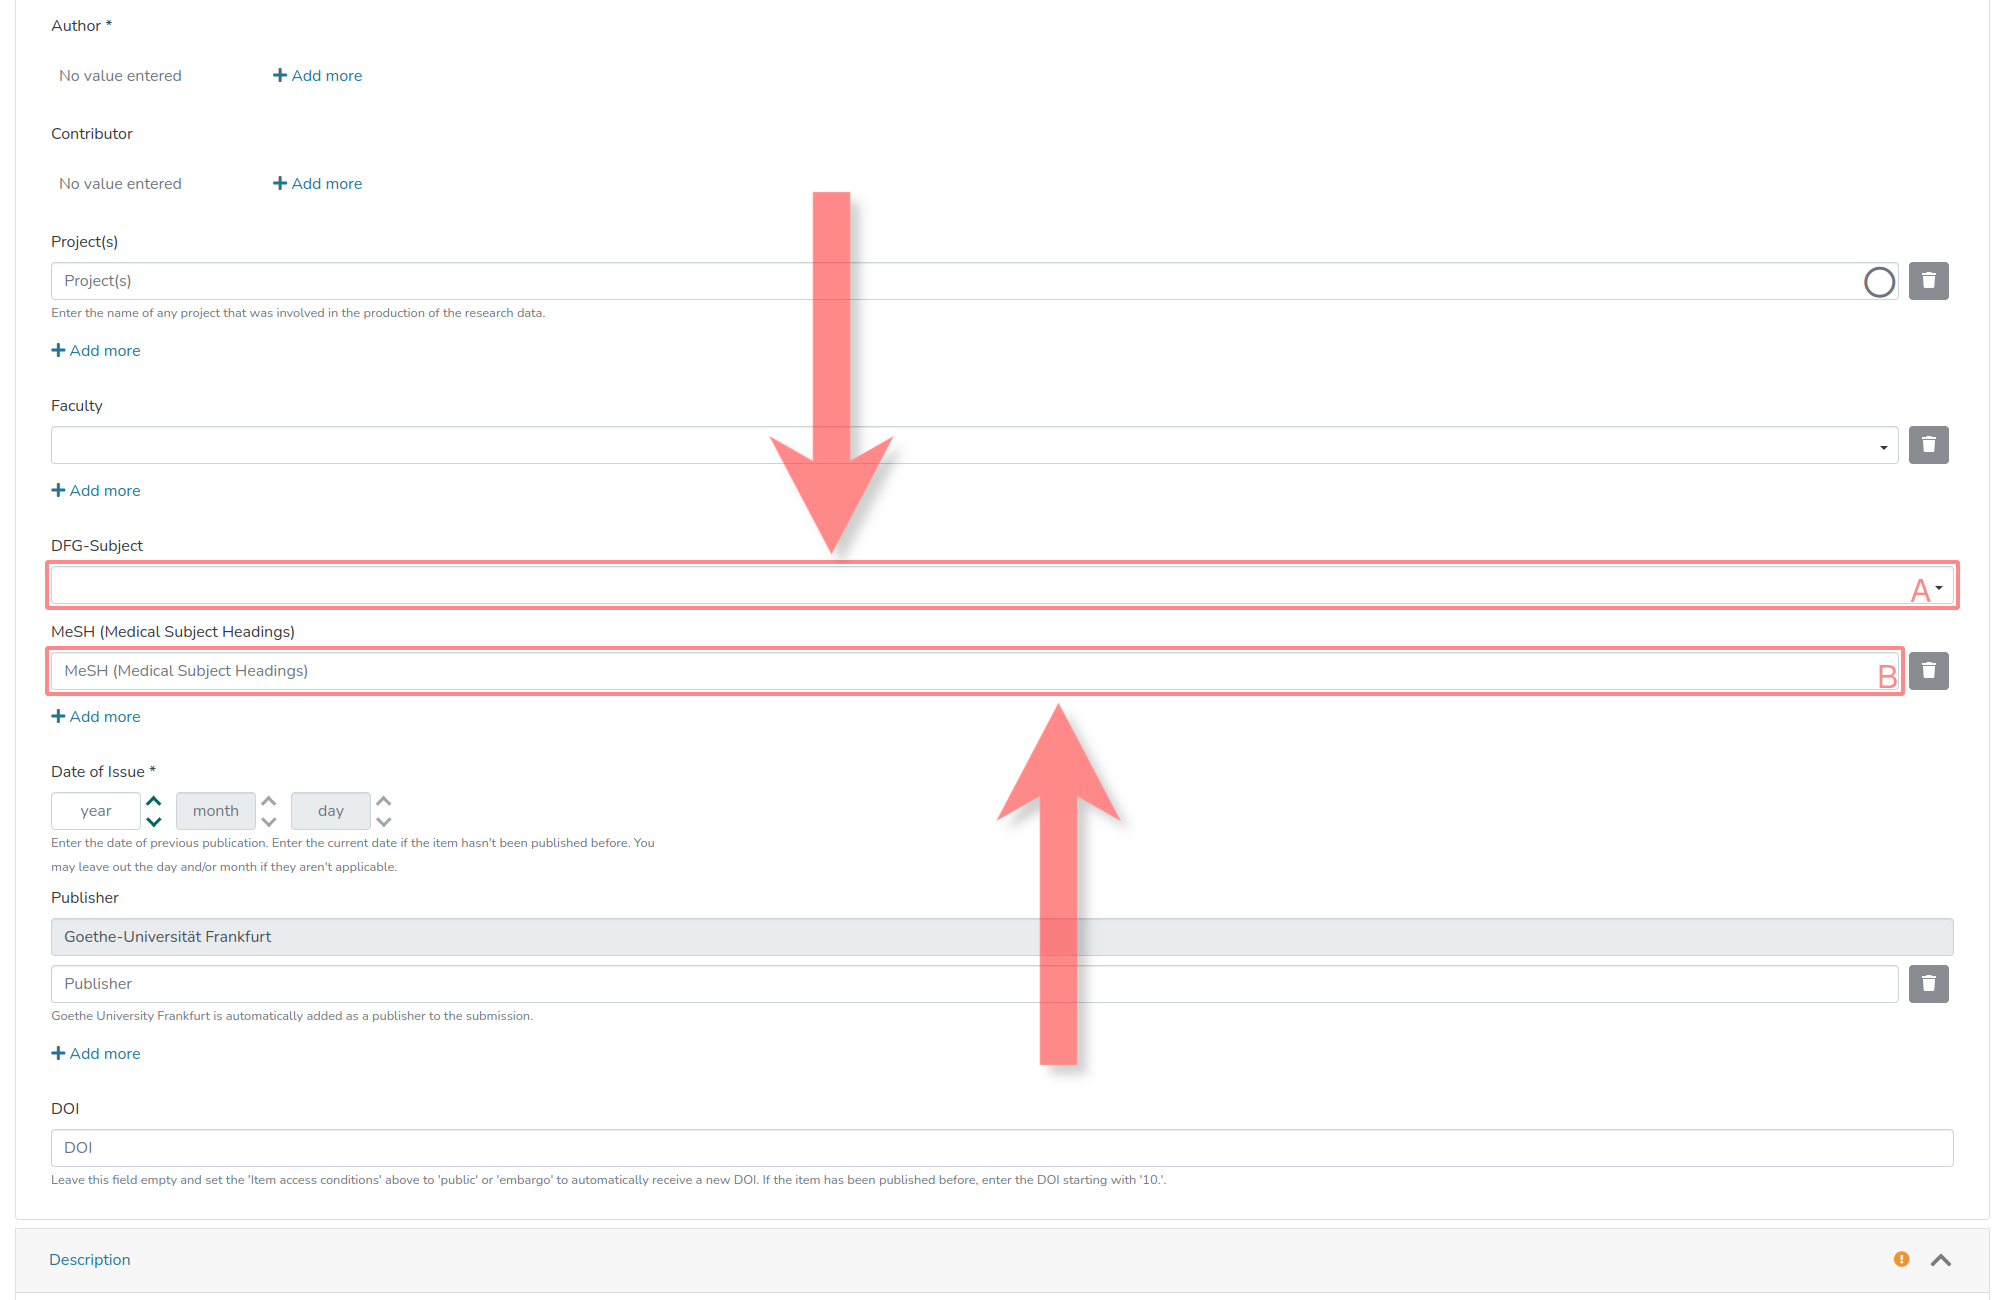
The subject area of the submission can be specified here in the marked fields. In (A), the relevant field from the DFG Classification System can be selected, and in (B), the corresponding Medical Subject Headings can be specified for medical data.
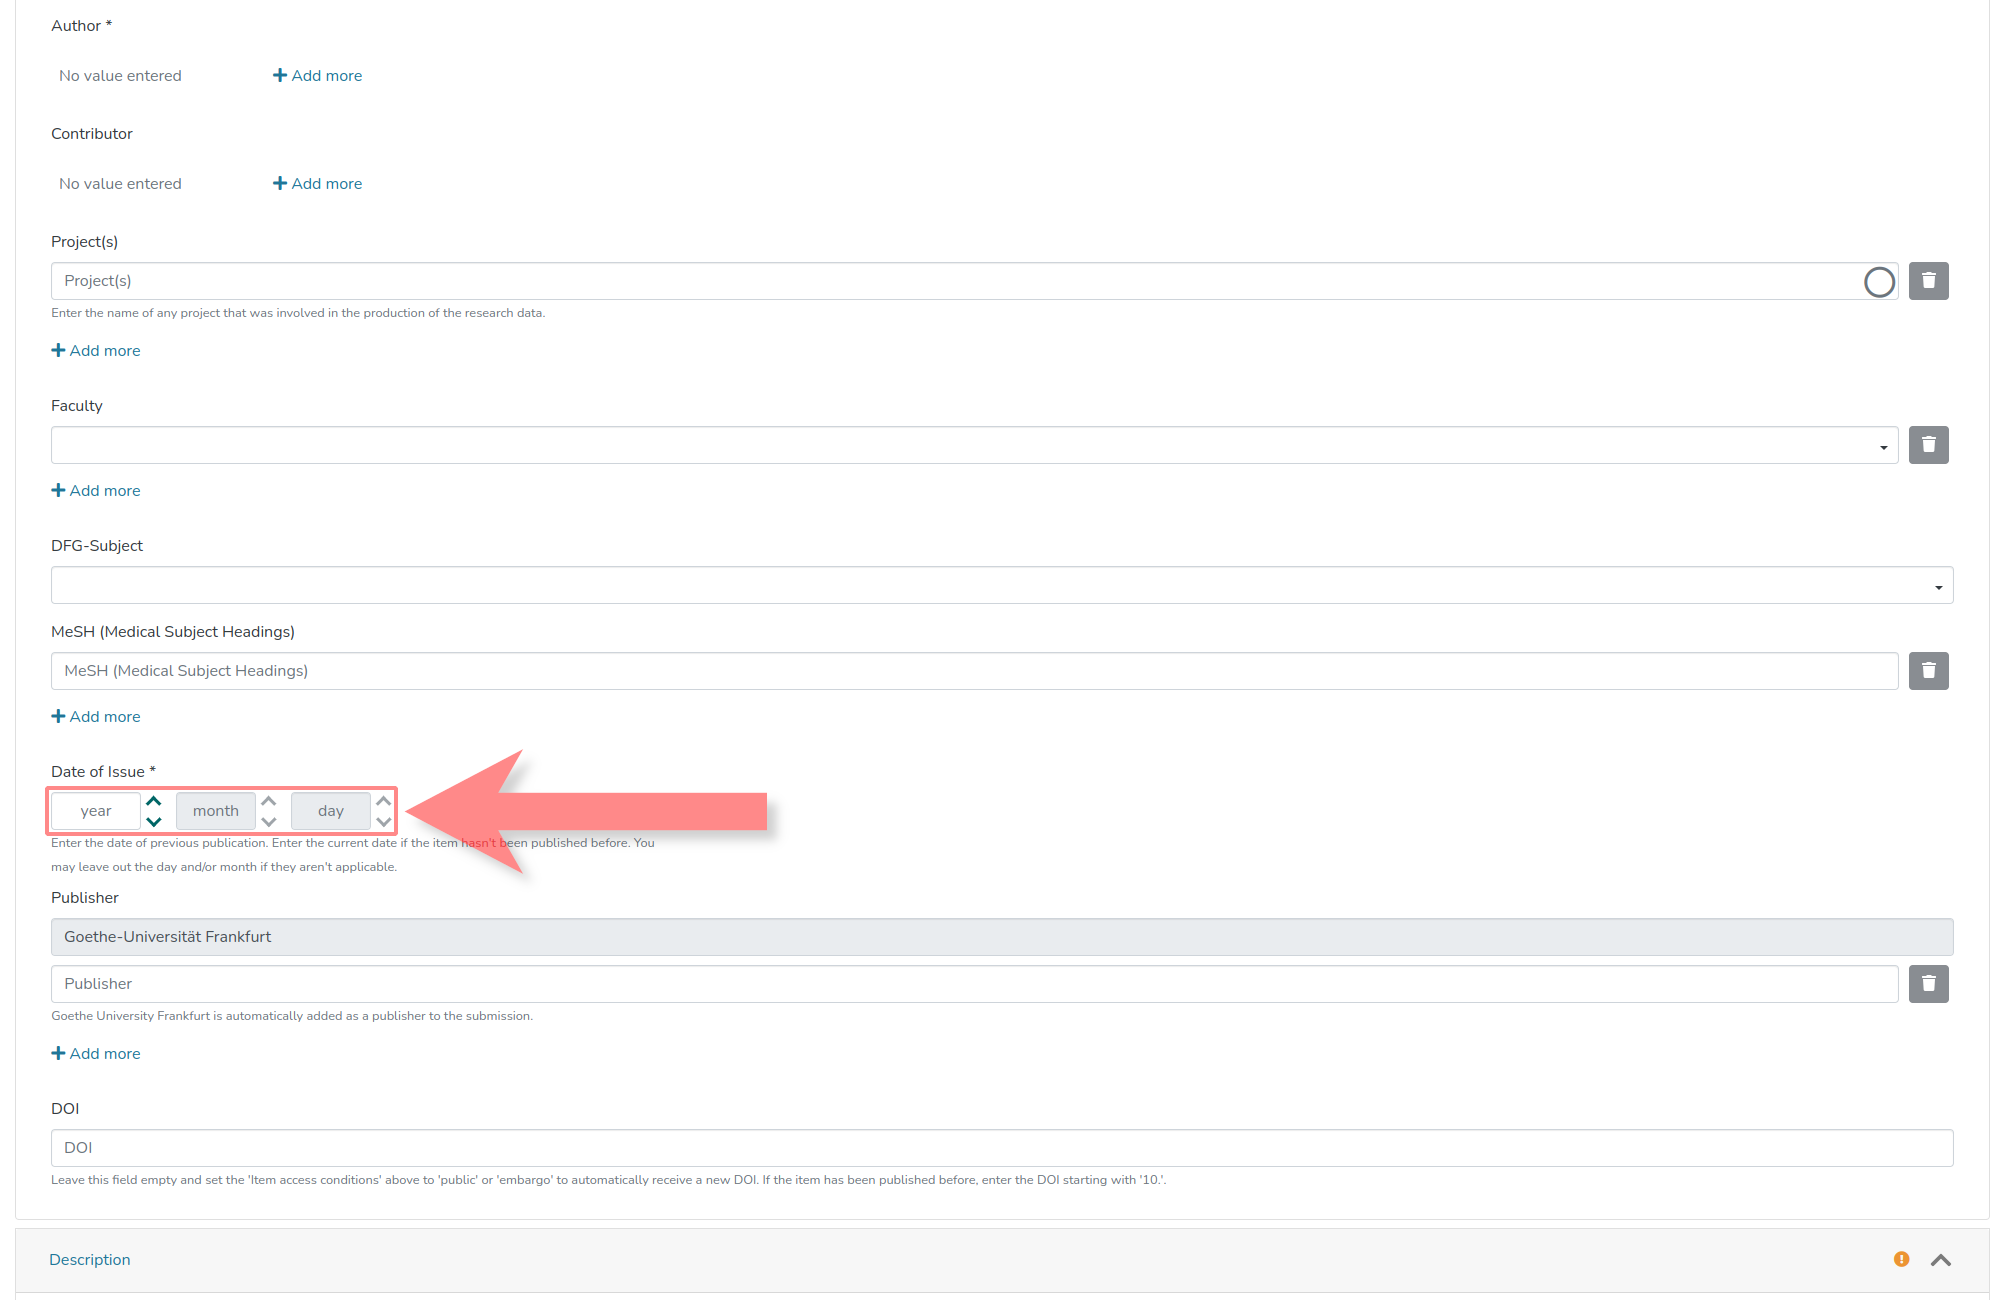
5.8. Specify (Initial) Submission Date
The date of the initial submission must be entered in the marked field here. Month and day are optional.
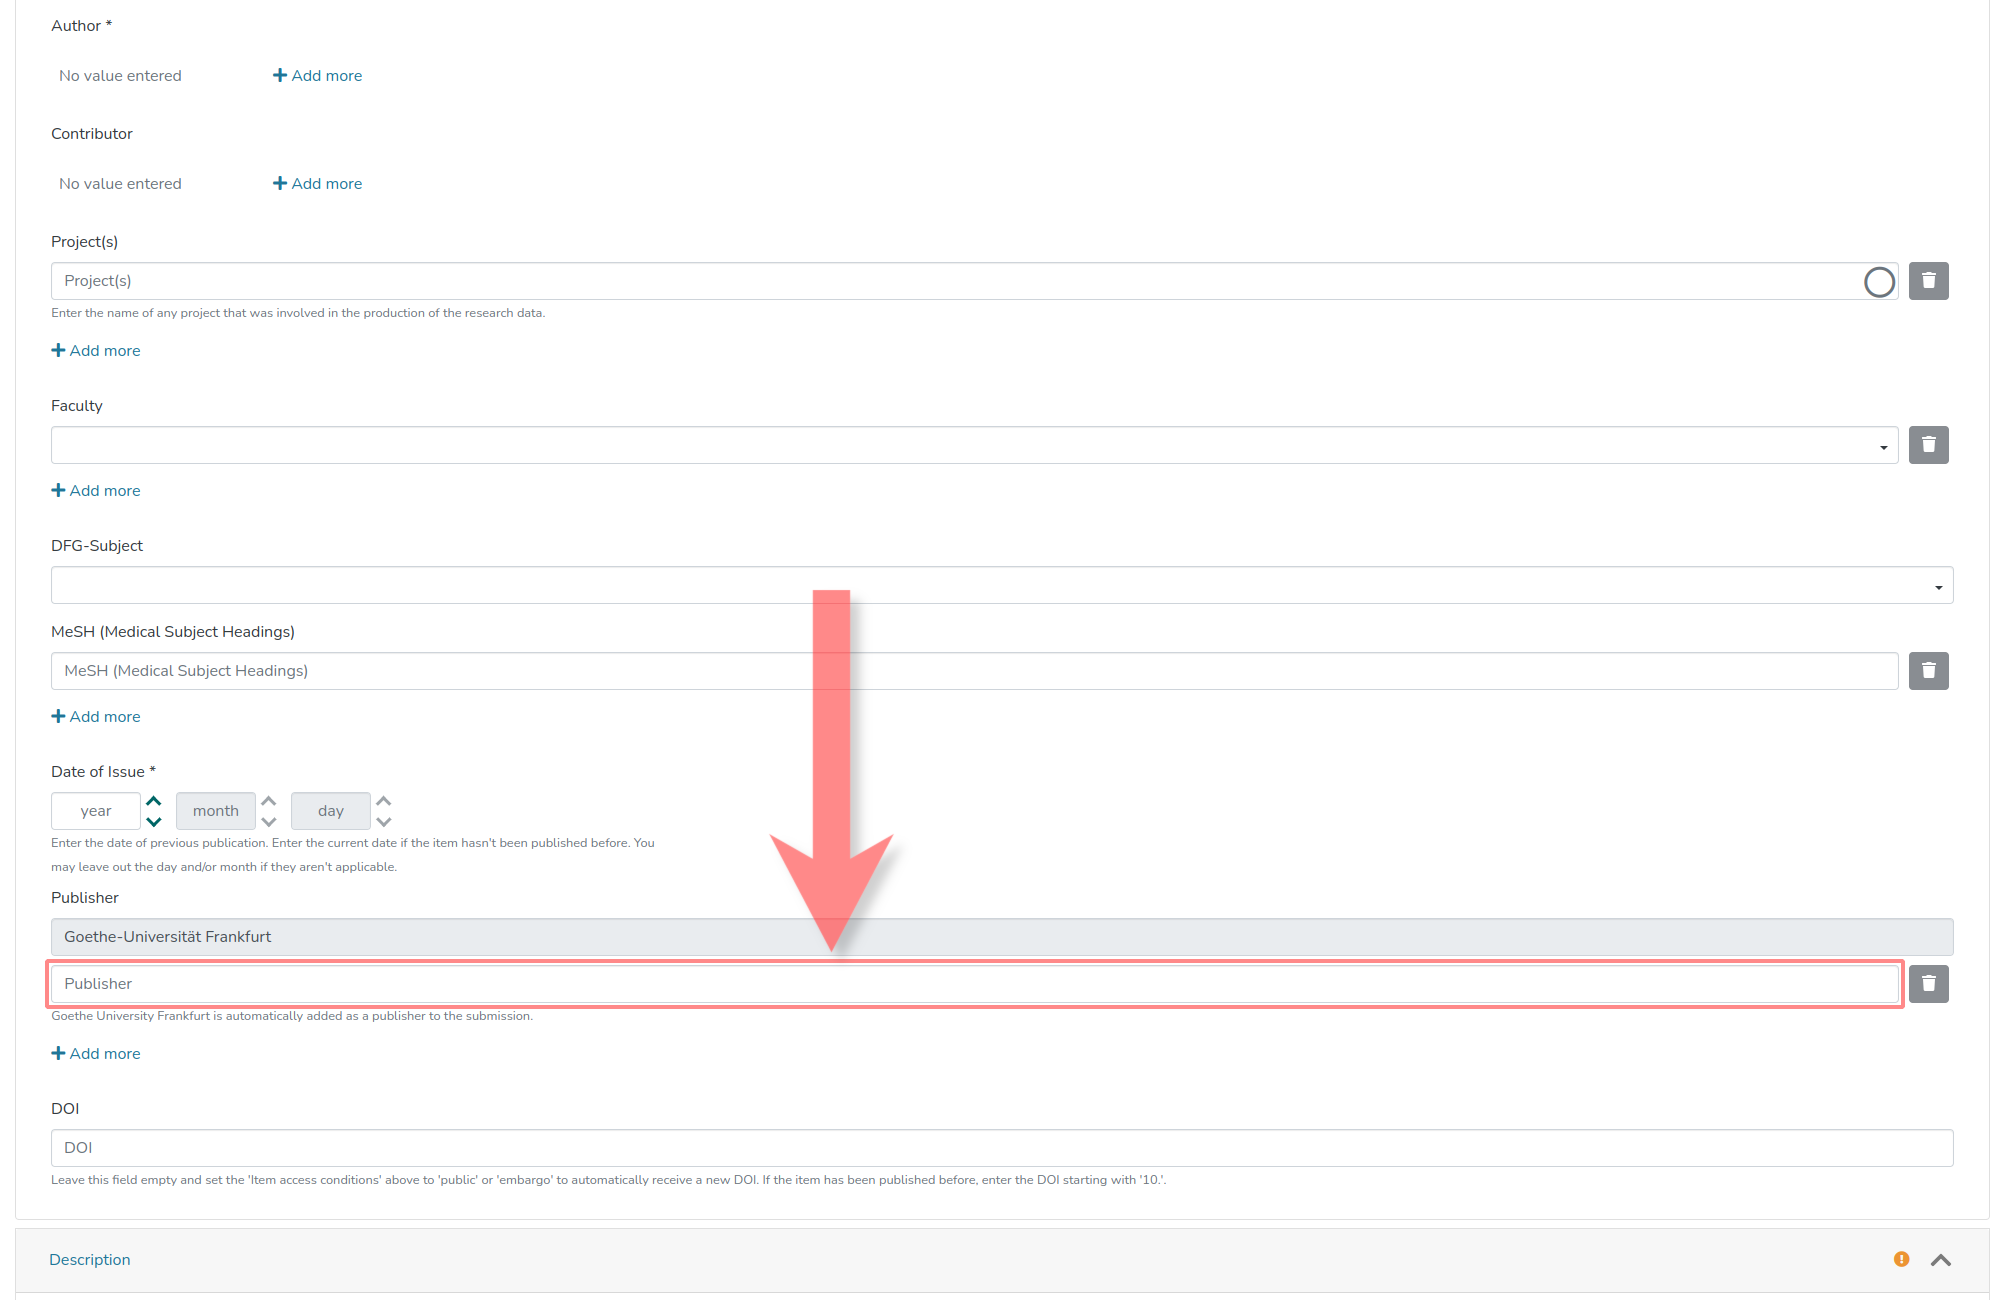
5.9. Specify Publishing Organisation(s)/Person(s)
The publishing organisations and/or persons must be specified here. Goethe University Frankfurt will automatically be listed as one of the publishers and cannot be removed.
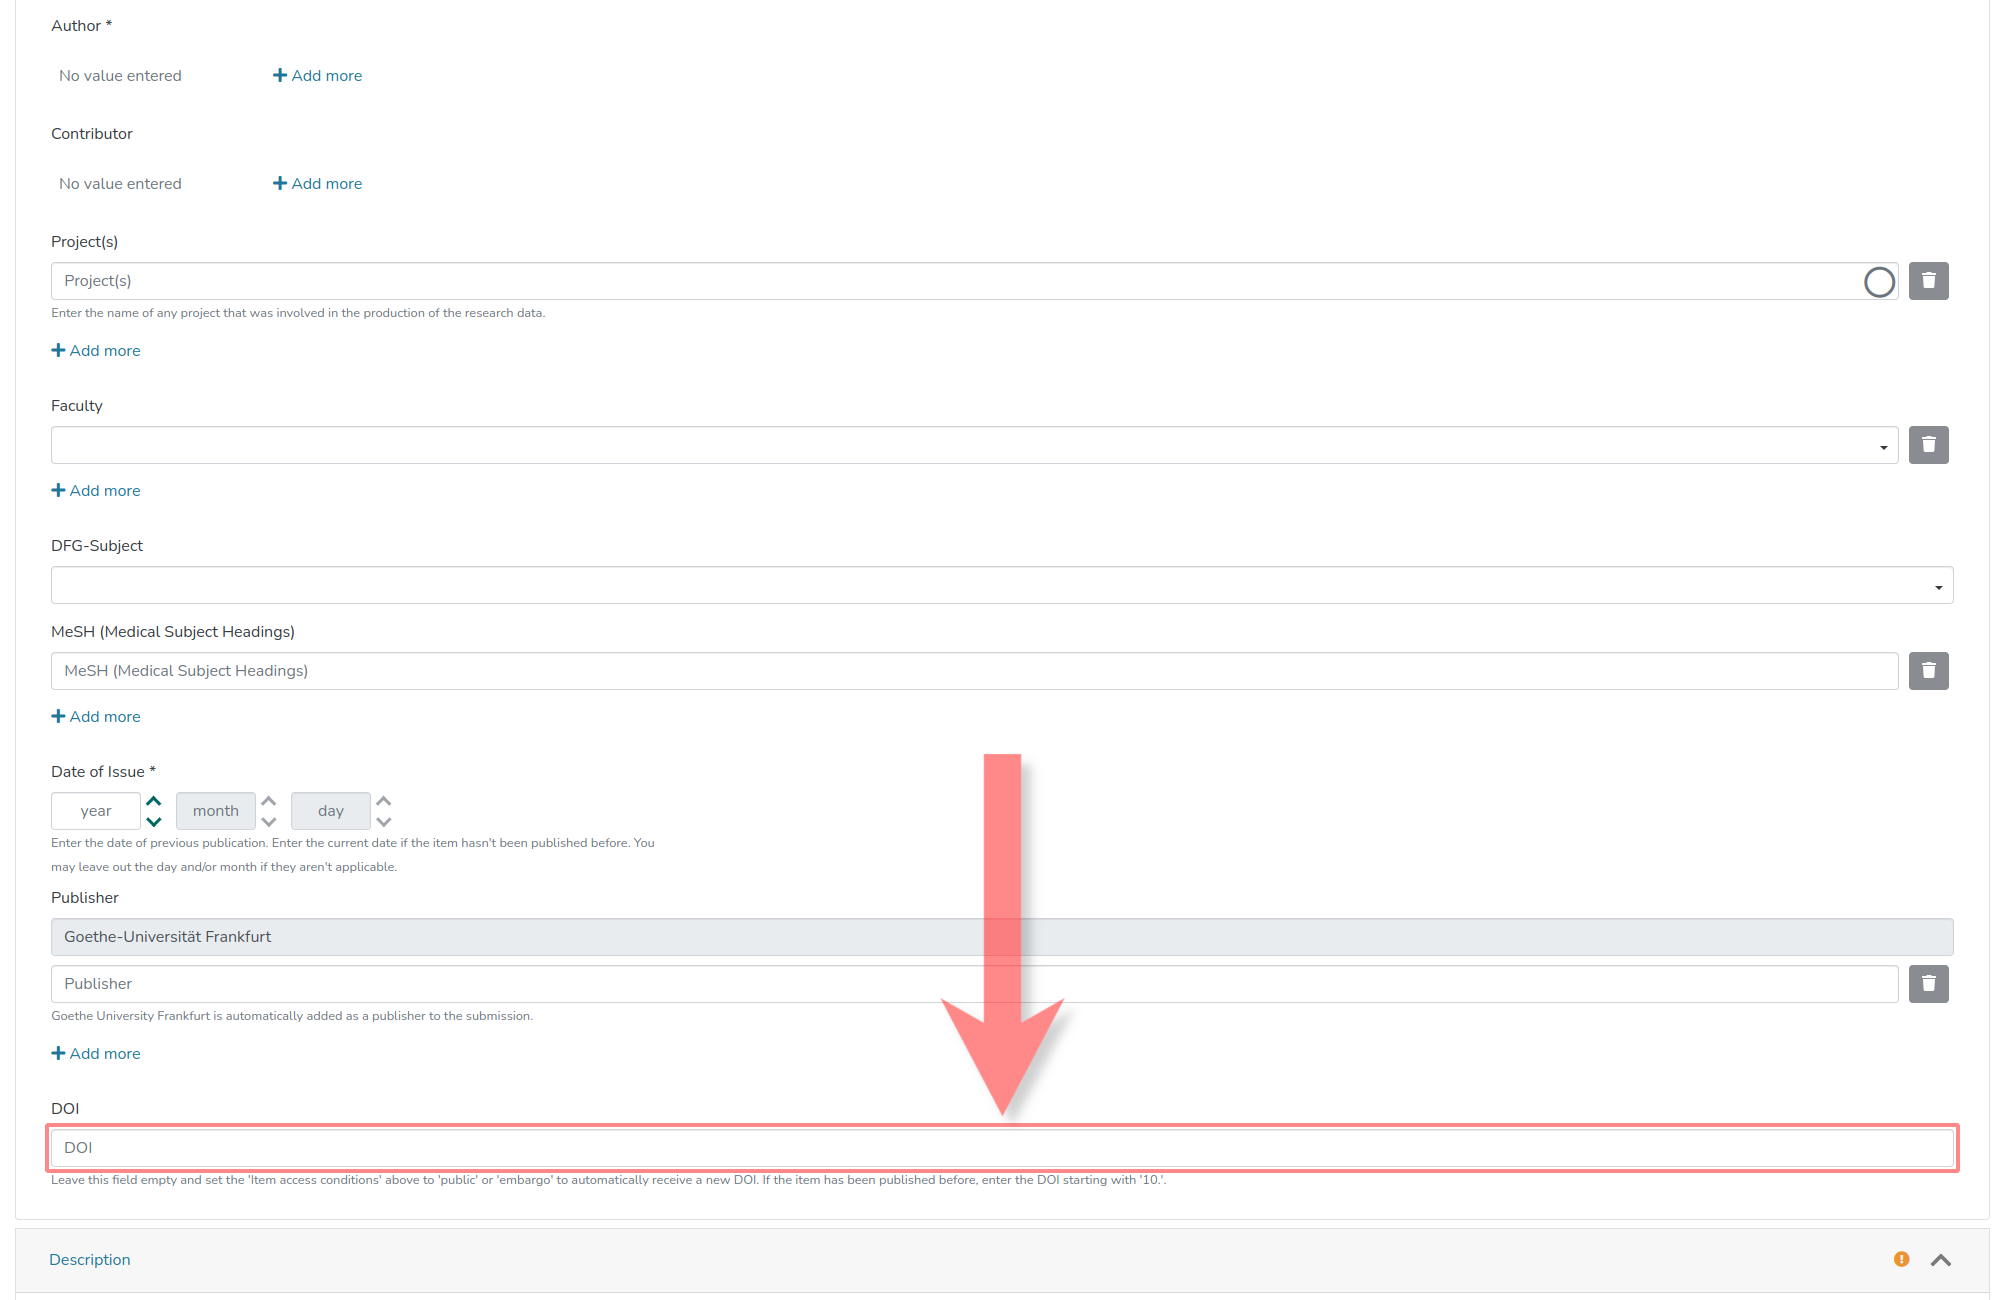
5.10. (OPTIONAL) Specify Existing DOI
If a pre-existing DOI exists for the dataset, it can be provided here. If a new DOI is desired, this field must be left empty, and the access restriction of the submission must either be 'Public' or 'Embargo'.
6. Add Descriptive Metadata
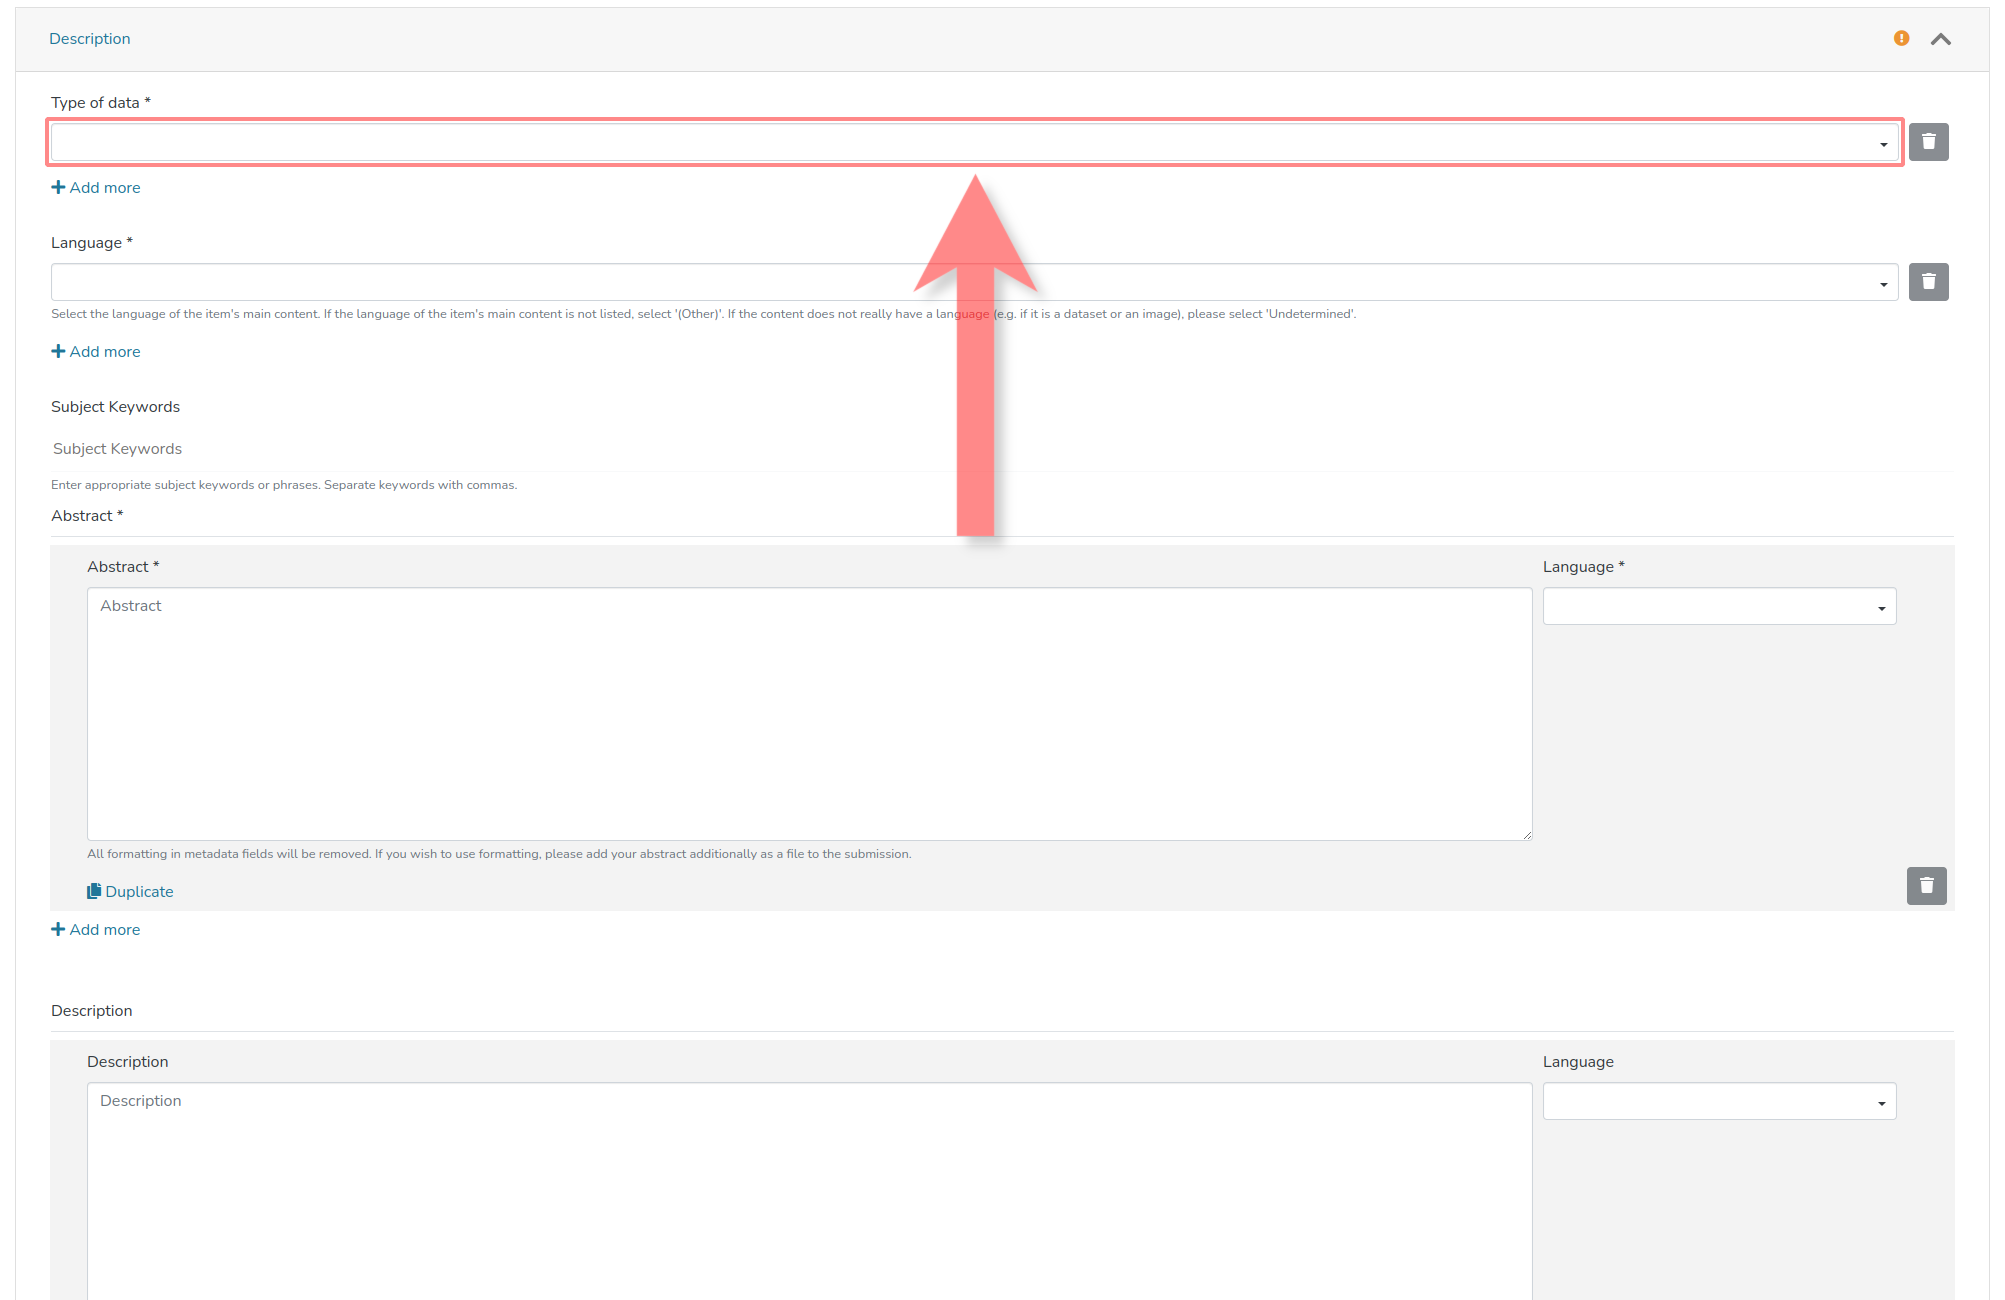
6.1. Specify Type of Submitted Data
The type of data being submitted must be specified in the marked field.
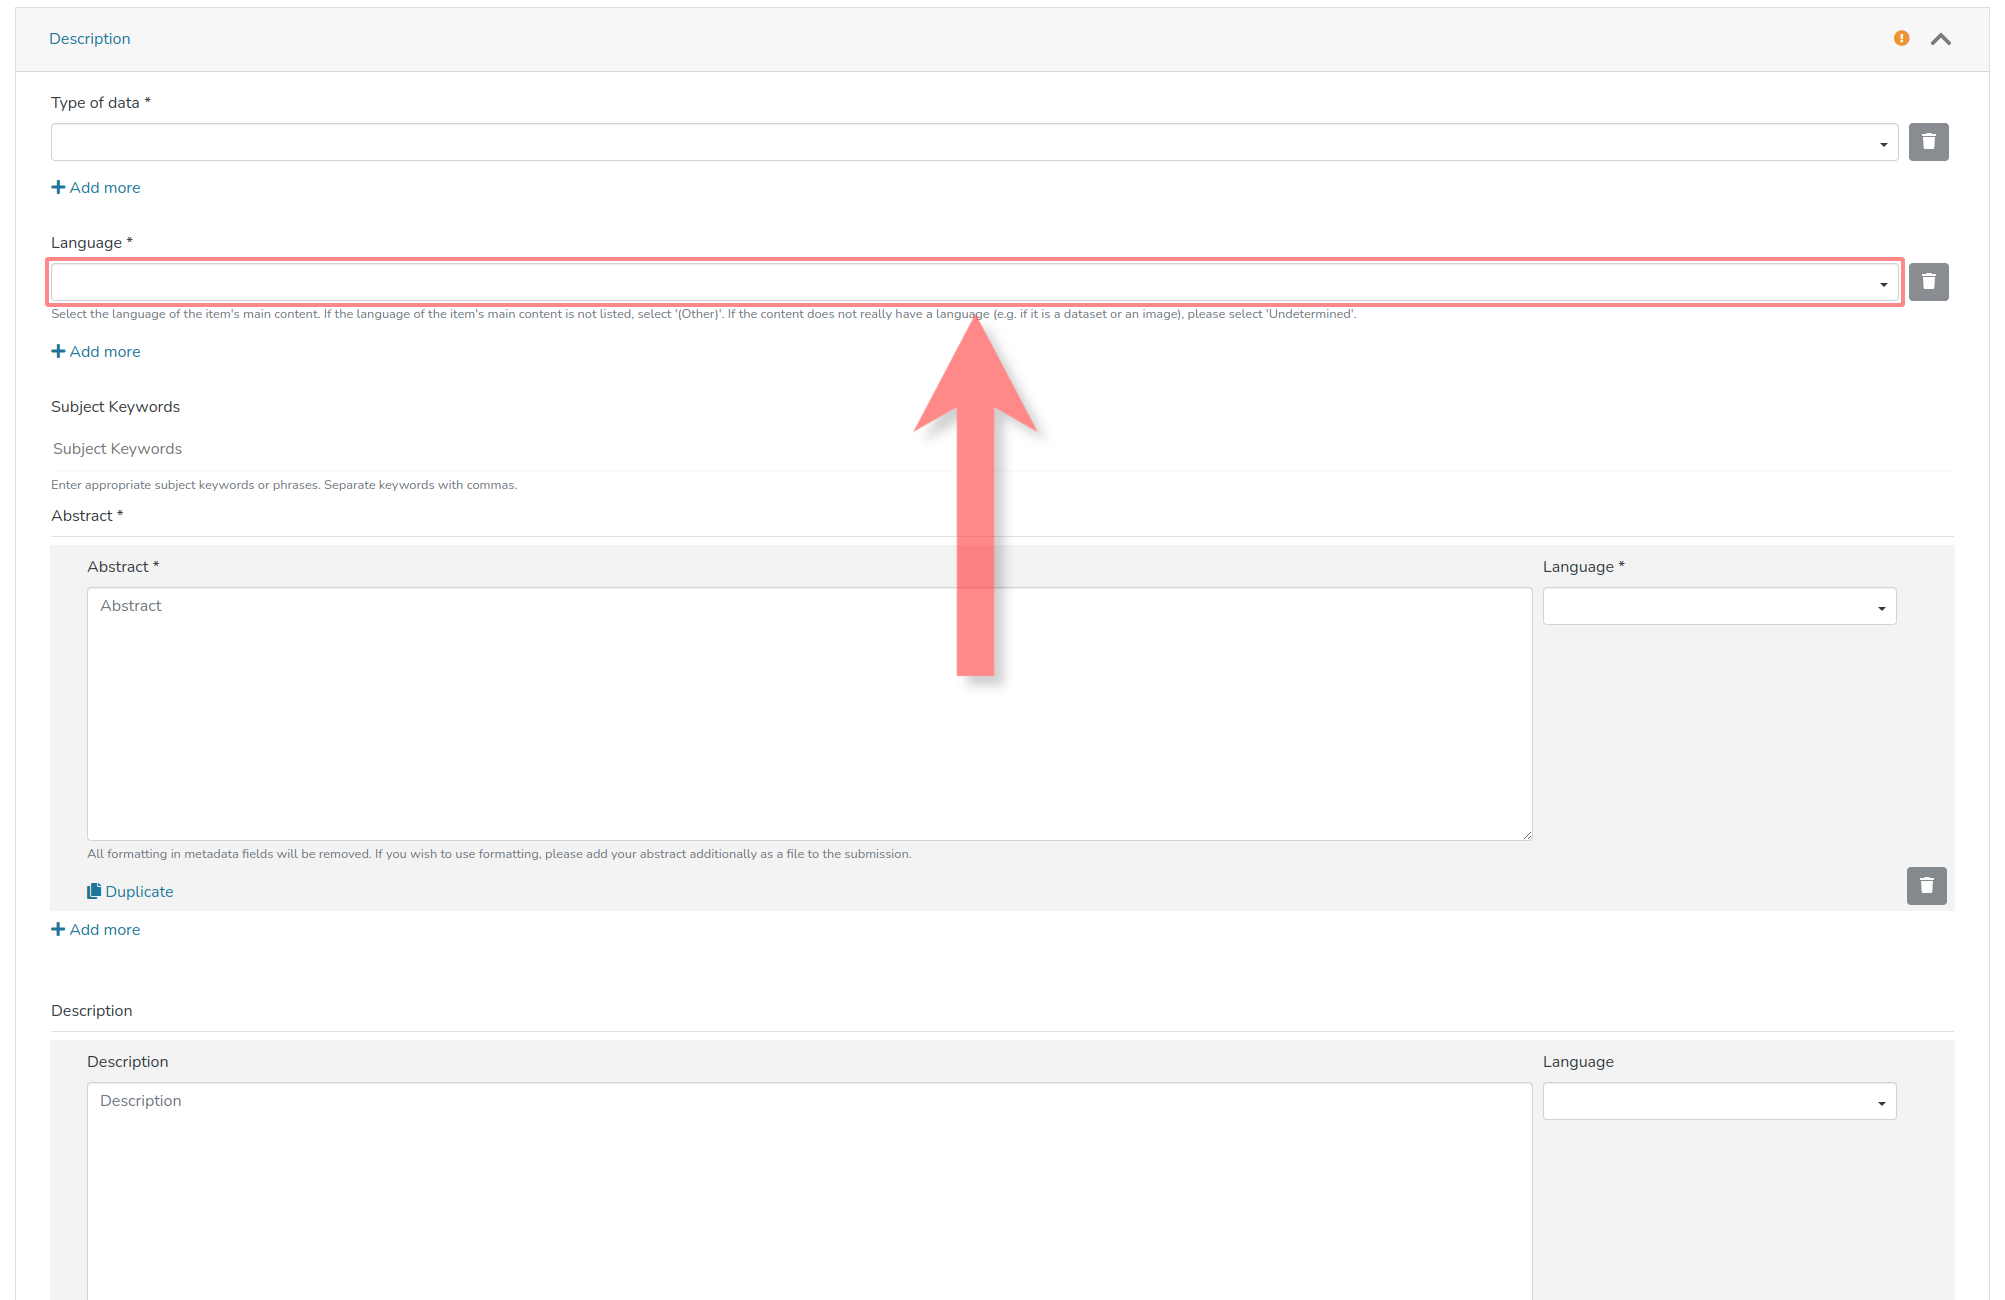
6.2. Specify Language(s) of the Main Content of the Submission
The language(s) of the main content of the submission must be specified in the marked field. If the language in question is not selectable, '(Other)' should be chosen. If the data does not use language in the common sense, 'Undetermined' should be selected.
6.3. (OPTIONAL) Specify Thematic Keywords for the Submission
If desired, thematic keywords for the submission can be specified here. Individual keywords should be separated by commas.

6.4. Enter Summary of the Content of the Submission/Publication
A summary of the content of the submission/publication must be entered in the marked field (A). The language in which the summary is written must be indicated in (B).

6.5. (OPTIONAL) Enter Description of Research Data
A description of the research data can be entered in the marked field (A) here. The language in which the description is written must be indicated in (B) if a description has been provided.

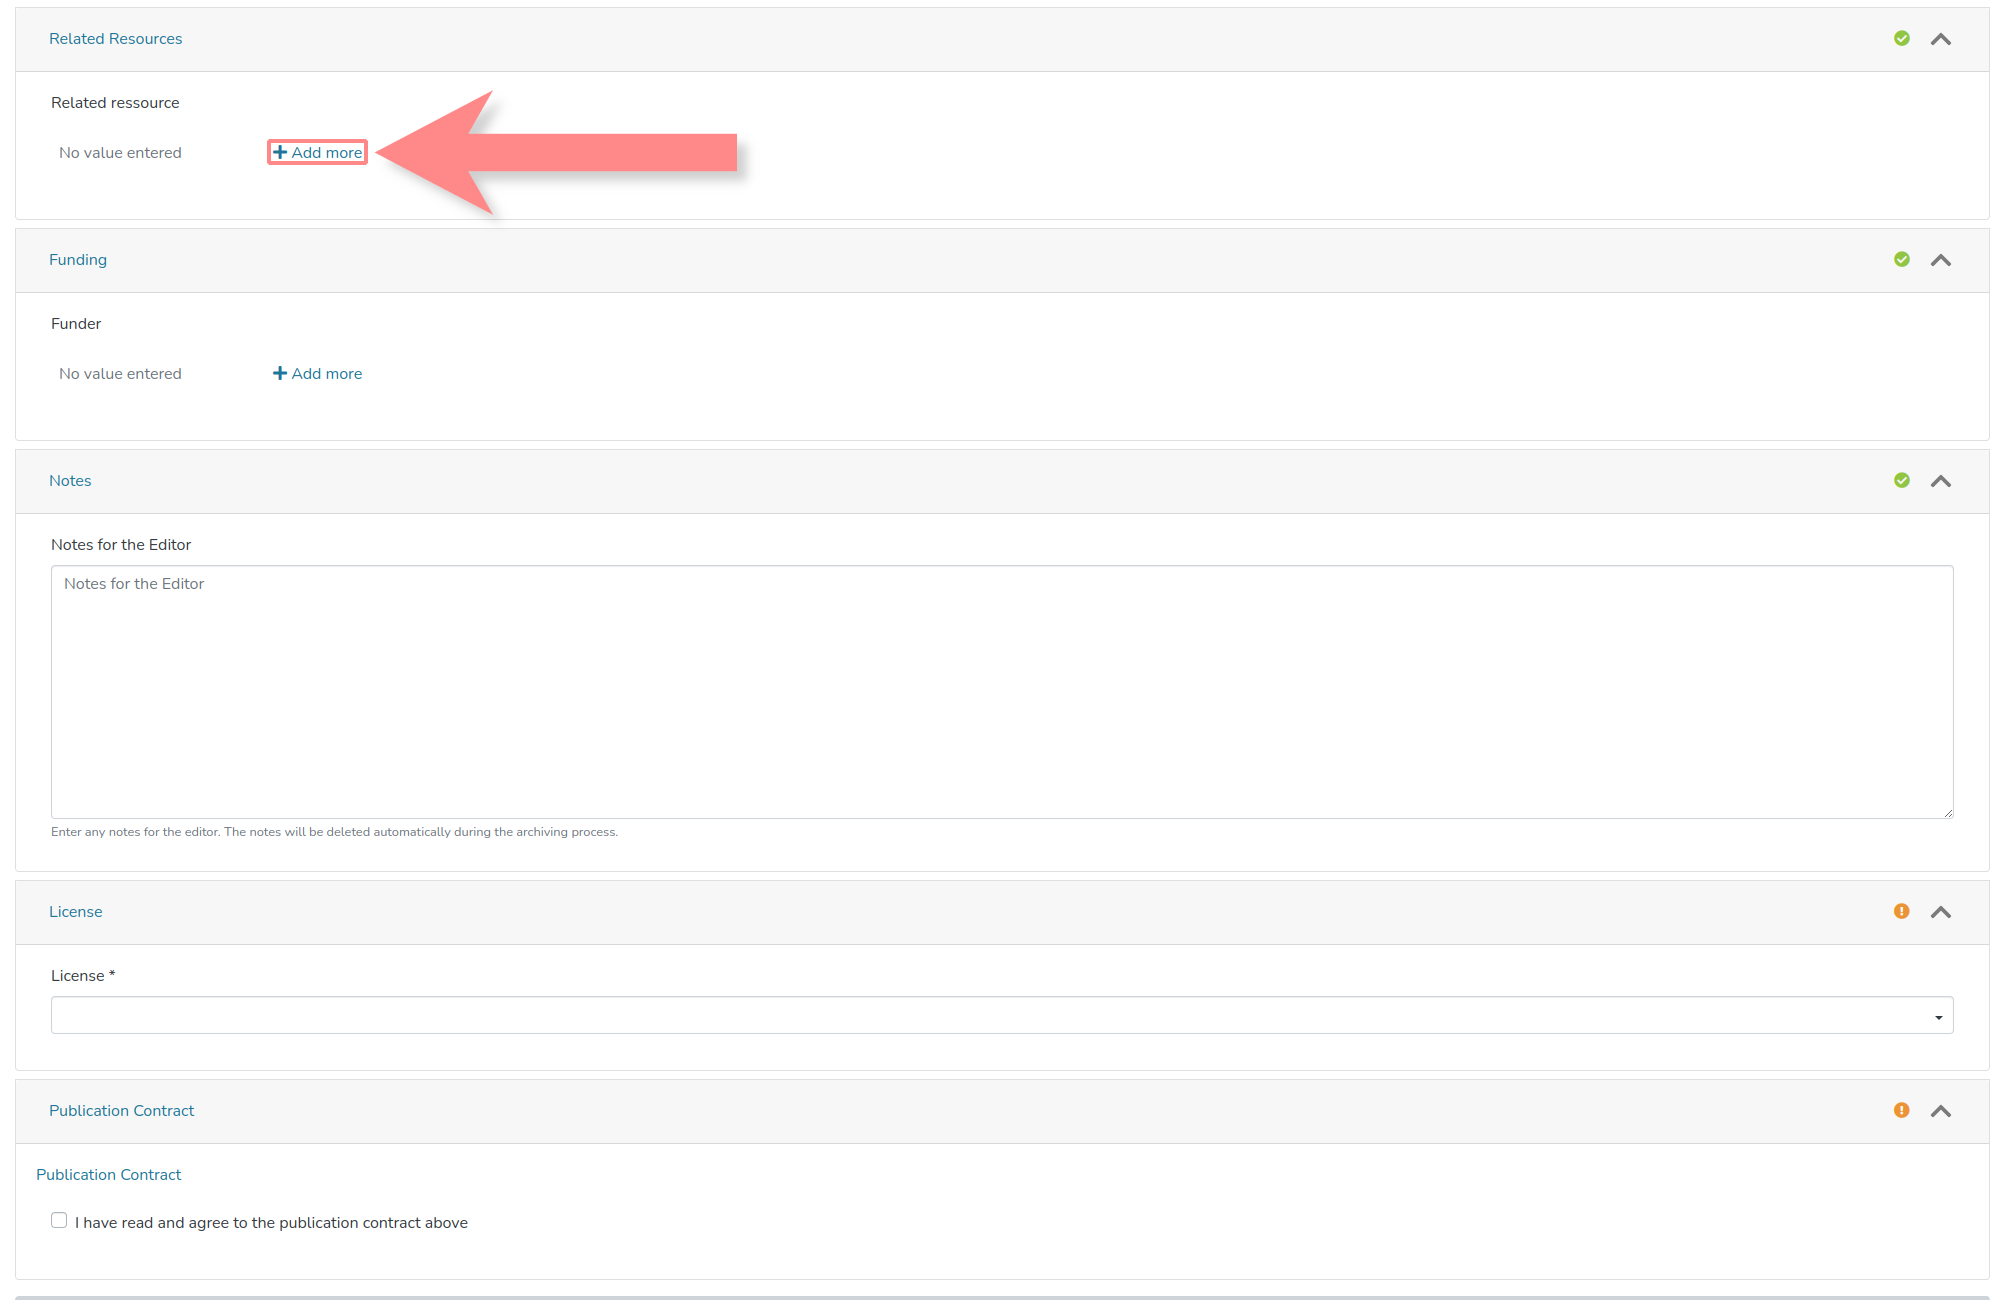
7. (OPTIONAL) Add Related Resources
7.1. (OPTIONAL) Add Related Resource
Resources related to the submitted research data can be added using the marked element here.
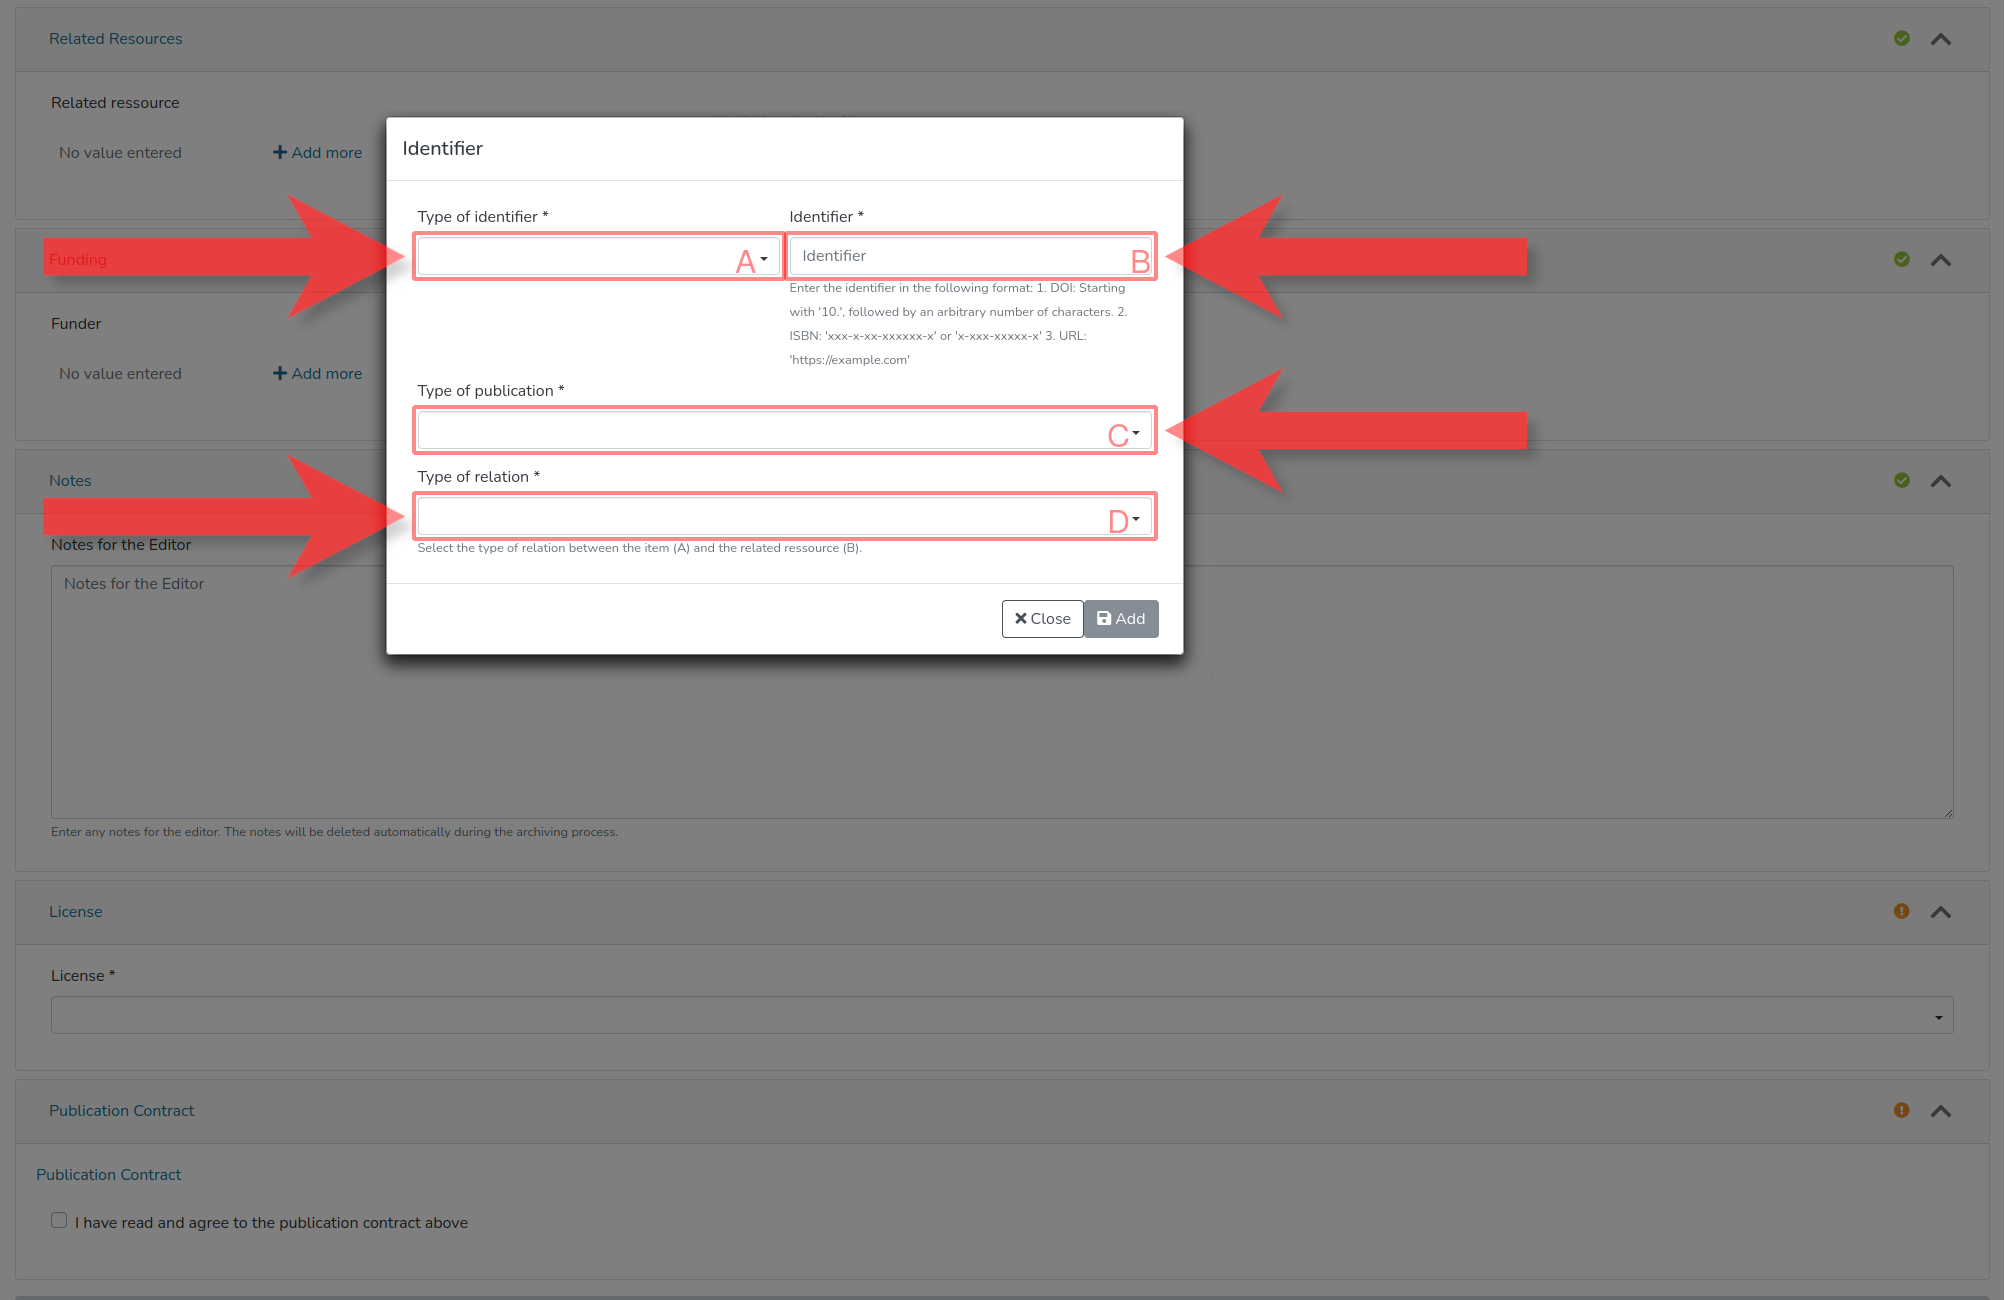
7.2. (OPTIONAL) Enter Identification Details of the Added Related Resource
If a related resource is added, identificational details of the resource must be entered in the marked fields here. The type of the identificational detail that is to be added in (B) must be specified in (A). The publication type of the resource must be indicated in (C), and the relationship between the submission and the related resource must be indicated in (D).
8. (OPTIONAL) Add Funding Information
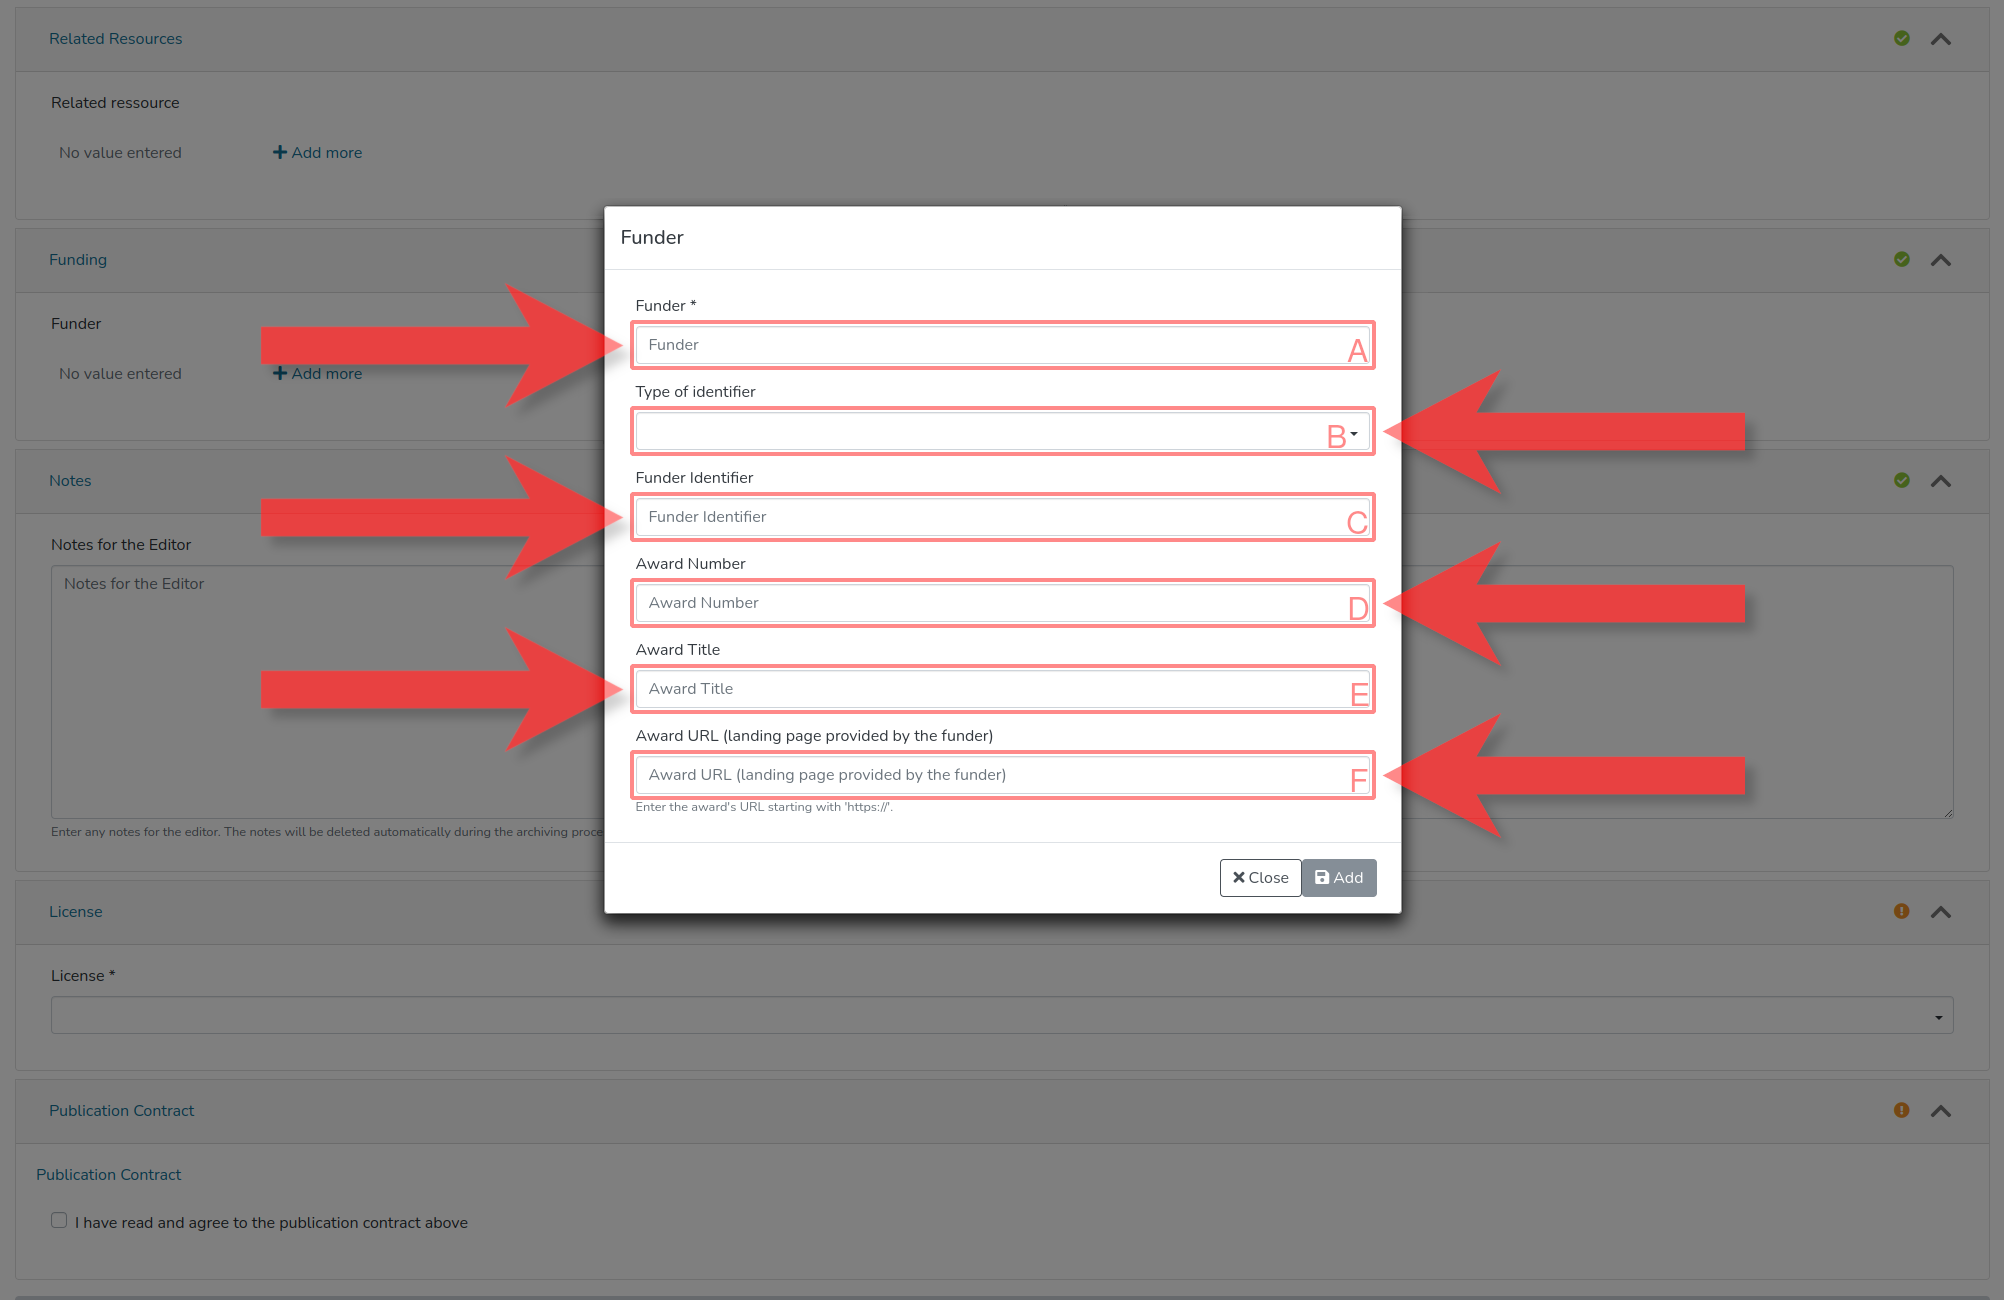
8.1. Add Funding Organisation(s)/Person(s)
Funding organisations/persons can be added using the marked element here.

8.2. Enter Identification Details of the Funding
If a funding is added, relevant identificational details must be provided in the marked fields here. The full name of the funding organisation/person must be entered in (A). The type of identificational detail to be provided in (B) can be specified, and the funding number in (D) and funding title in (E) must be indicated, under which the research that produced the research data was funded. The funding URL can be provided in (F), leading to the specific funding webpage of the funding organisation.
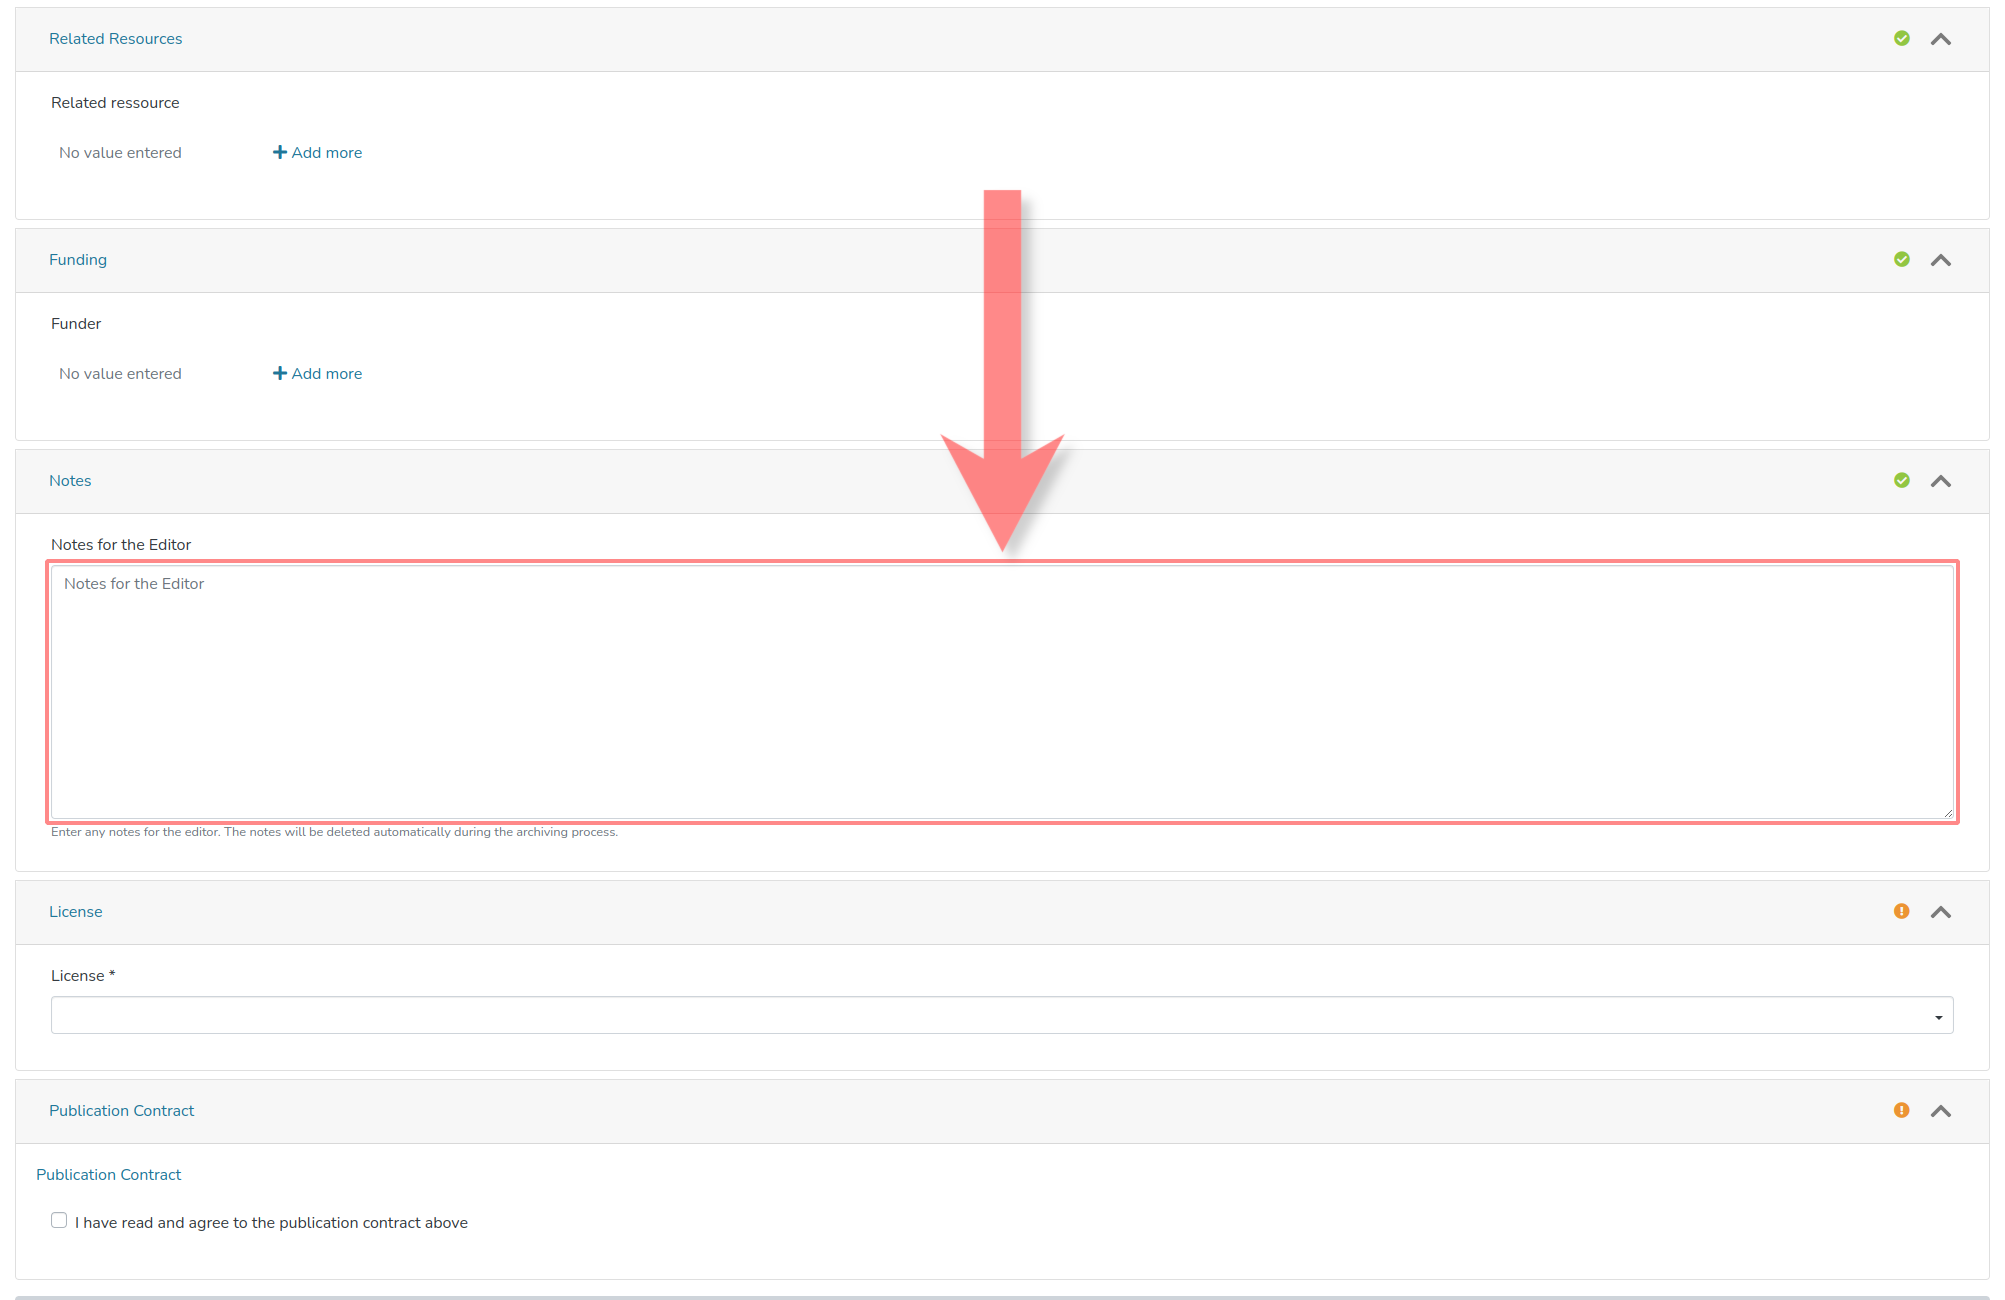
9. (OPTIONAL) Add Notes to the Editorial Team
If specific notes to the editorial team are desired or necessary, they can be entered in the marked field here.
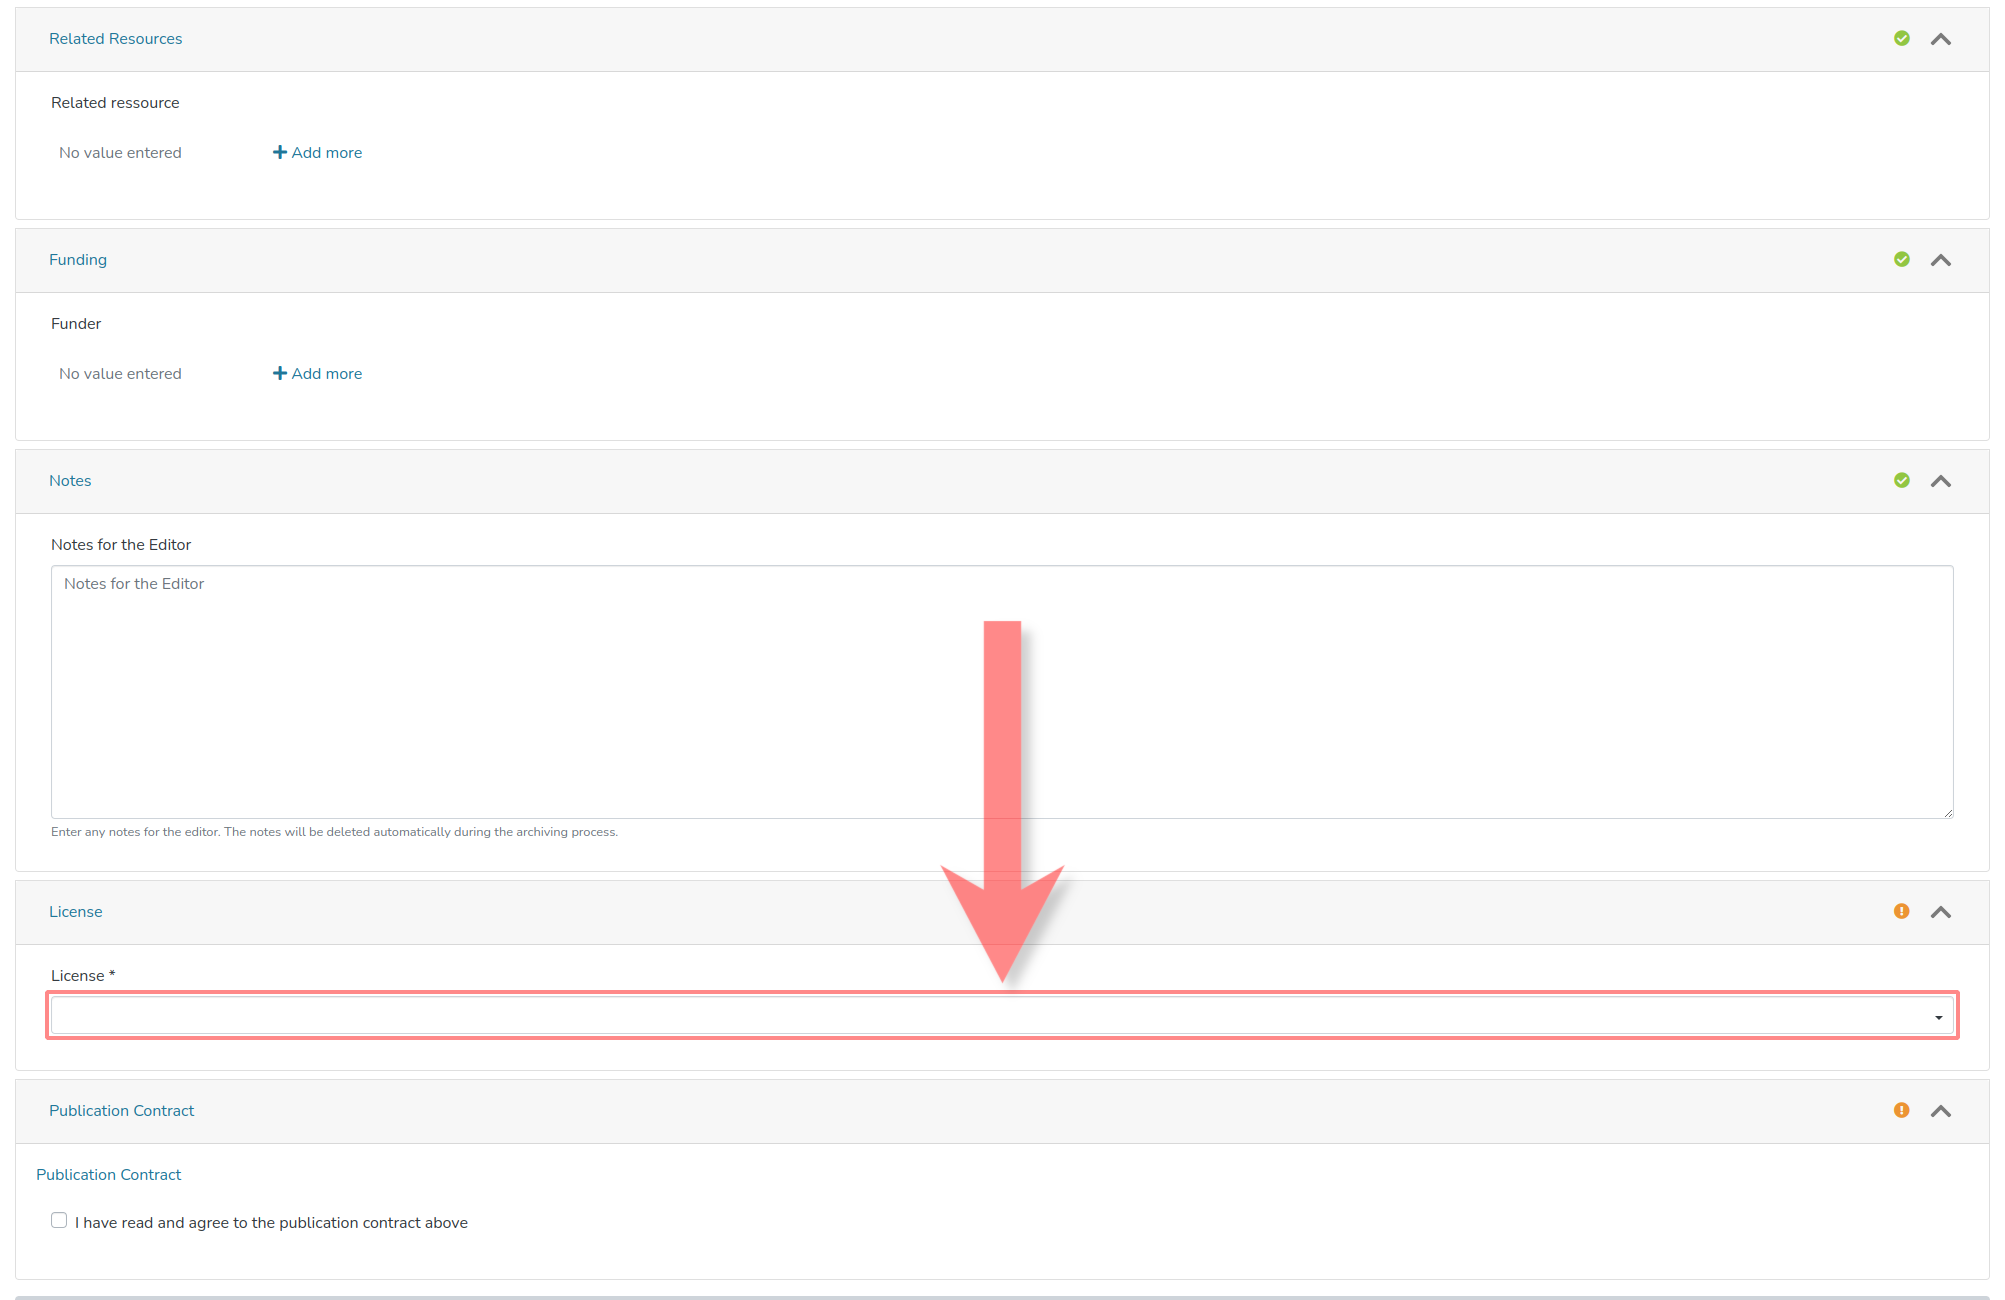
10. Set License for Publication of the Submission
Before publishing the data, the license under which the research data will be published must be selected here.
11. Agree to Publication Agreement
Lastly, before publishing the research data, the publication agreements must be agreed to.
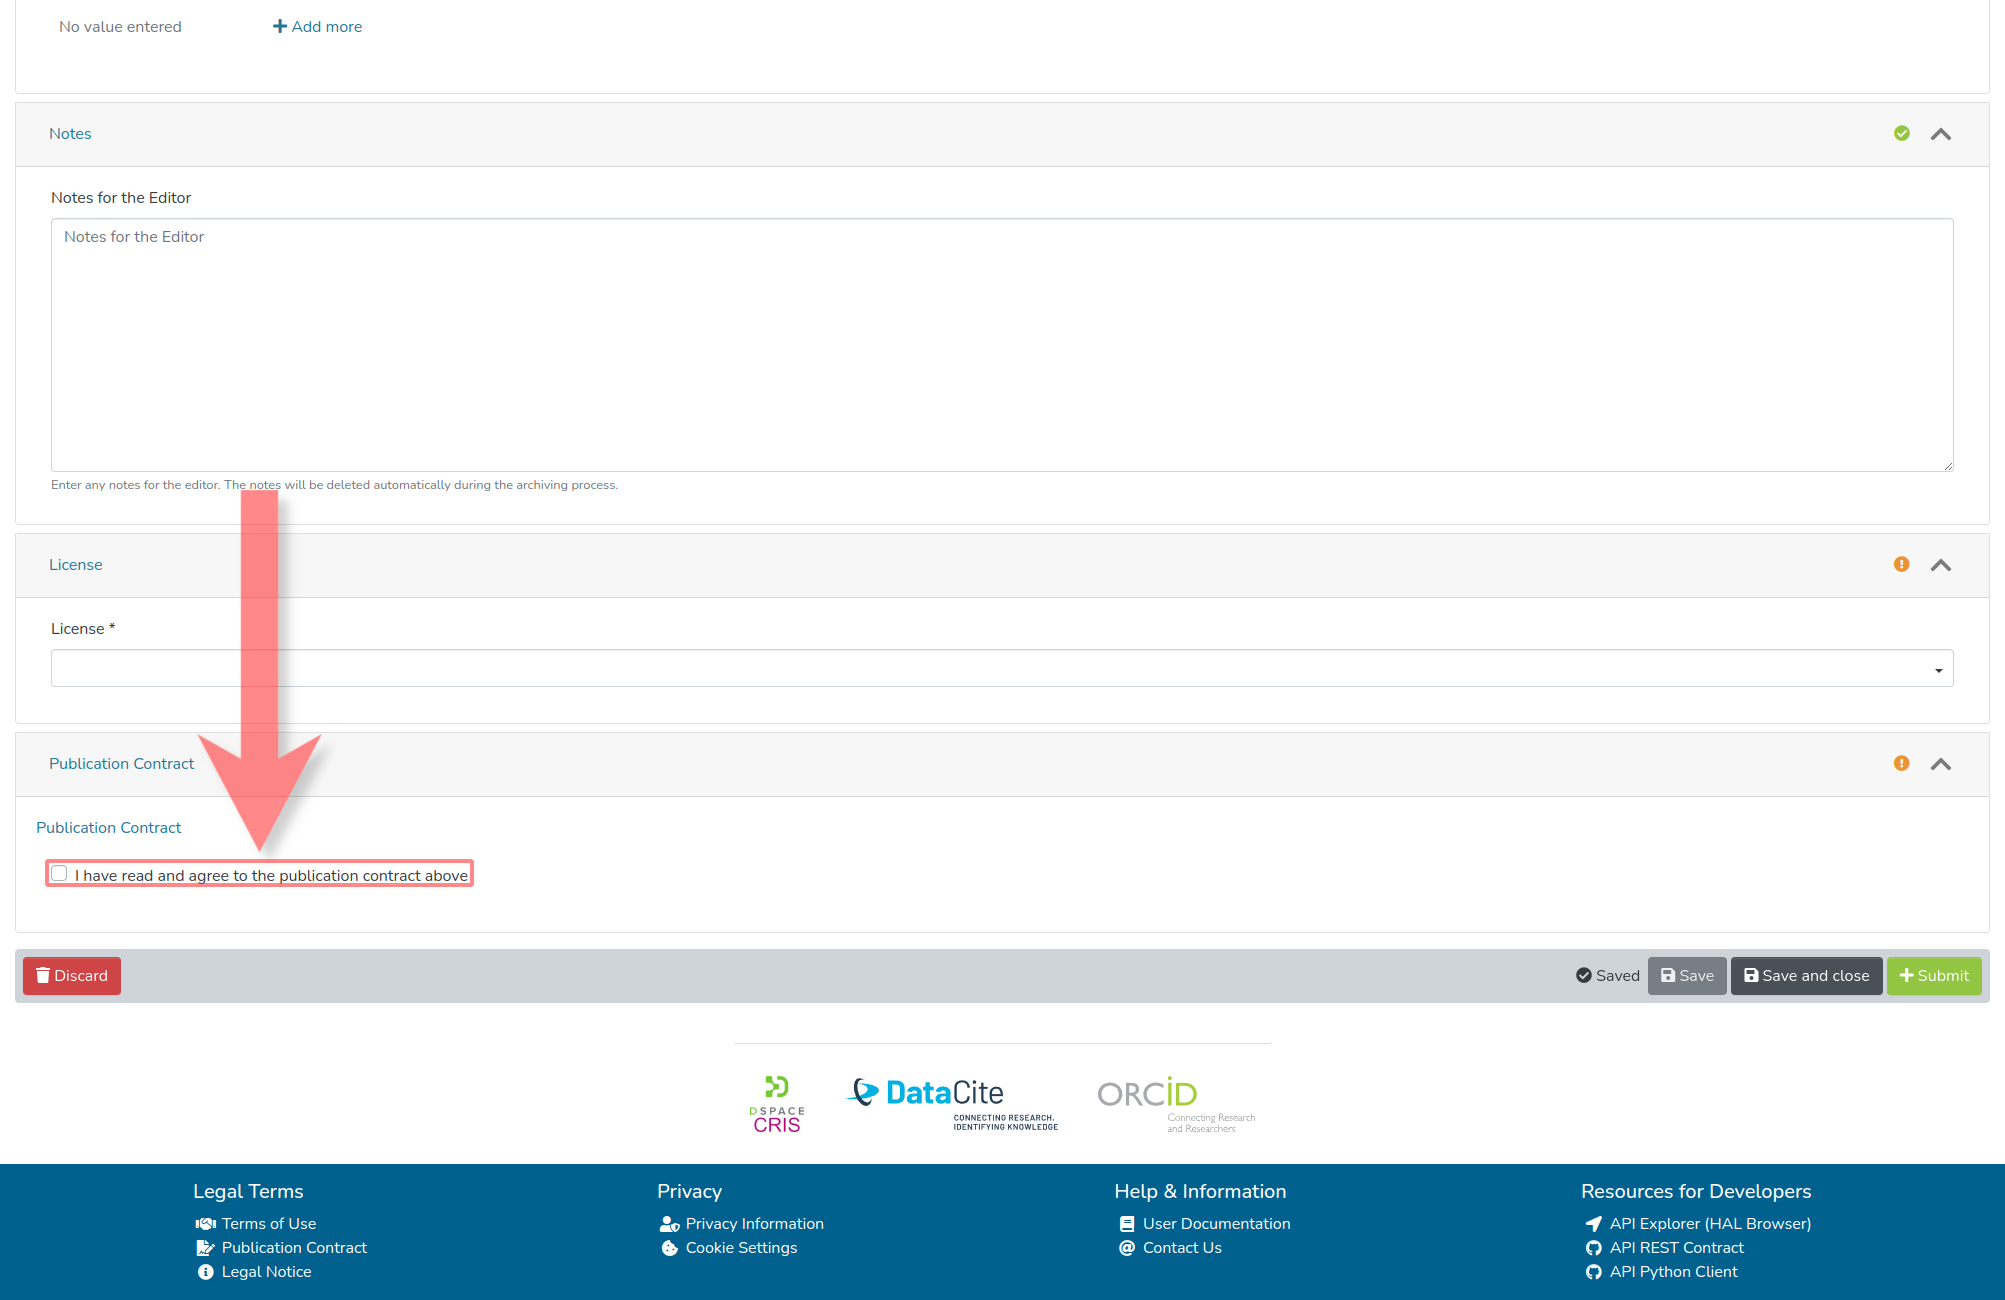
12. Submit the Submission Form
If all data is uploaded and all desired metadata is provided, the marked element '+Submit' may now be selected. This will submit the submission to the editorial team.

Create a New Version of a Research Dataset
1. Navigate to 'MyGude'
1.1. Click on the profile icon at the top right
To access 'MyGUDe', first click on the profile icon at the top right.
1.2. Select 'MyGude'
After clicking on the profile icon, a selection opens. 'MyGUDe' should be selected here.
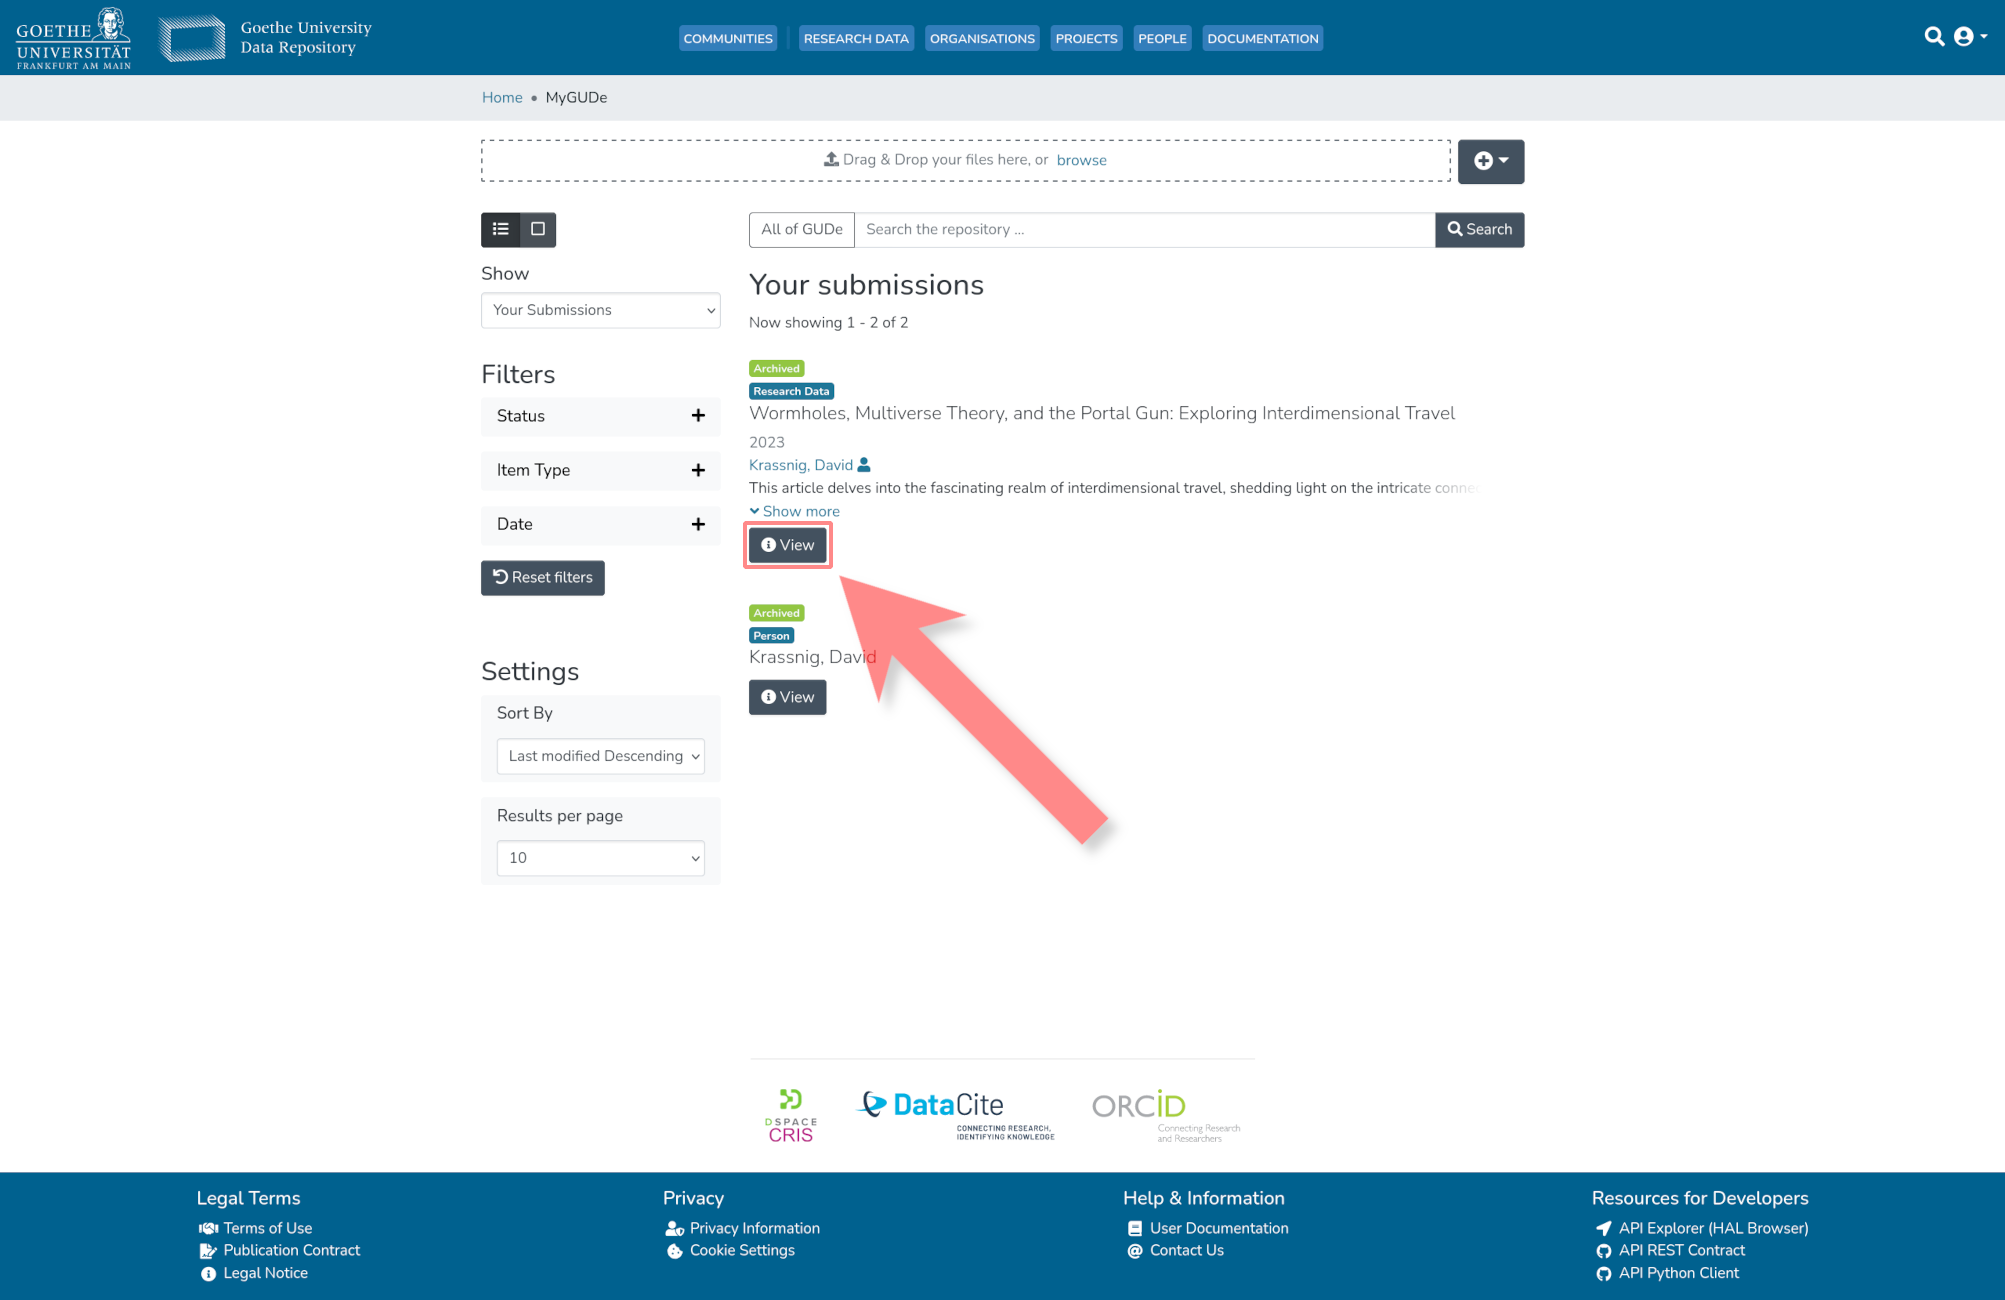
2. Select the Research Dataset
Once 'MyGude' is opened, the dataset that should receive a new version needs to be selected by clicking on its corresponding View element.
3. Create a New Version of the Research Dataset
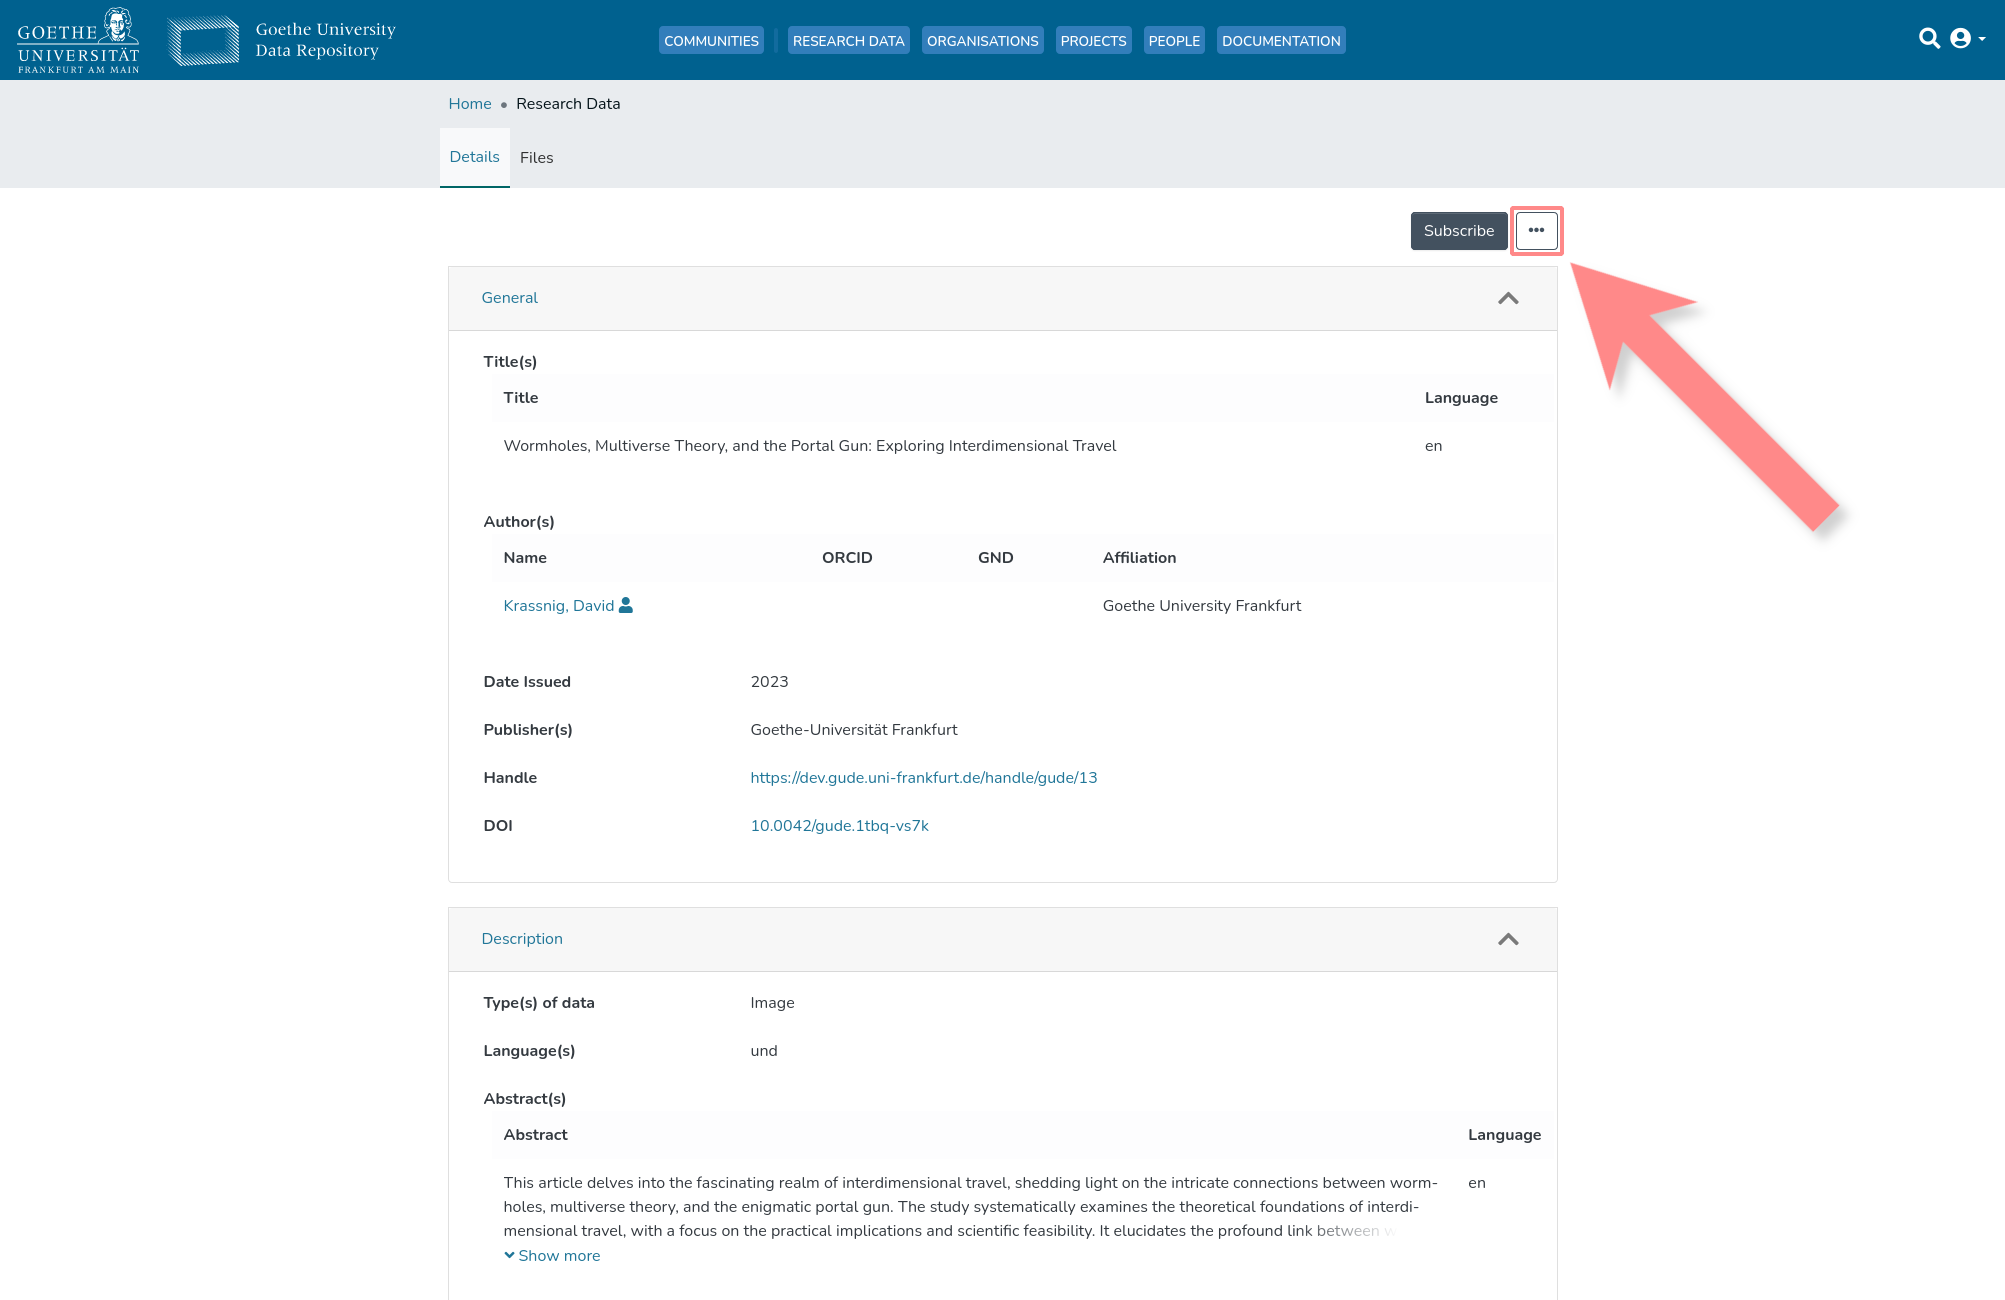
3.1. Click on the three horizontal dots at the top right
After selecting the research dataset, a new page with further information opens. '···' should be selected here.
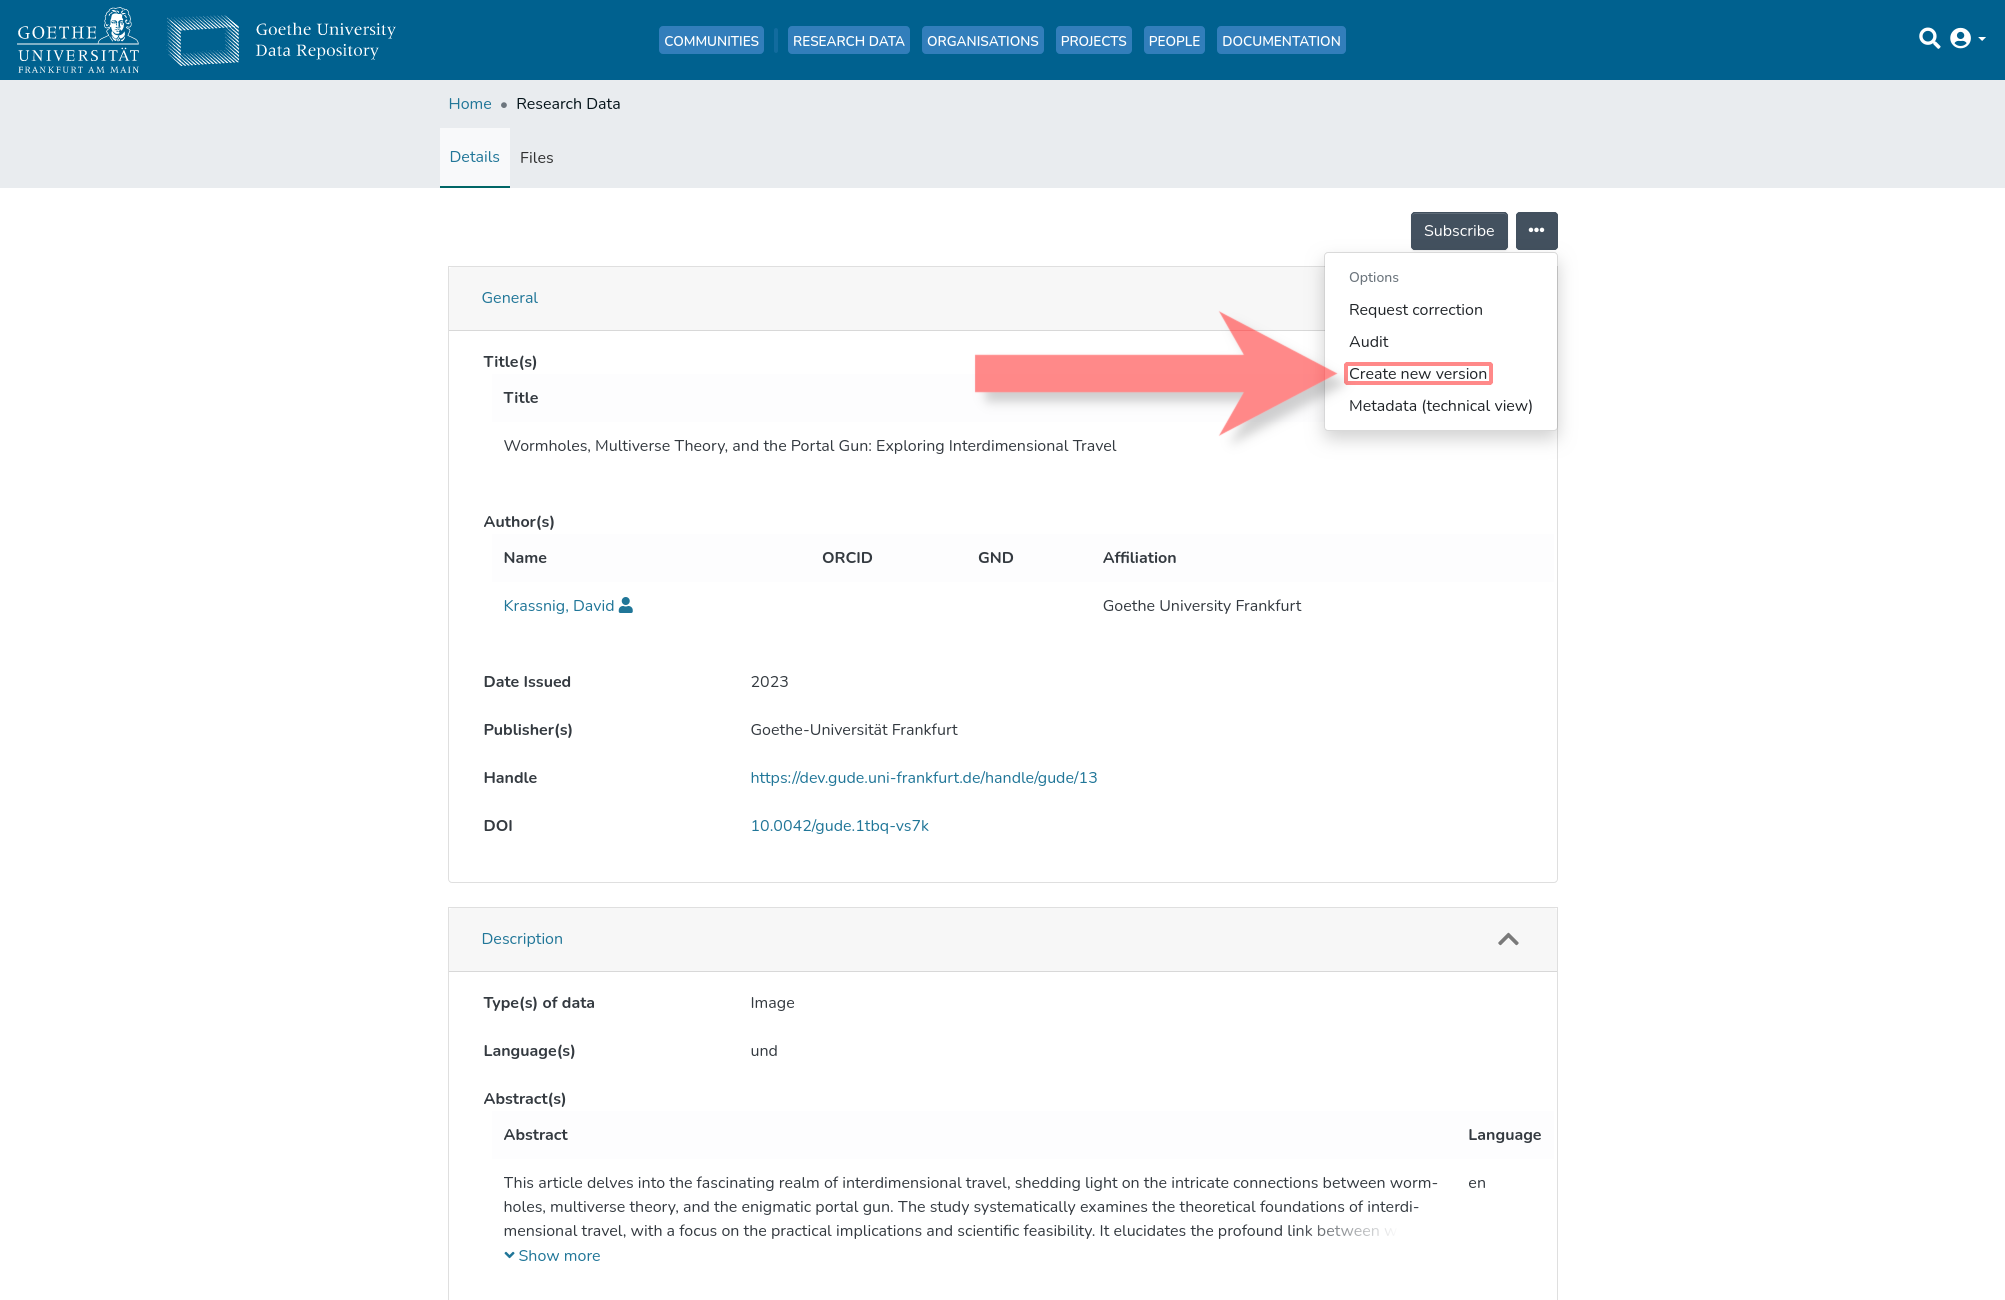
3.2. Click on 'Create New Version'
Subsequently, 'Create New Version' must be clicked.
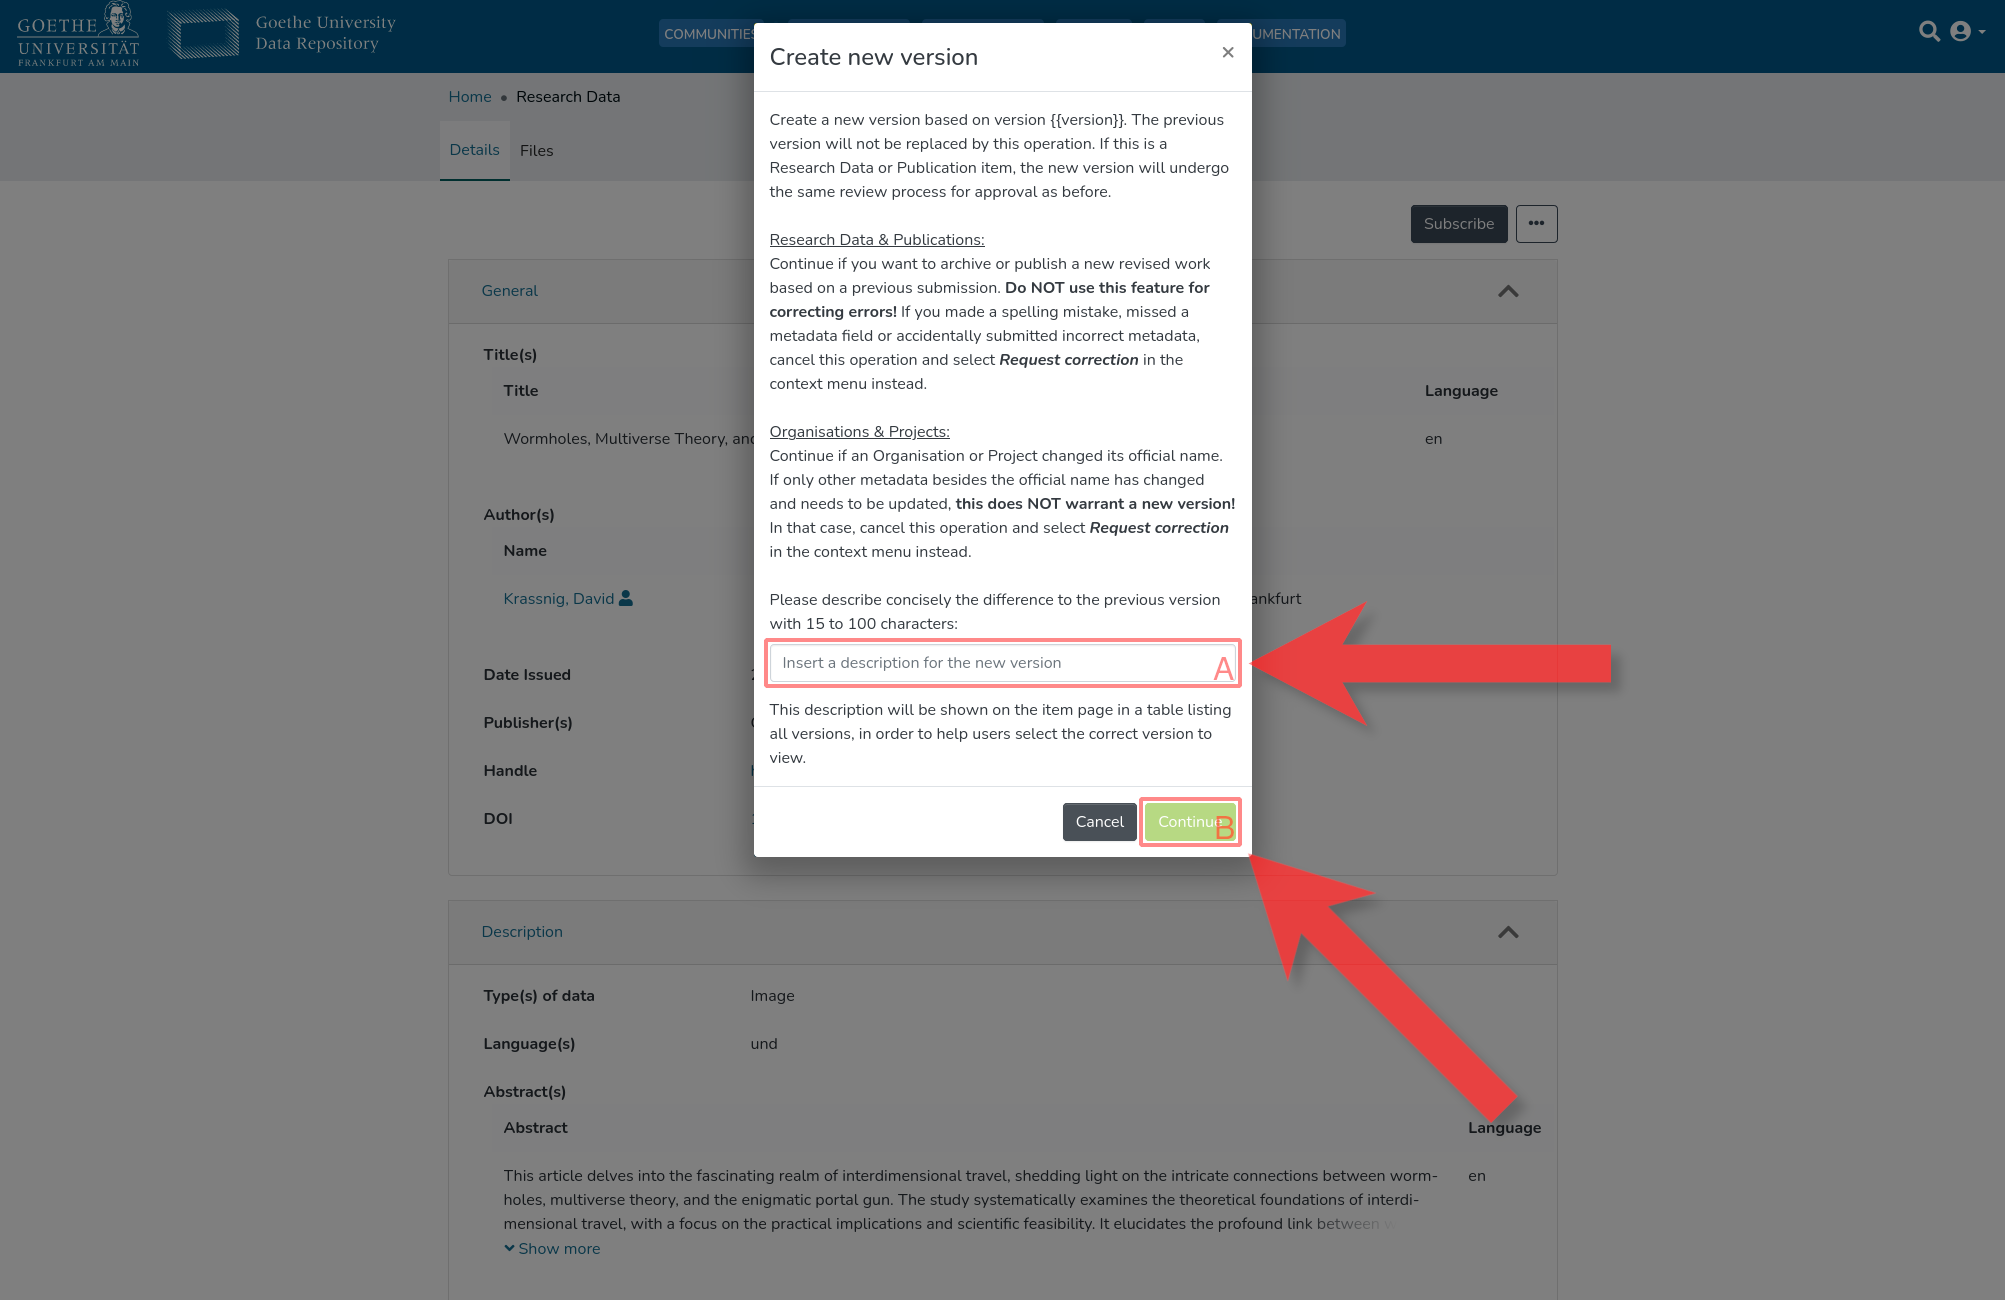
3.3. Enter a concise description of the new version and confirm
In the form that then opens, it must first be stated concisely in (A) how the new version differs from the previous one before confirming and proceeding with 'Continue' in (B).
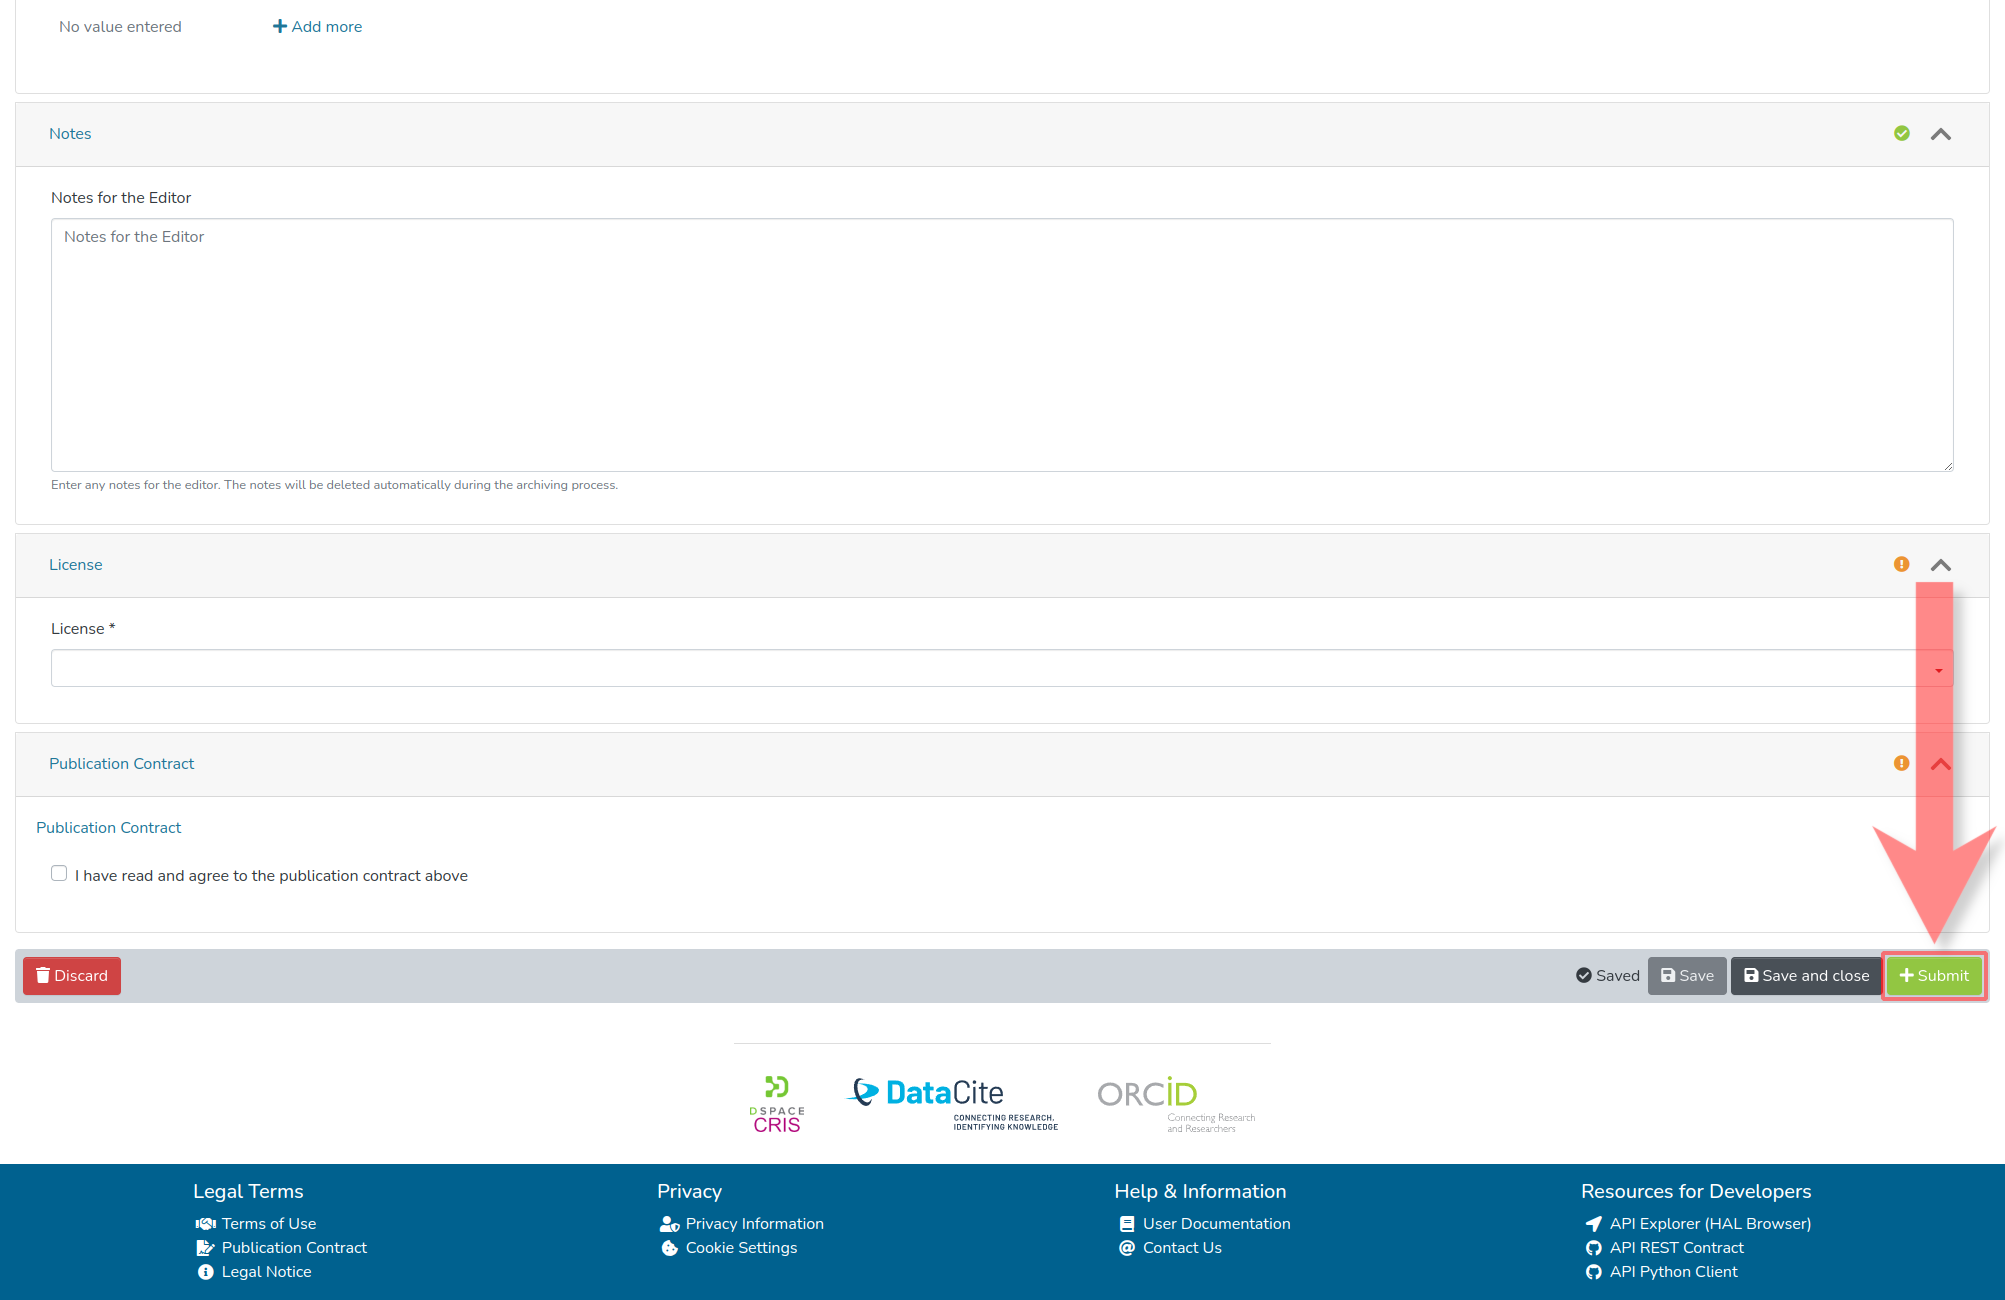
4. Edit the Data Submission Form
In the subsequent data submission form, the existing information about the research data as well as the research data itself are available. These can now be edited as in a new submission. For details, the corresponding step-by-step guide for new data submissions can be consulted.

5. Submit the Submission Form
Once all desired edits to the research dataset have been made, the version can now be submitted by clicking on the 'Submit' element.
Request a Correction of a Research Dataset
1. Navigation to 'MyGude'
1.1. Clicking on the Profile Icon at the Top Right
To reach 'MyGUDe', the profile icon at the top right must first be clicked.
1.2. Selecting 'MyGude'
Once the profile icon is clicked, a menu opens. 'MyGUDe' is to be selected here.
2. Selection of the Research Dataset
After opening 'MyGude', the dataset that is to receive a correction must be selected by clicking on its corresponding View element.
3. Creation of a Correction of the Research Dataset
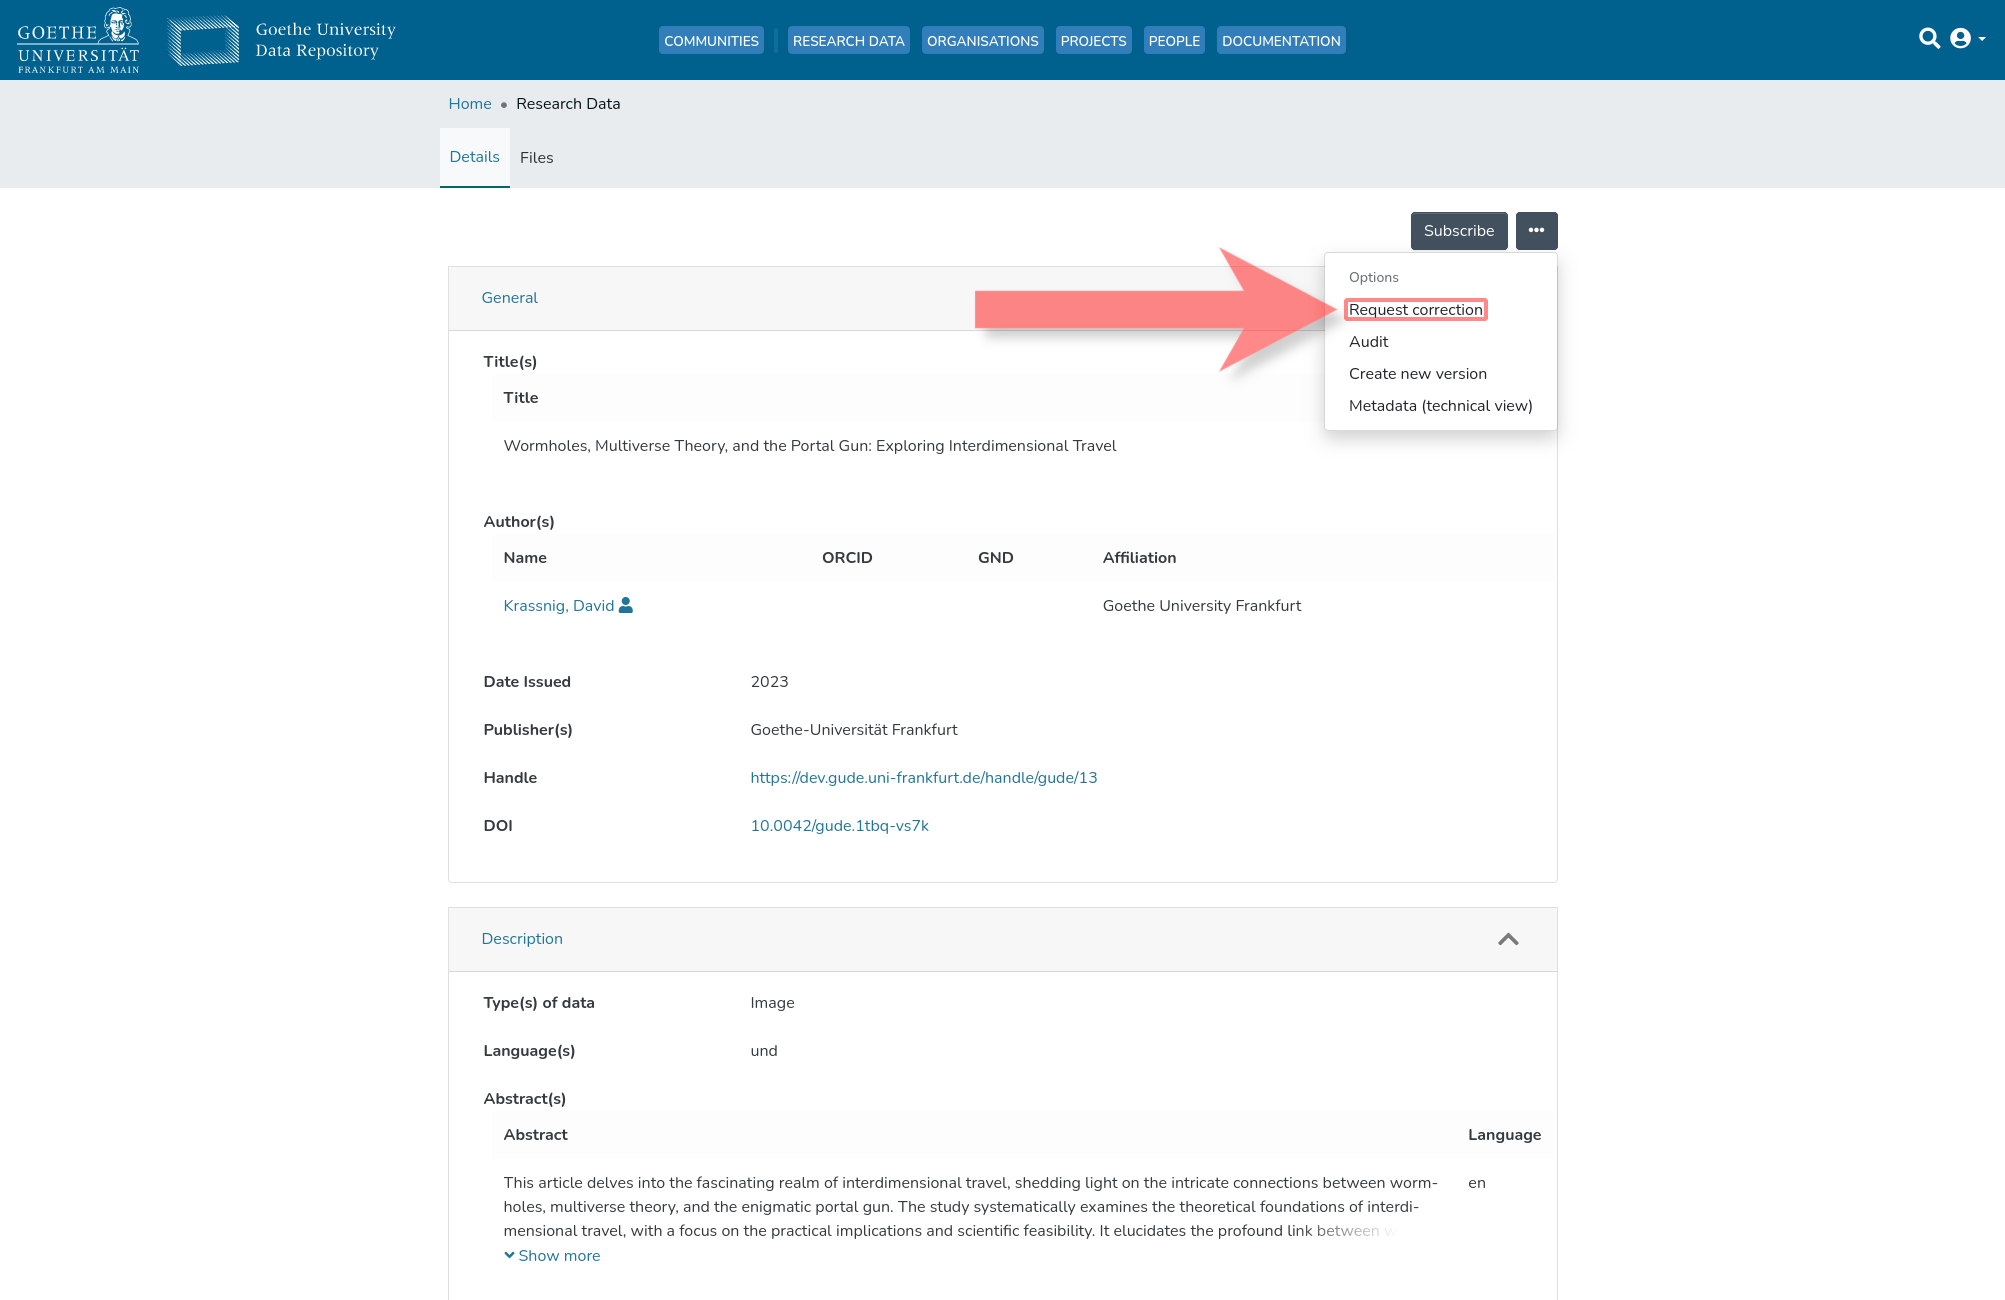
3.1. Clicking on the Three Horizontal Dots at the Top Right
After selecting the research dataset, a new page with further information opens. Here, '···' is to be selected.

3.2. Clicking on 'Request correction'
Next, 'Request correction' must be clicked.
3.3. Reading the Instructions and Clicking on 'Continue'
In the ensuing form, after reading the instructions, 'Continue' is to be clicked.

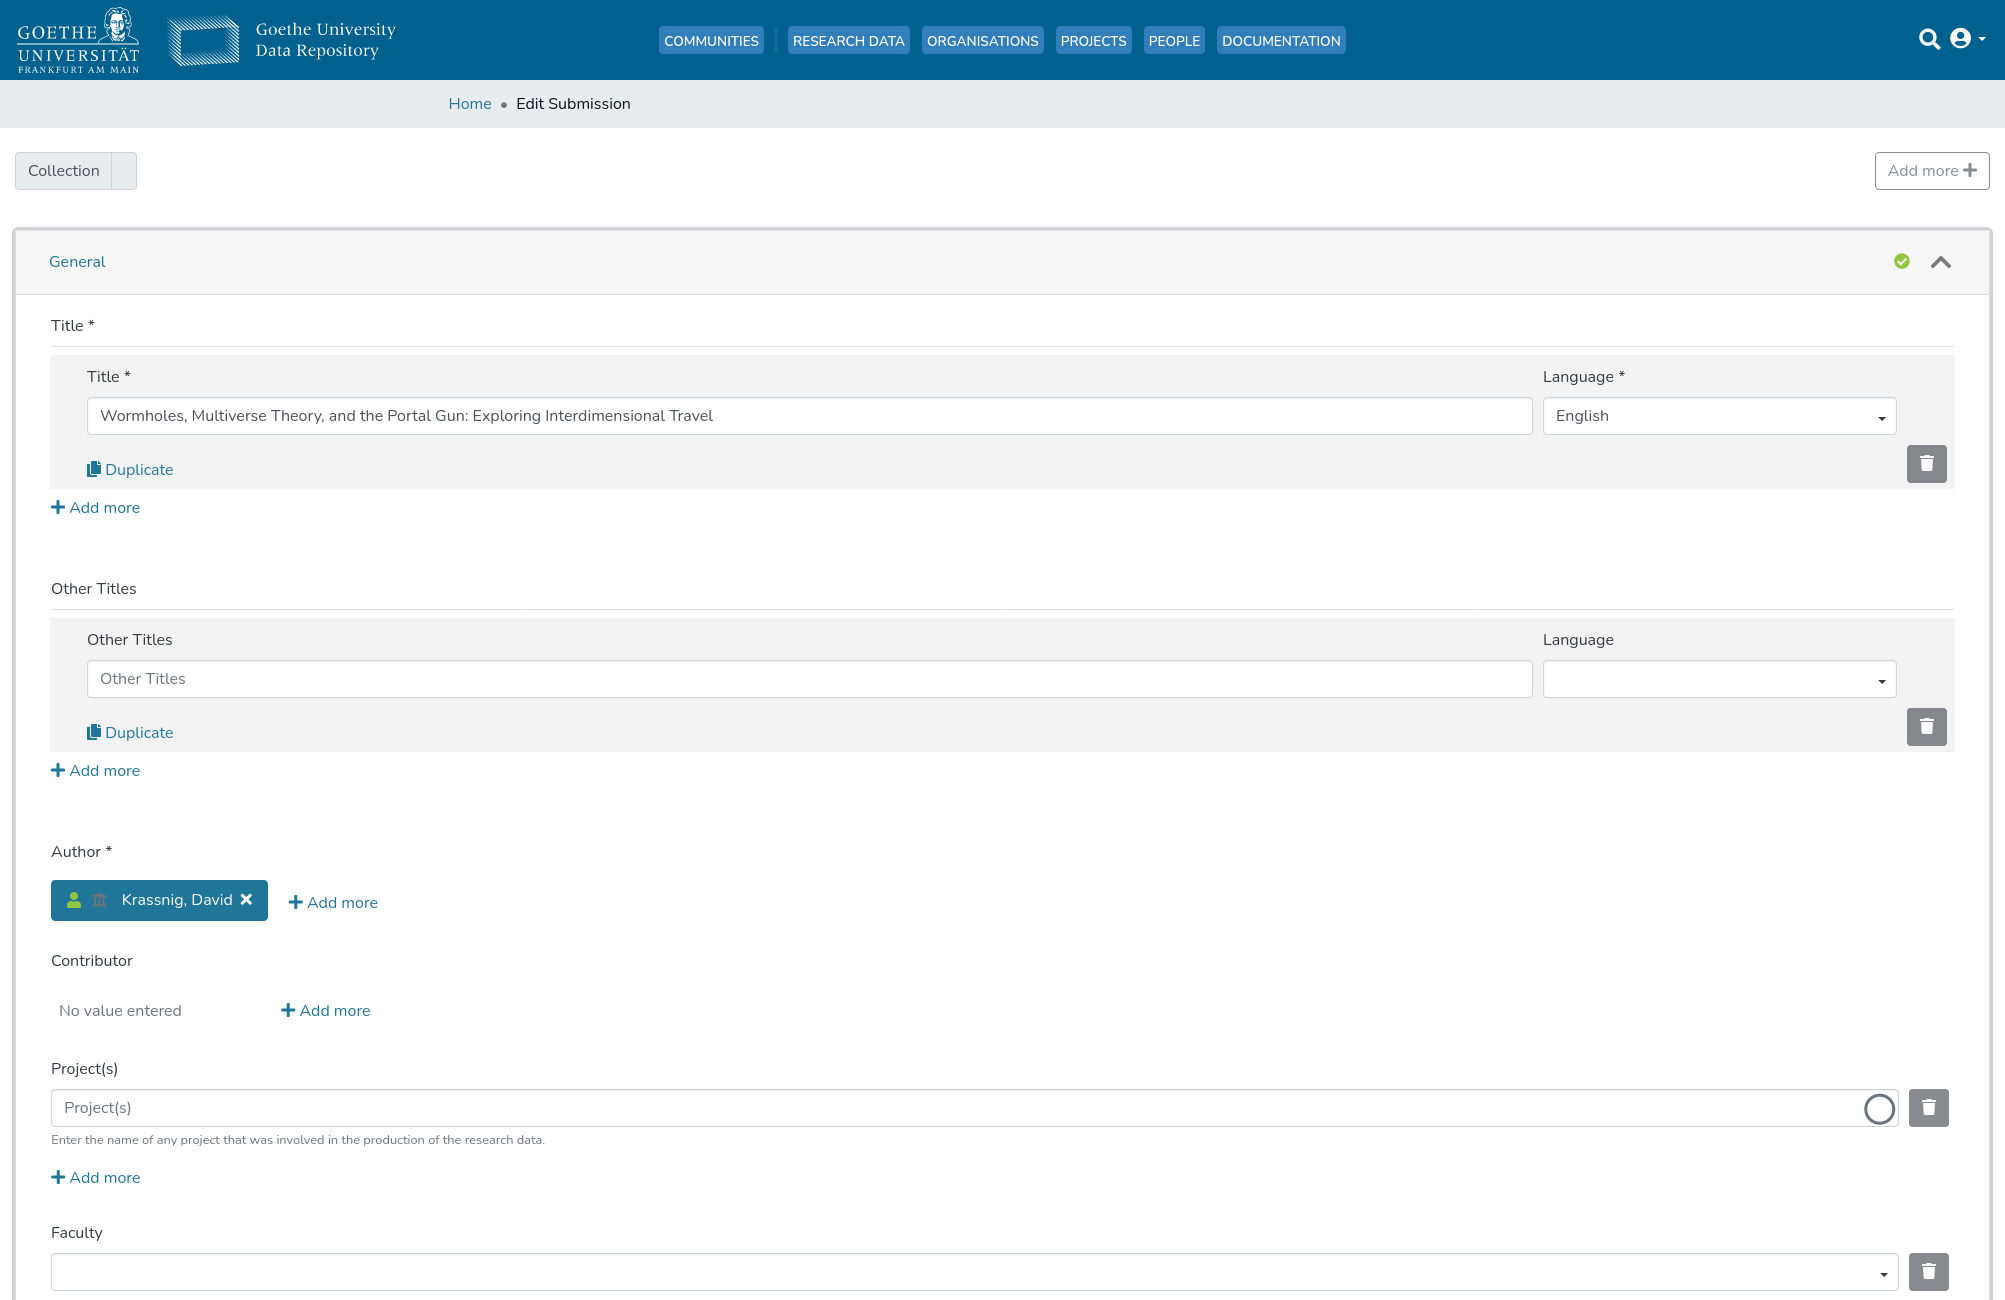
4. Editing the Correction Request Form
In the ensuing form, the existing details of the research data submission are displayed. These can now be edited akin to a new submission (excluding the addition of new research data). For more details, please refer to the corresponding step-by-step guide for new data submissions.
5. Submission of the Submission Form
Once all desired edits to the research dataset have been made, the correction can be requested by clicking on the 'Submit' element.
Create a New Organisation
1. Navigate to 'MyGude'
1.1. Click on the Profile Icon at the Top Right
To access 'MyGUDe', the profile icon at the top right must first be clicked.
1.2. Select 'MyGude'
After clicking on the profile icon, a menu opens. 'MyGUDe' is to be selected here.
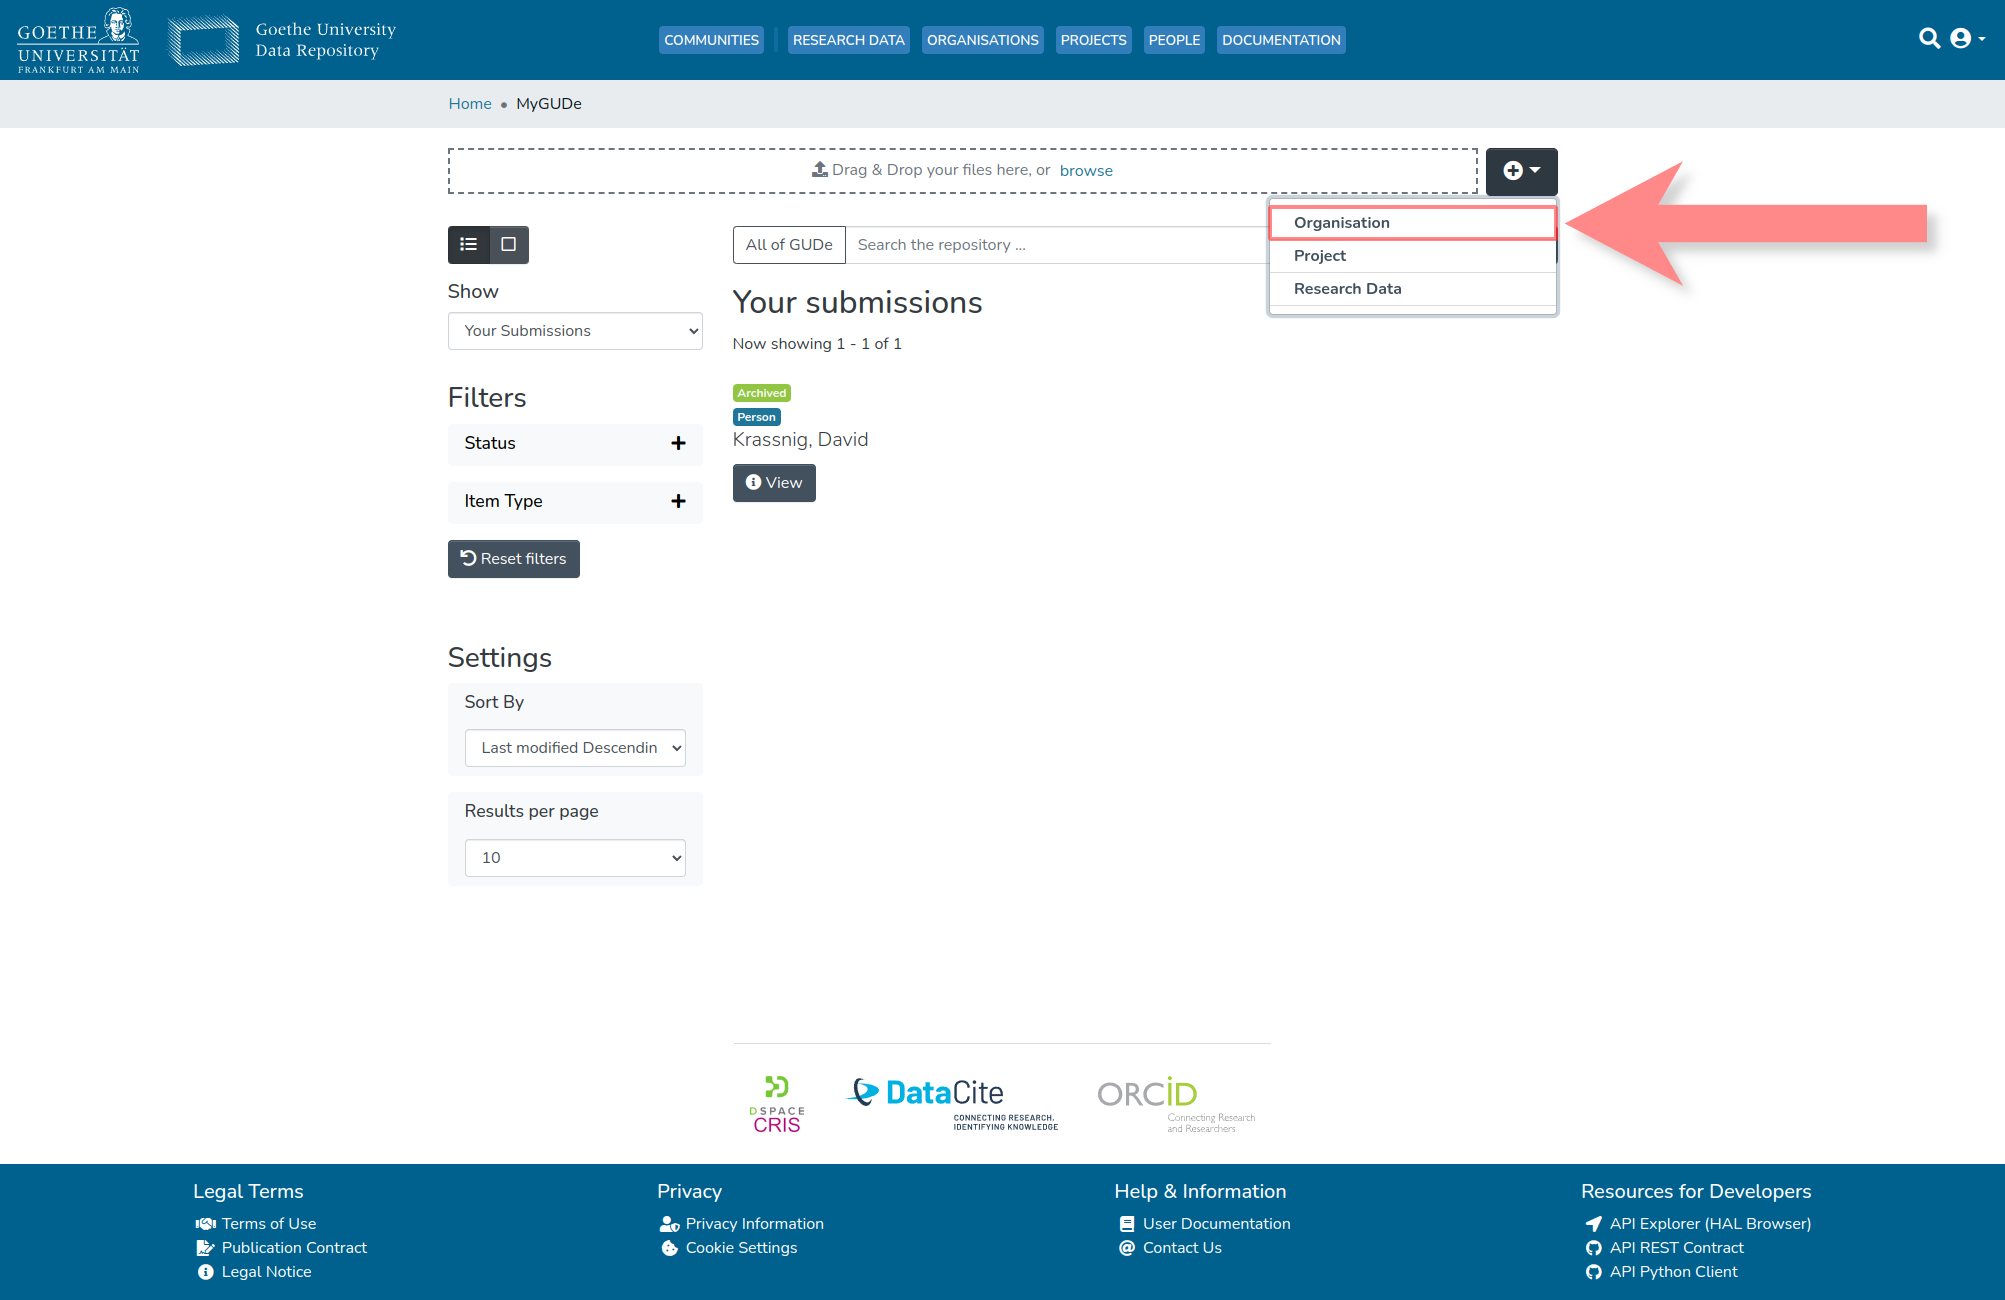
2. Submit a New Organisation
2.1. Click on the Plus Icon (⊕) at the Top Right
To create a new submission of any kind, the highlighted plus icon must first be clicked.
2.2. Select 'Organisation'
After clicking on the plus icon, a menu appears. 'Organisation' is to be selected here.
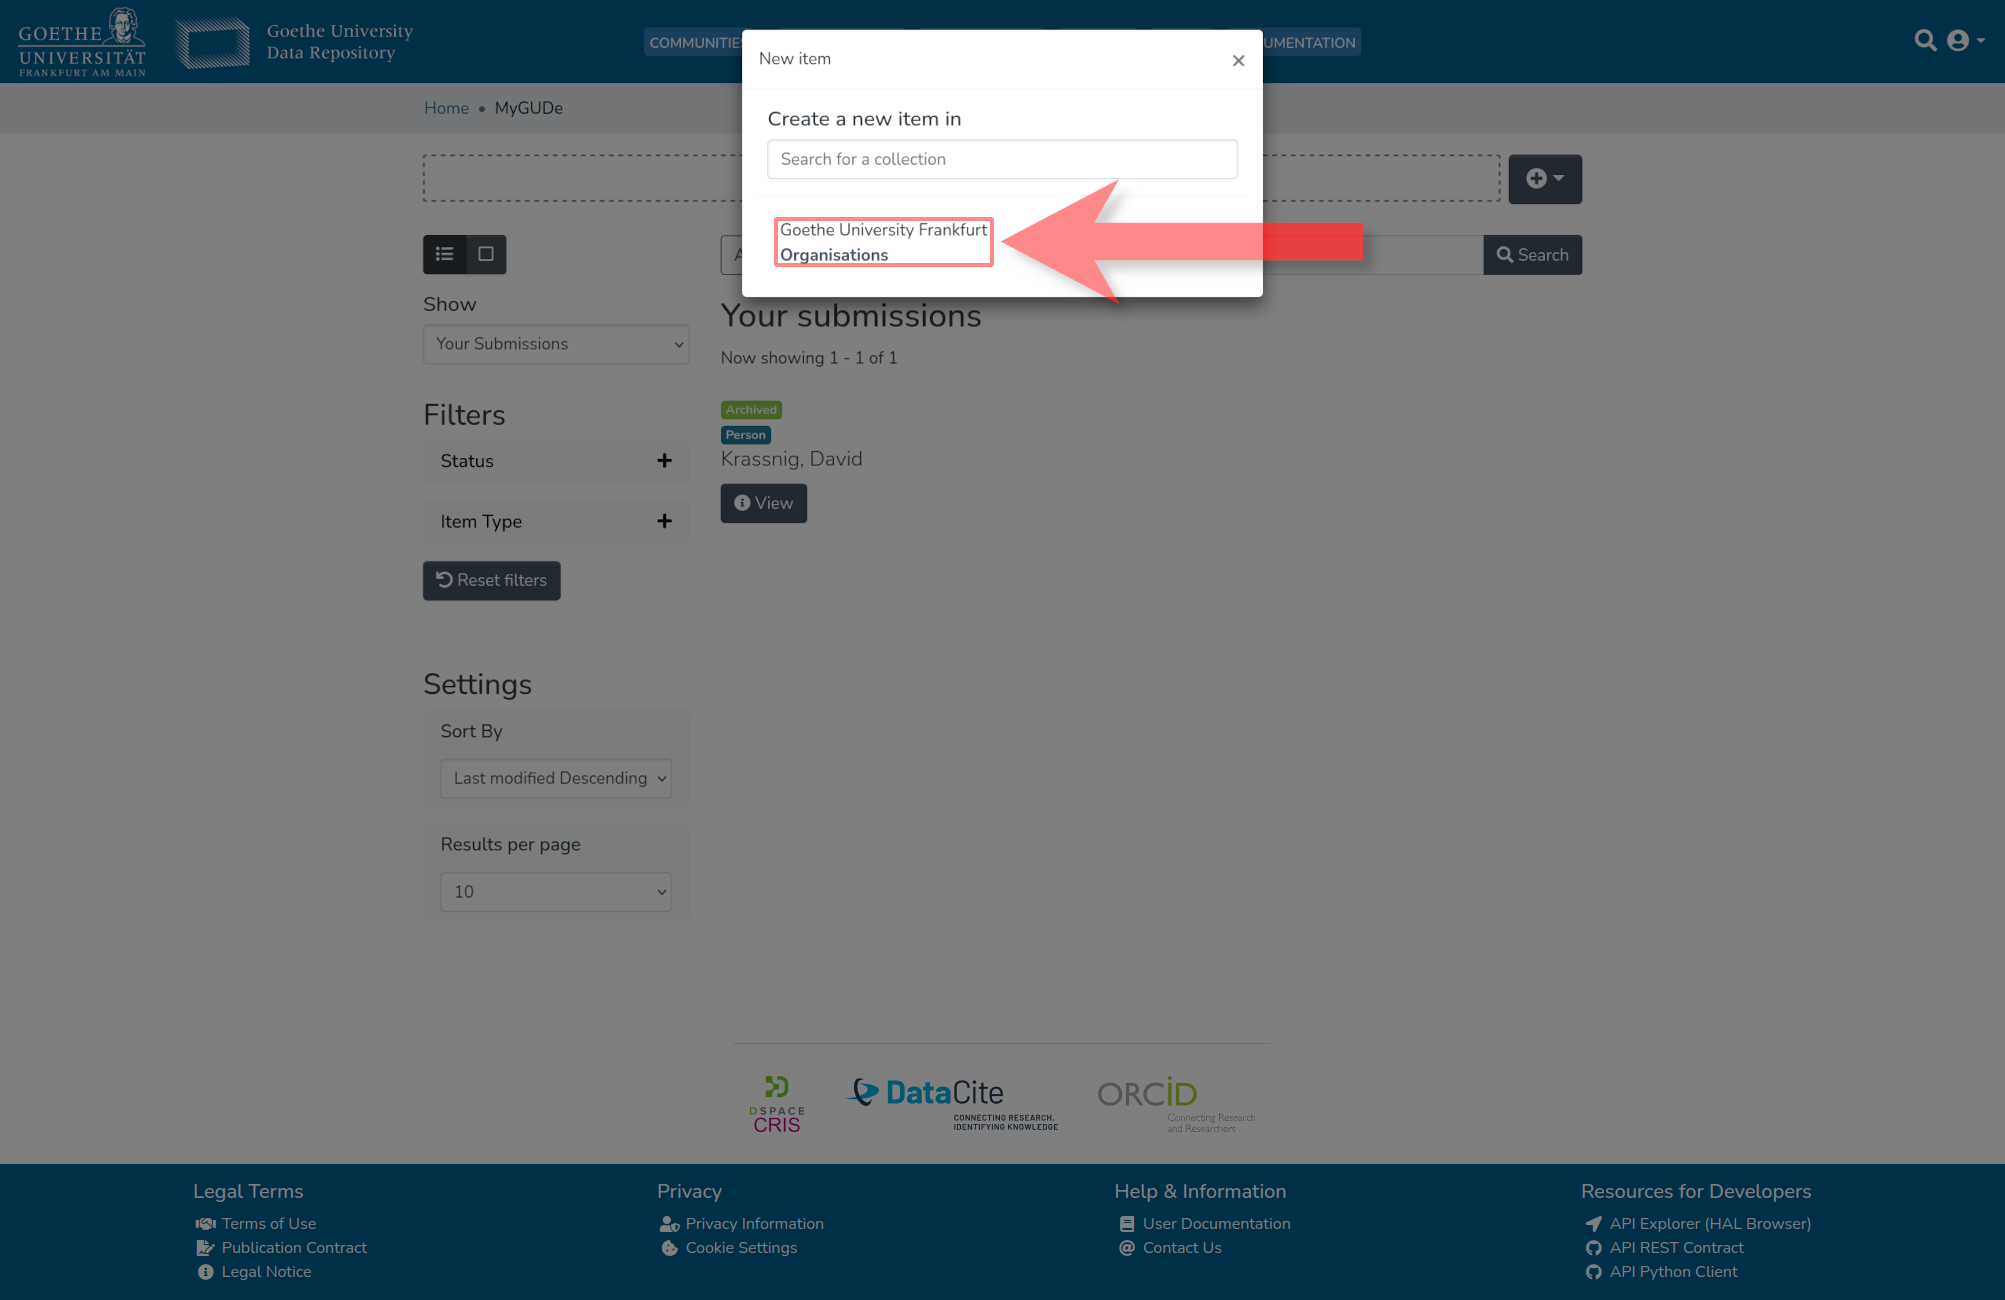
2.3. (OPTIONAL) Search for the Desired Collection
If the submission should be associated with a collection that is not directly displayed, the name of the desired collection can be searched for in the highlighted area to display it.

2.4. Select the Desired Collection
Once the desired collection is displayed, it can be clicked to create a new submission in that collection.
3. Enter Metadata
3.1. Enter the Name of the Organisation
In the metadata entry form that opens, the full name of the organisation must be entered in the highlighted area.

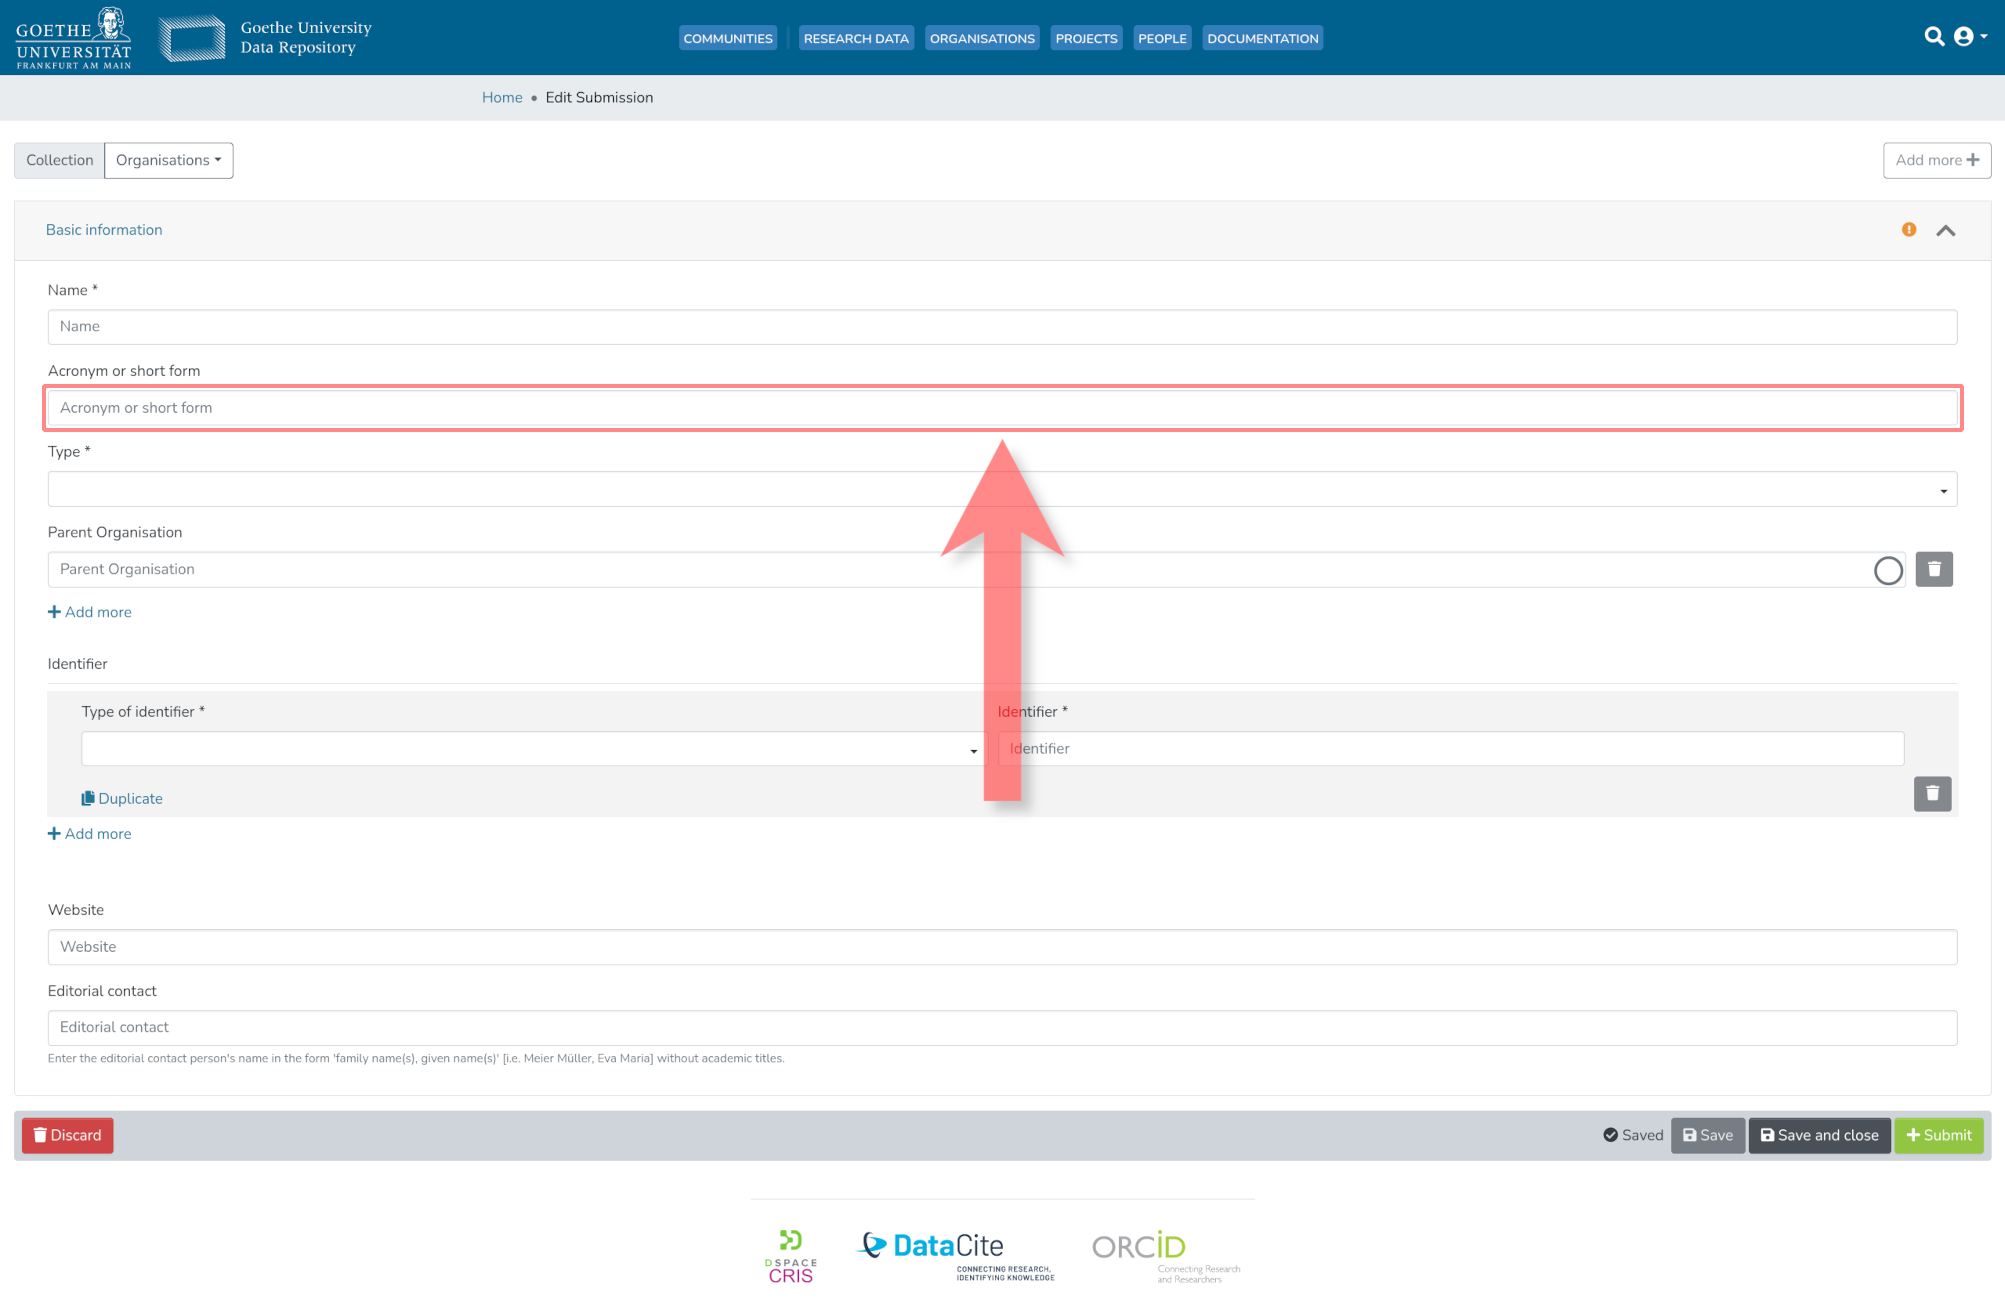
3.2. (OPTIONAL) Enter Acronym or Abbreviation of the Organisation
If there is a common acronym or abbreviation for the organisation, it can be entered in the highlighted area.
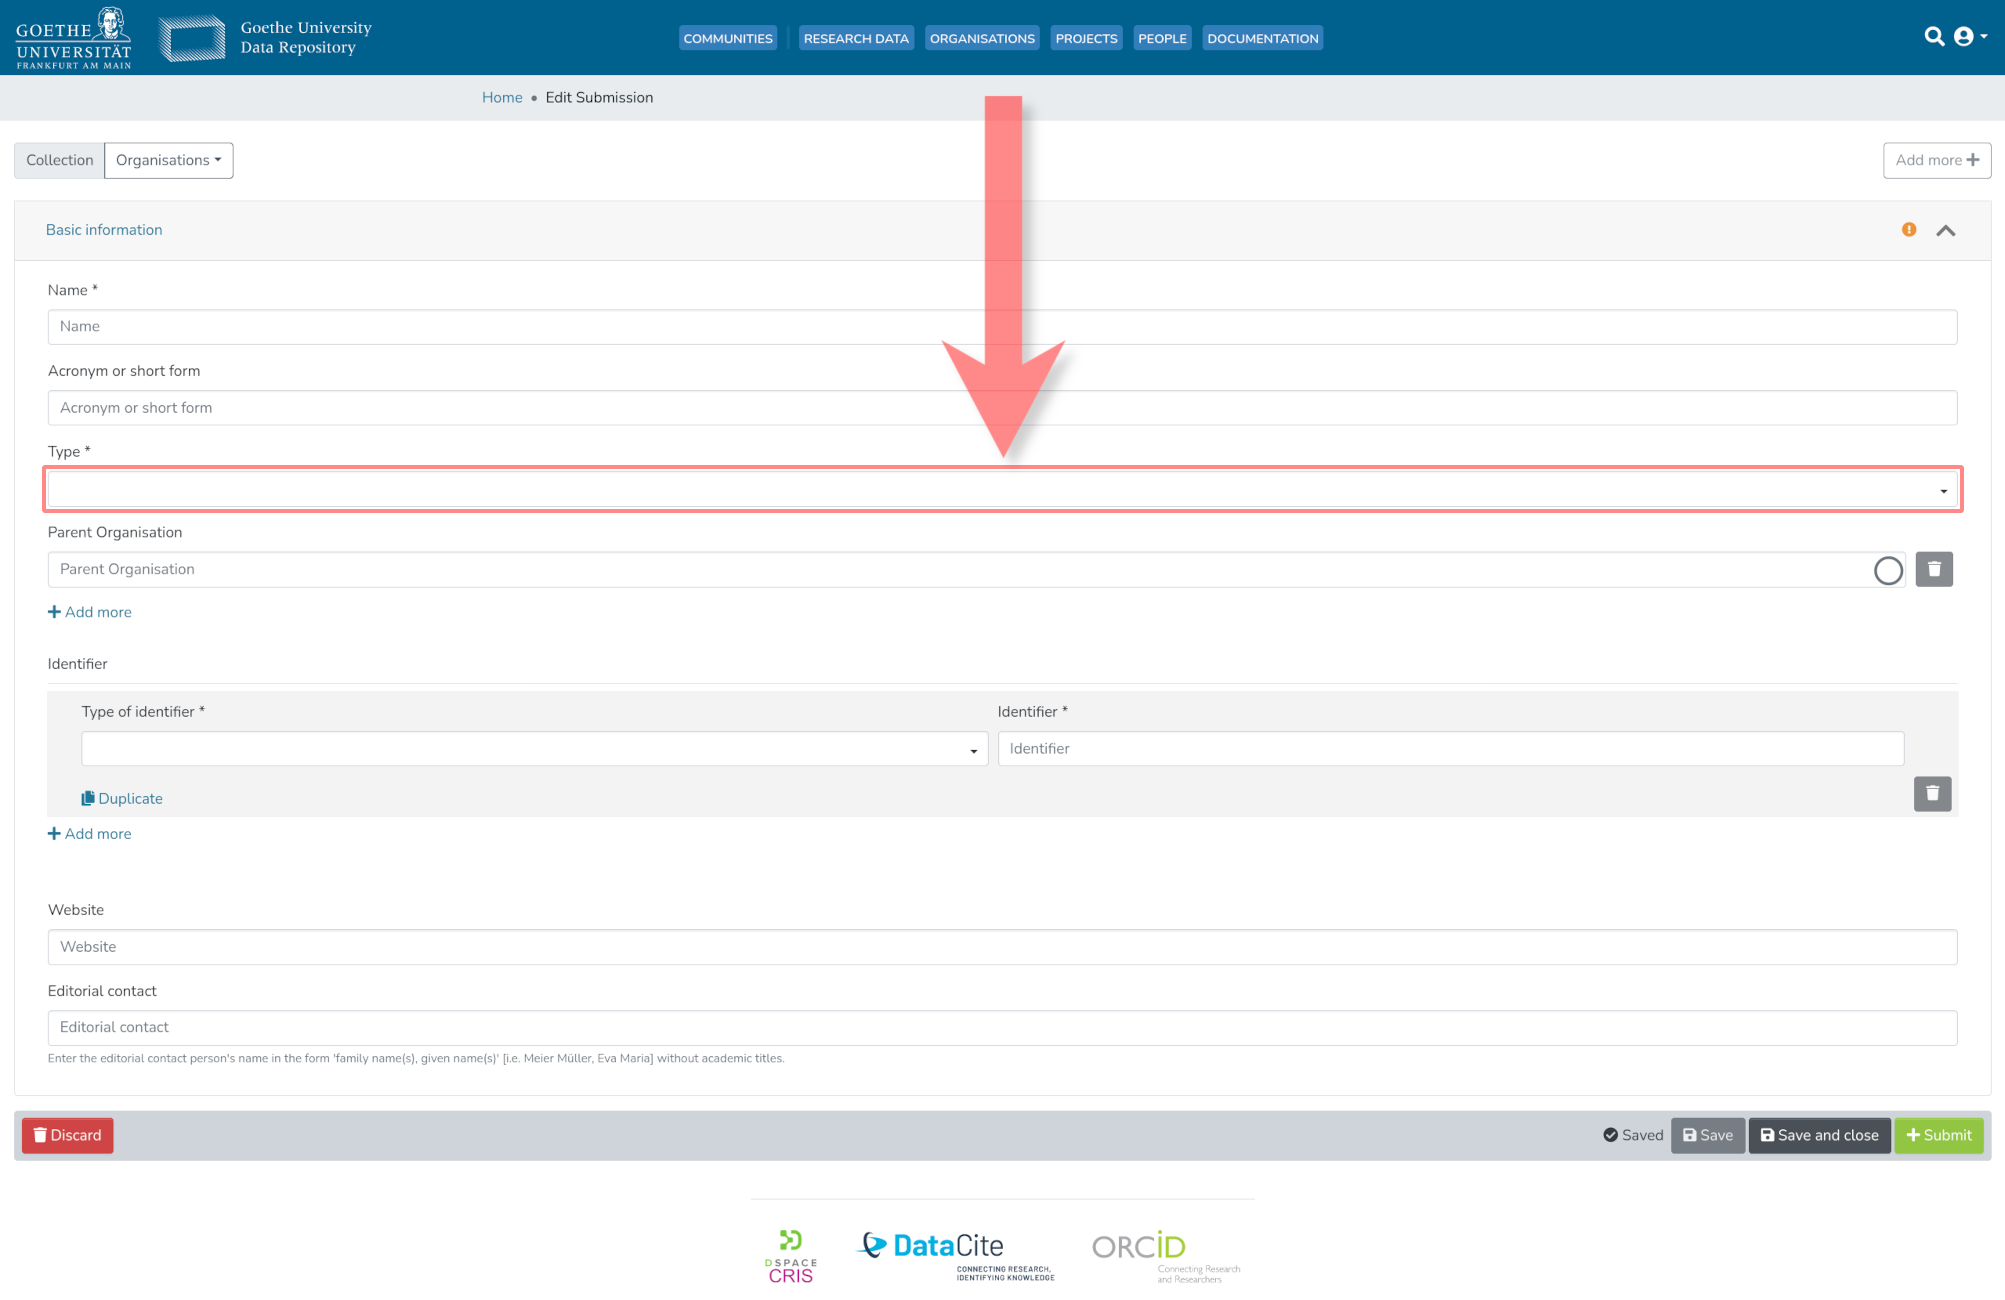
3.3. Select the Type of Project Organisation
Next, the type of organisation must be selected in the highlighted area.
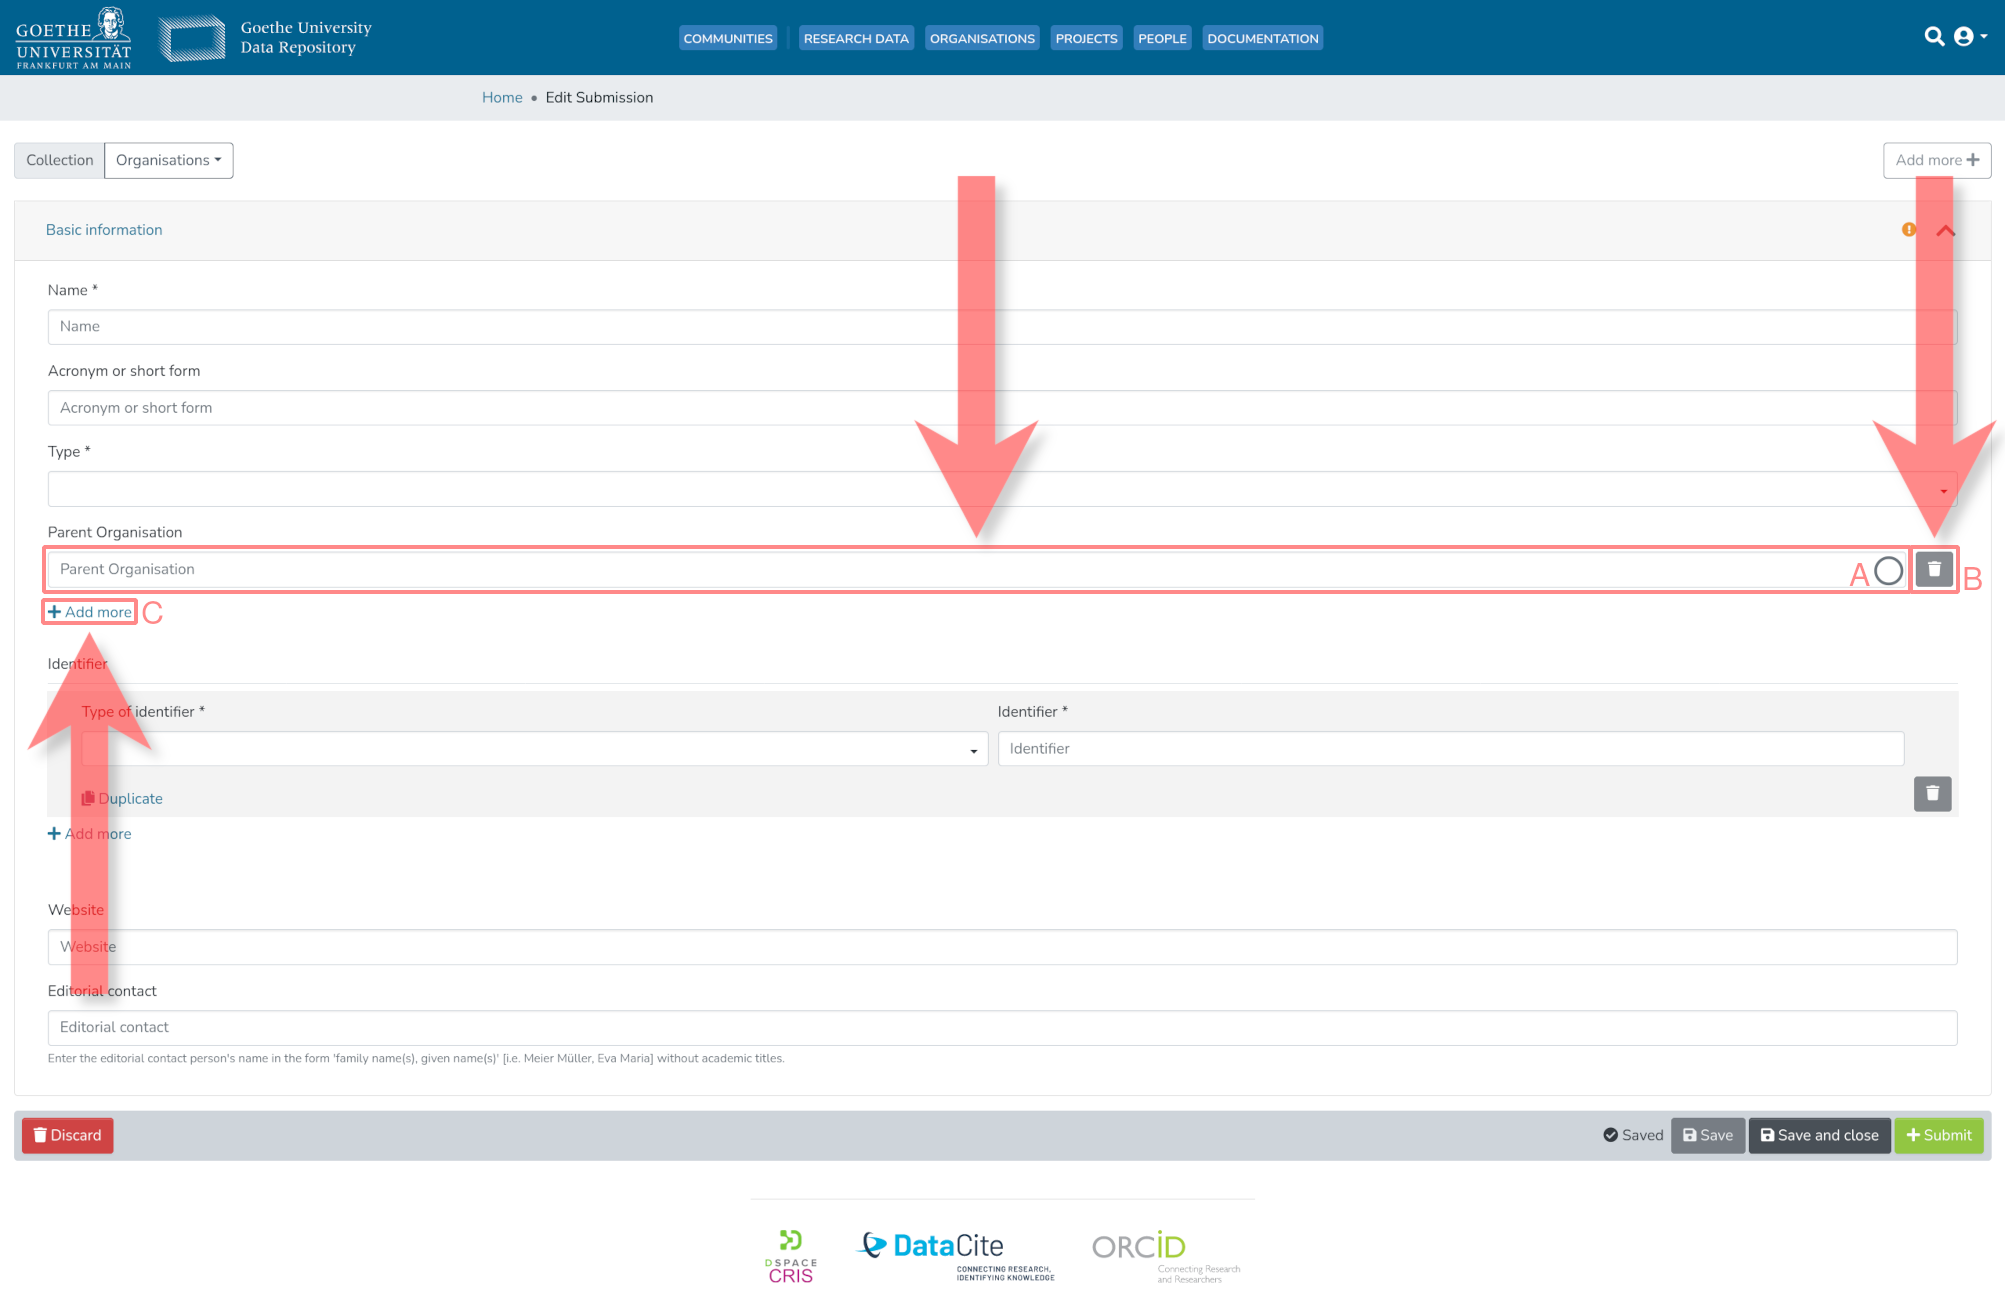
3.4. (OPTIONAL) Enter Parent Organisation
If applicable, the organisations directly superior to this organisation should be entered here. A successful link with the corresponding dataset in GUDe is indicated by a green circle. Additional organisations can be added by clicking on (C). To delete an existing entry, click on (B).
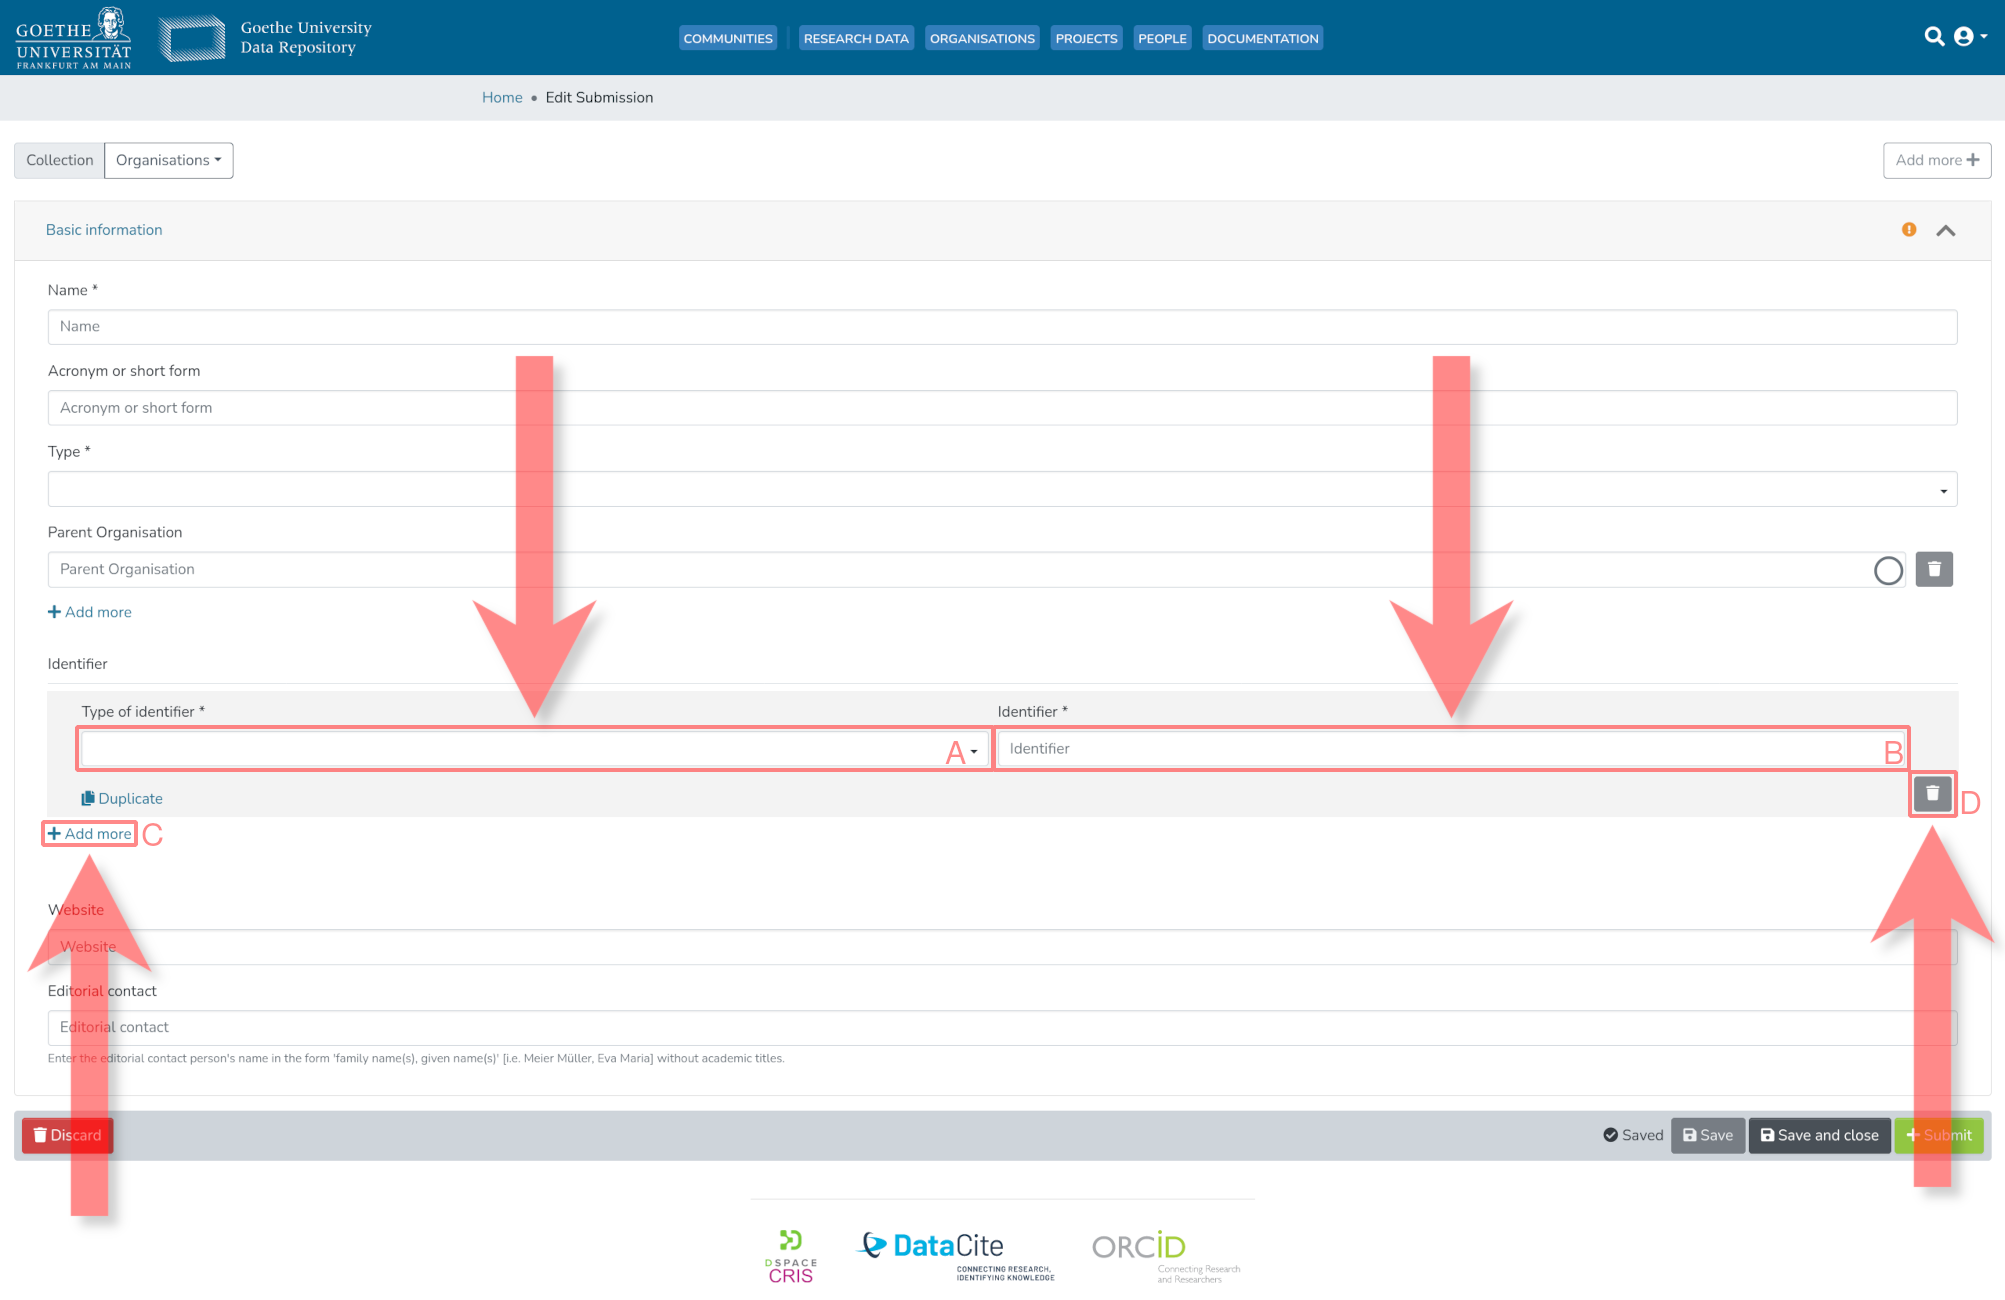
3.5. (OPTIONAL) Enter Identification Identifiers
If available, identification identifiers of the organisation can be entered here (available identifiers include GND-ID, Wikidata ID, and ROR ID (Research Organisation Registry)). Select the type of identification identifier in (A) and enter the corresponding value in (B). Additional identification identifiers for the organisation can be added with (C). To delete entries, click (D).
3.6. (OPTIONAL) Enter Website
If available, the address of the organisation's primary website can be entered in the highlighted area.

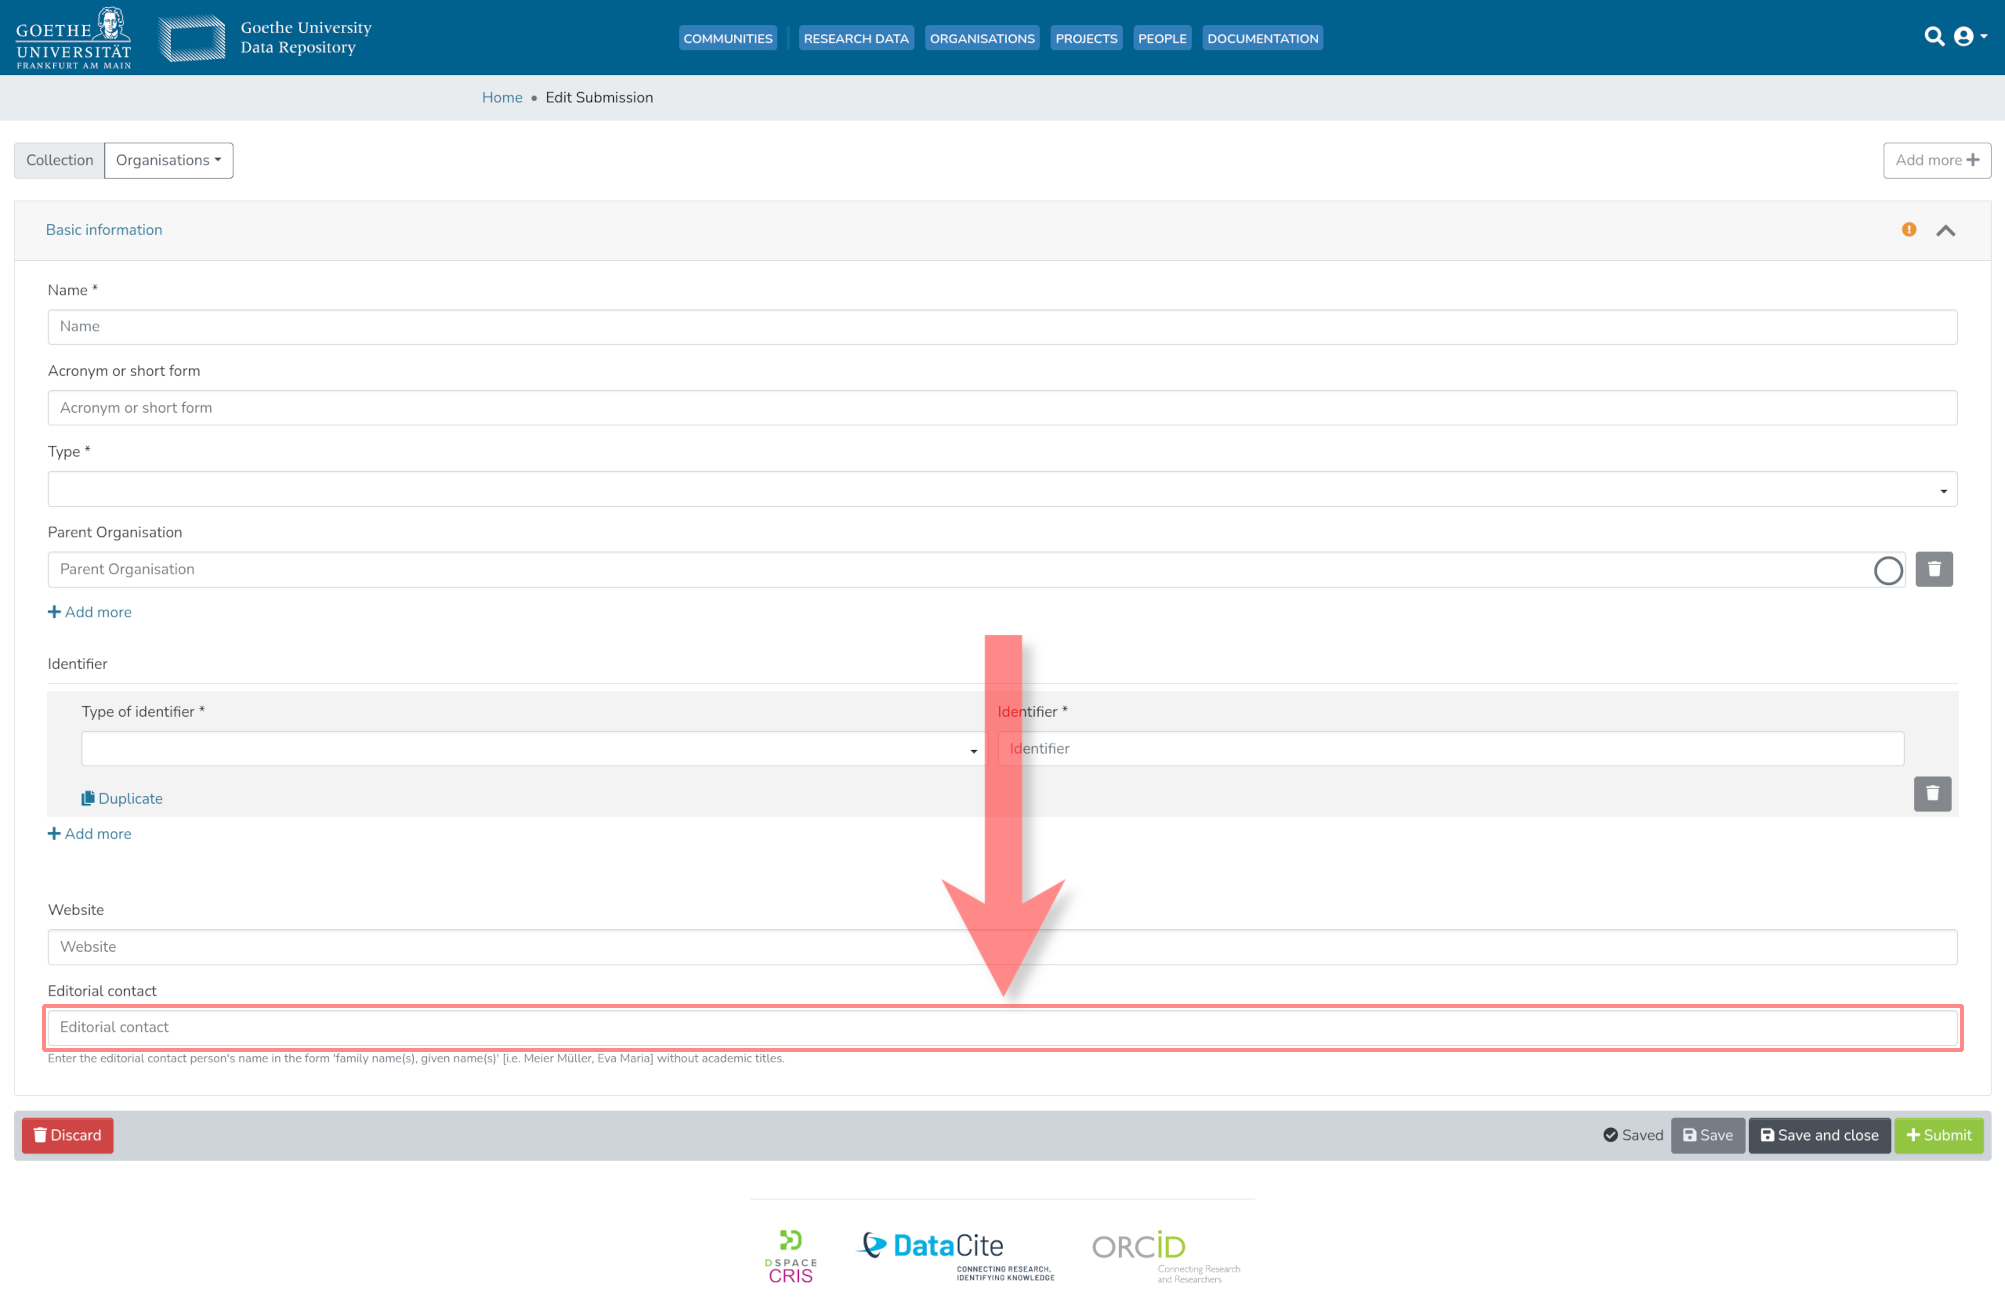
3.7. (OPTIONAL) Enter Editorial Contact Person
If there is a designated editorial contact person, they should be entered
in the highlighted field.
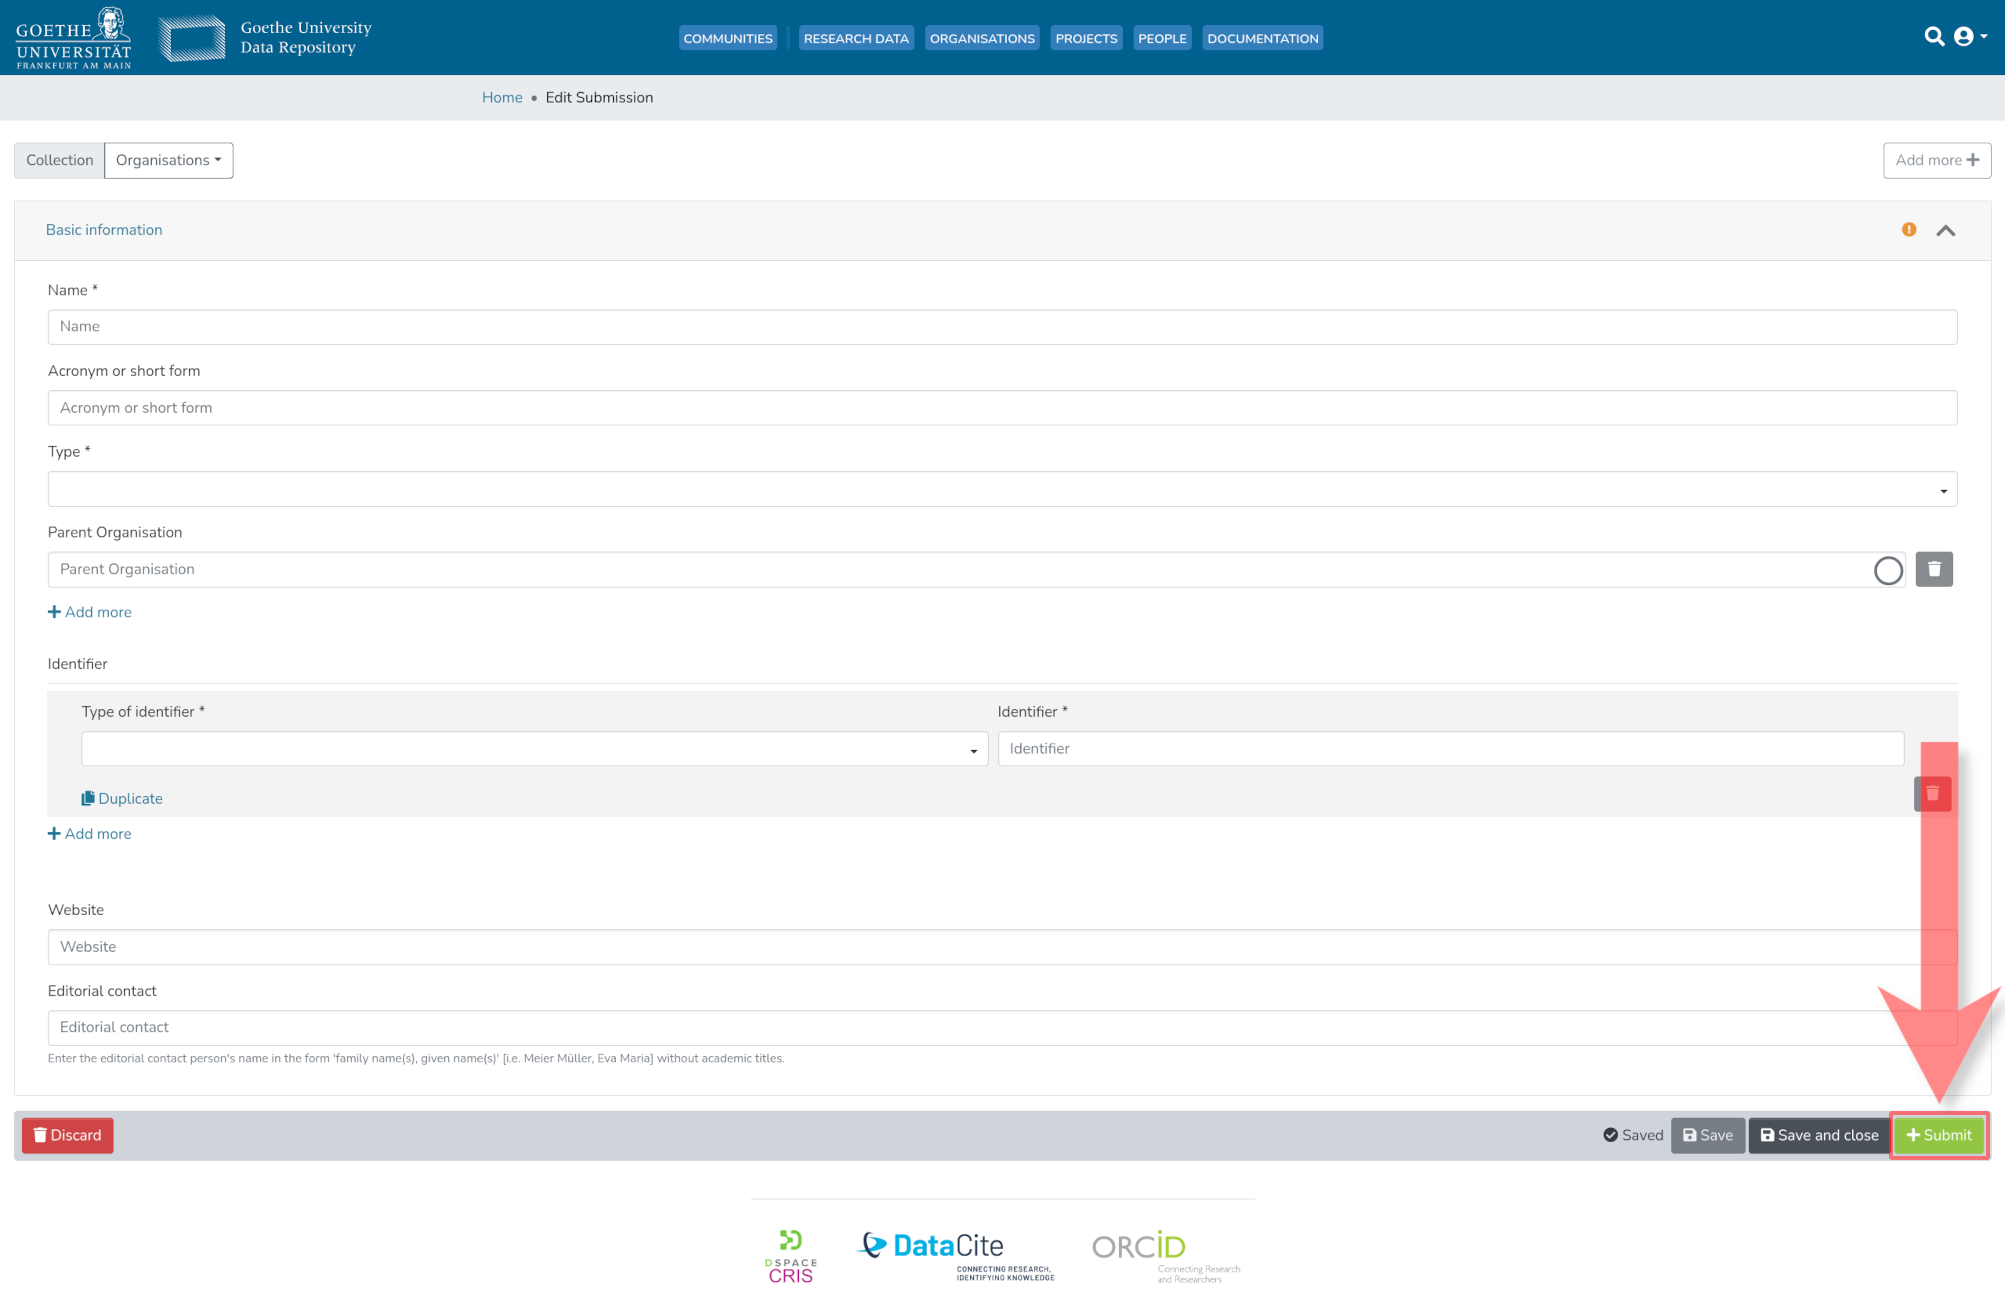
4. Submit the Submission Form
If all desired metadata has been provided, the marked element '+Submit' can now be selected. This will submit the submission to the editorial team.
Create a New Project
1. Navigate to 'MyGude'
1.1. Click on the Profile Icon at the Top Right
To access 'MyGUDe', the profile icon at the top right must be clicked first.
1.2. Select 'MyGude'
After clicking on the profile icon, a selection opens. 'MyGUDe' should be selected here.
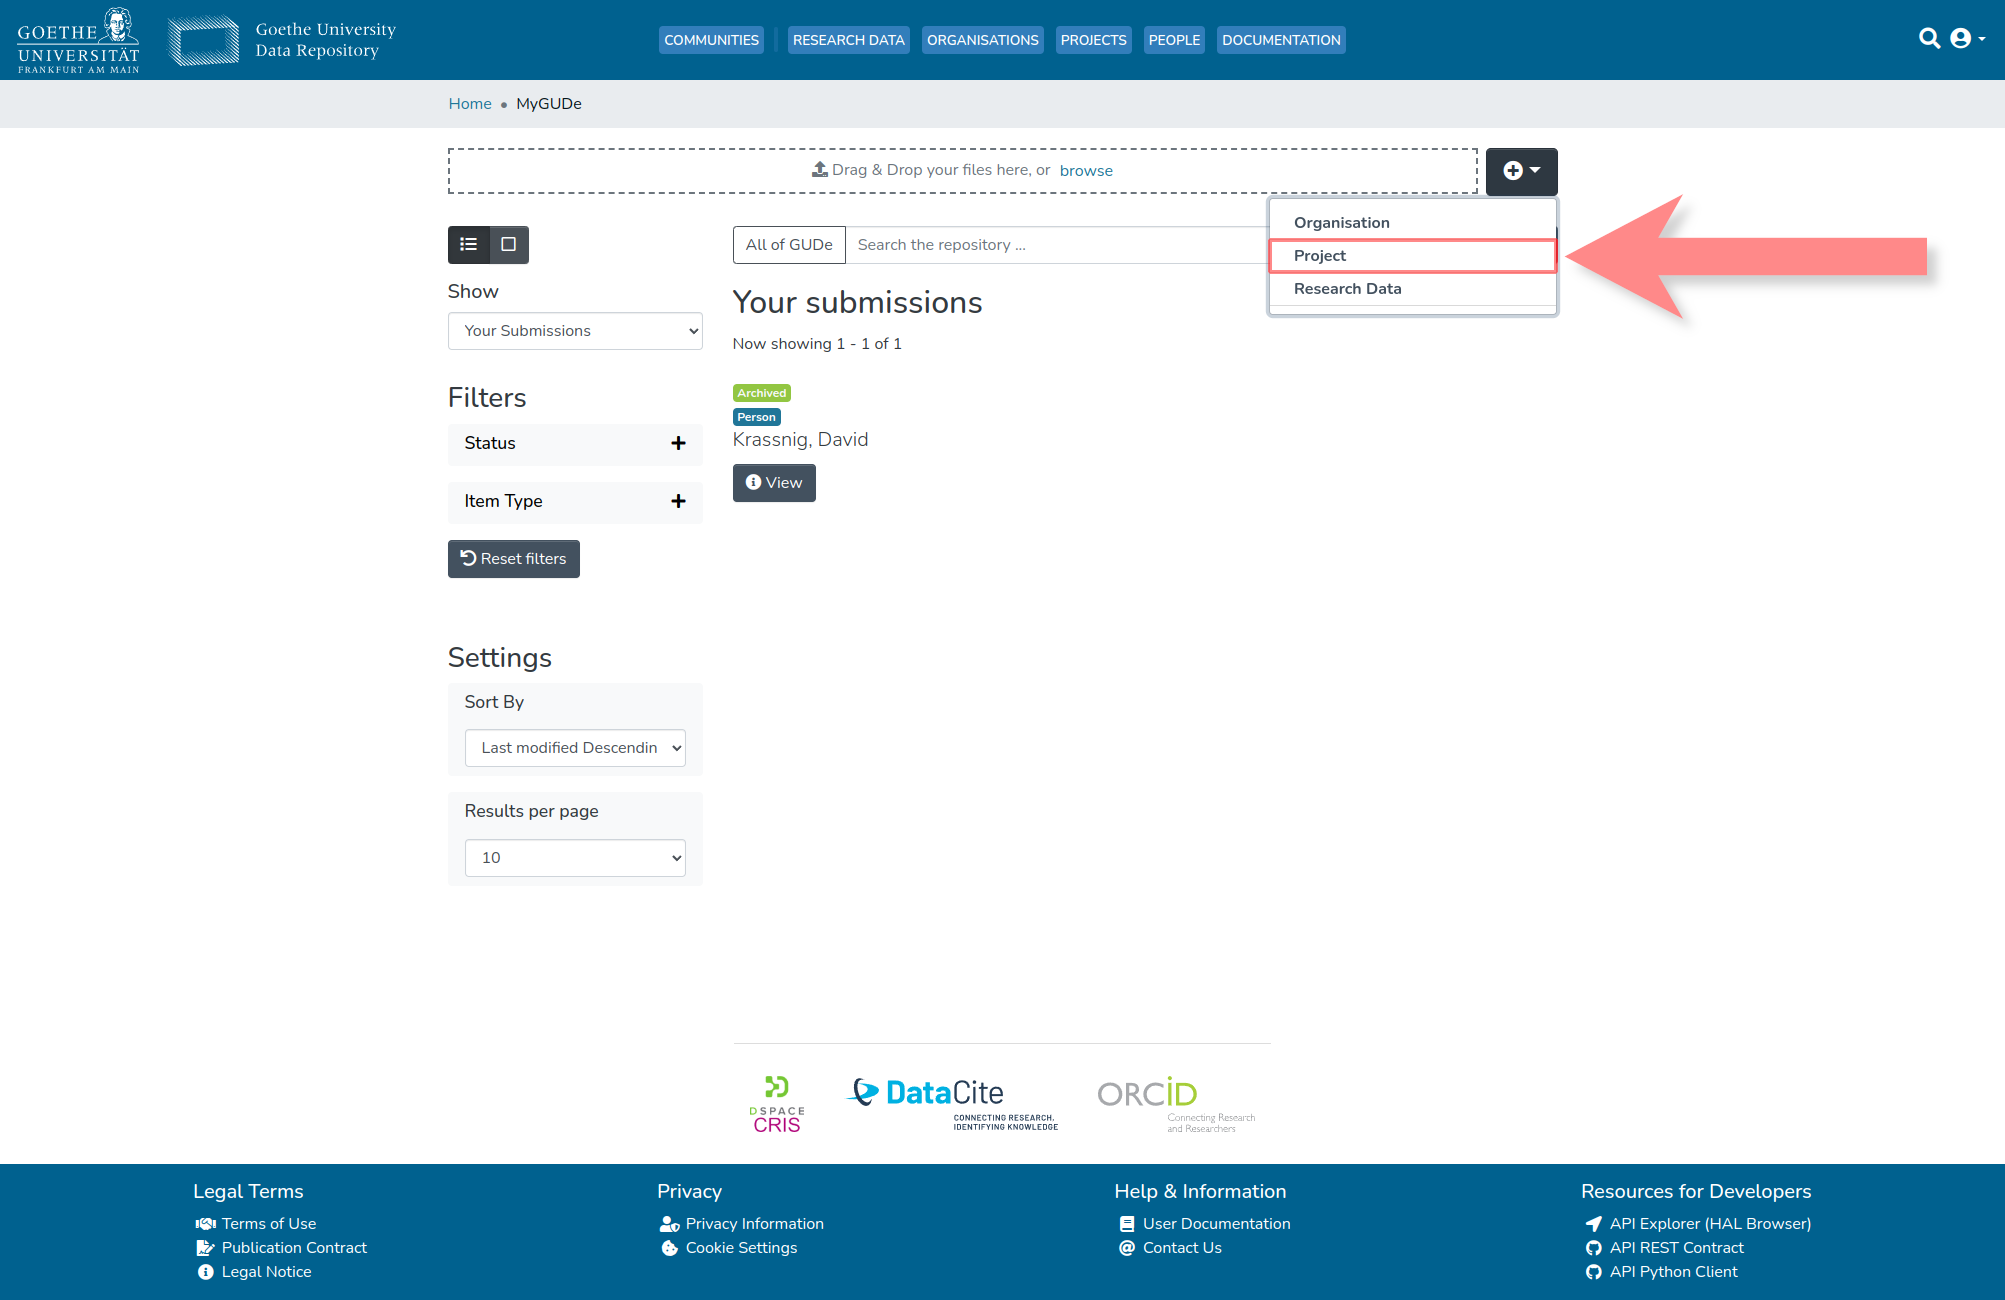
2. Submit a New Project
2.1. Click on the Plus Icon (⊕) at the Top Right
To create a new submission of any kind, click on the highlighted plus icon first.
2.2. Select 'Project'
After clicking on the plus icon, a selection opens. 'Project' should be selected here.
2.3. (OPTIONAL) Search for the Desired Collection
If the submission should be associated with a collection not directly displayed, search for the desired collection's name in the highlighted area to display it.
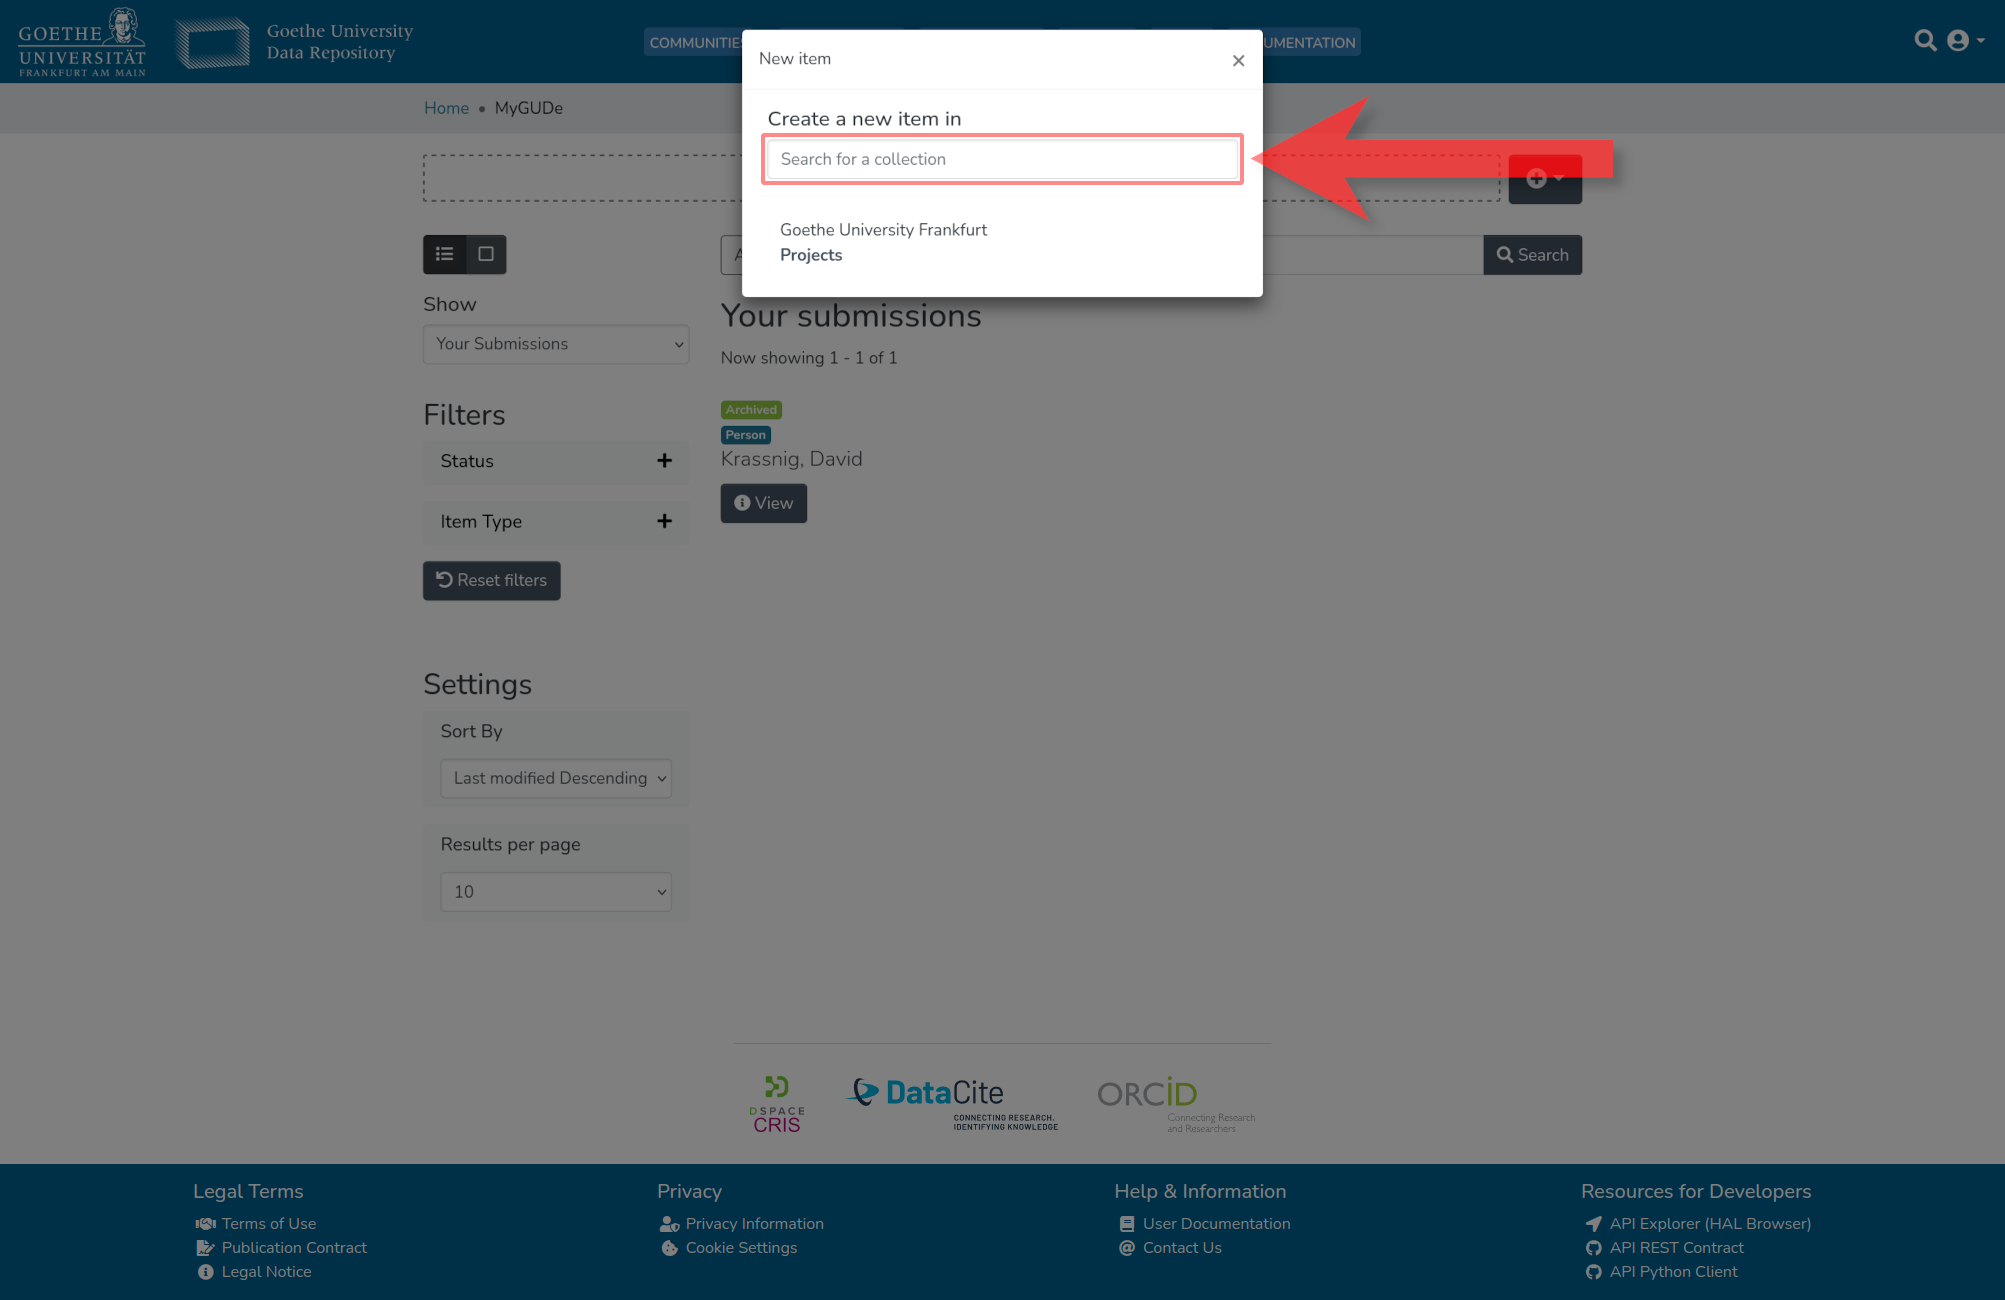
2.4. Select the Desired Collection
If the desired collection is displayed, click on it to create a new submission in that collection.

3. Enter Metadata
3.1. Enter the Project Name
In the now opened metadata input mask, enter the complete name of the project in the highlighted area first.
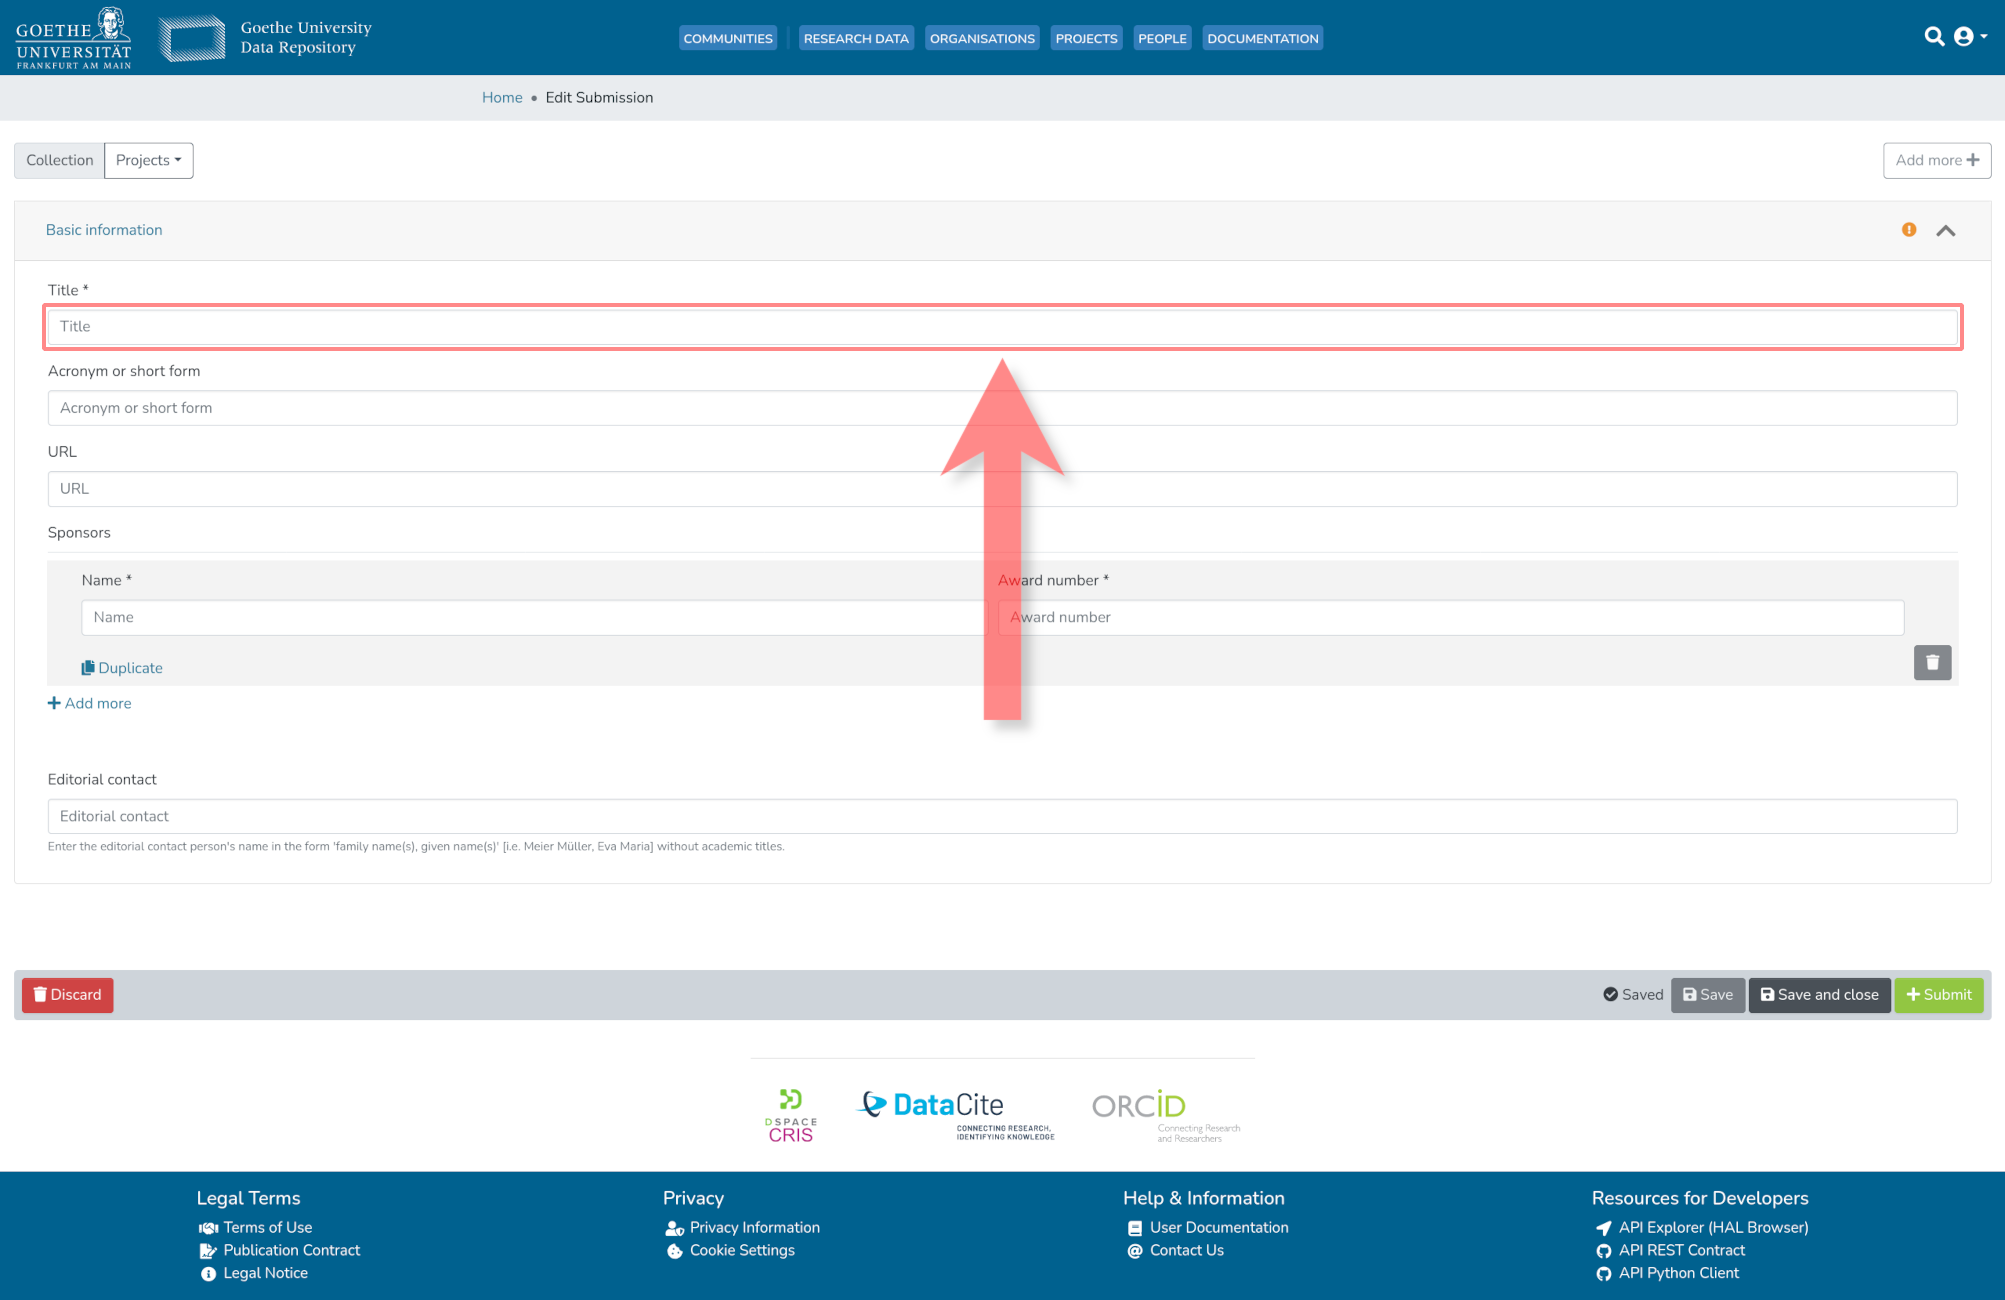
3.2. (OPTIONAL) Enter Project Acronym or Abbreviation
If there is a common acronym or abbreviation for the project, it can be entered in the highlighted area.

3.3. (OPTIONAL) Enter Project URL
If available, enter the URL for the primary website of the project in the highlighted area.
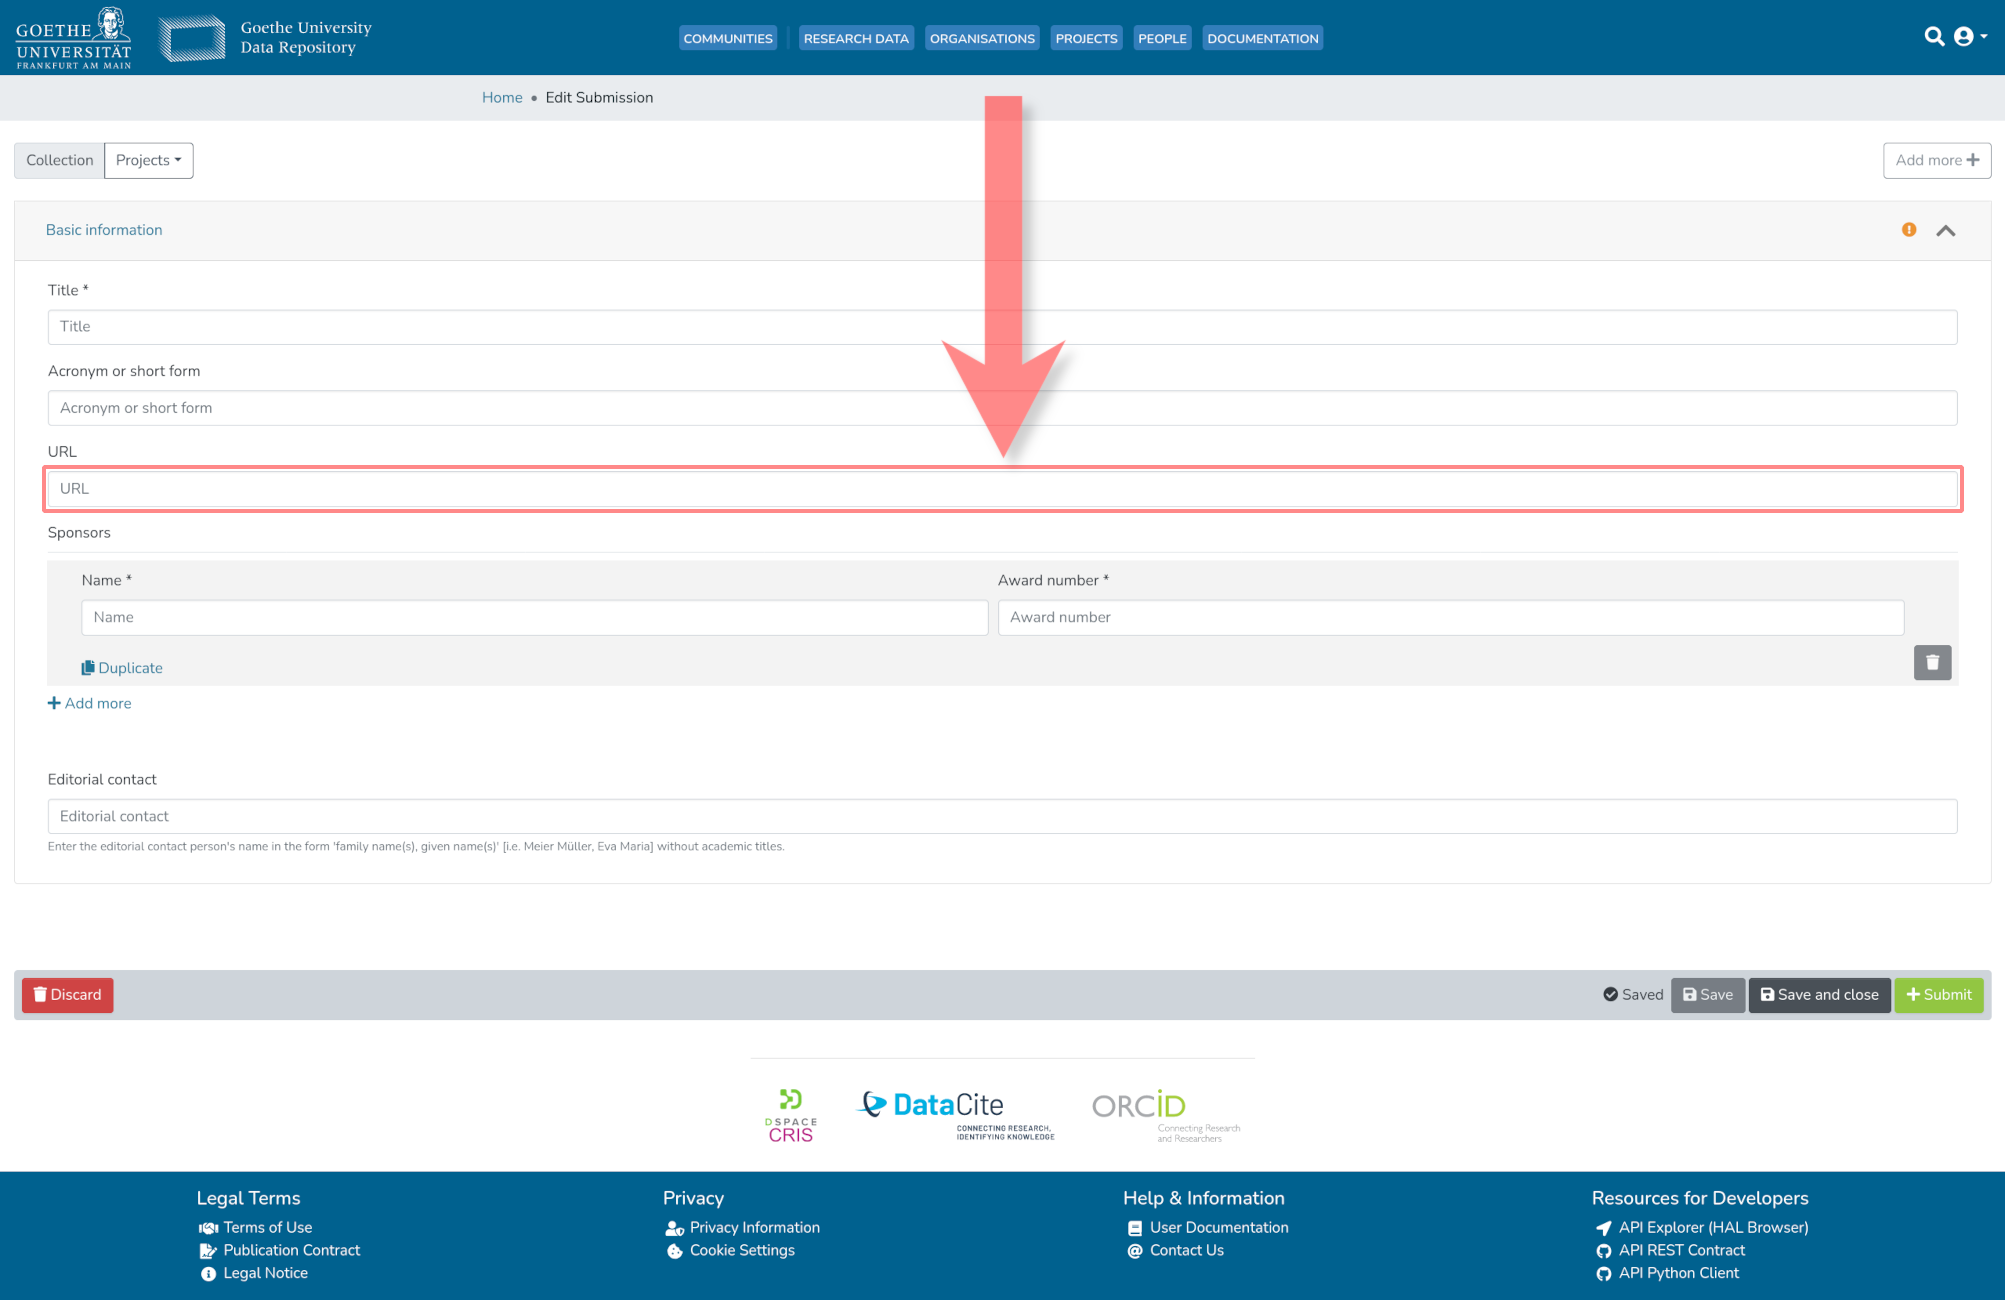
3.4. Enter Project Funding Source
Next, enter the complete name of the project's funder in (A) and the funding number under which the project is funded by the funder in (B) (e.g., the DFG project number). If there are multiple funders for the project, additional entries can be created with (C) and deleted with (D).
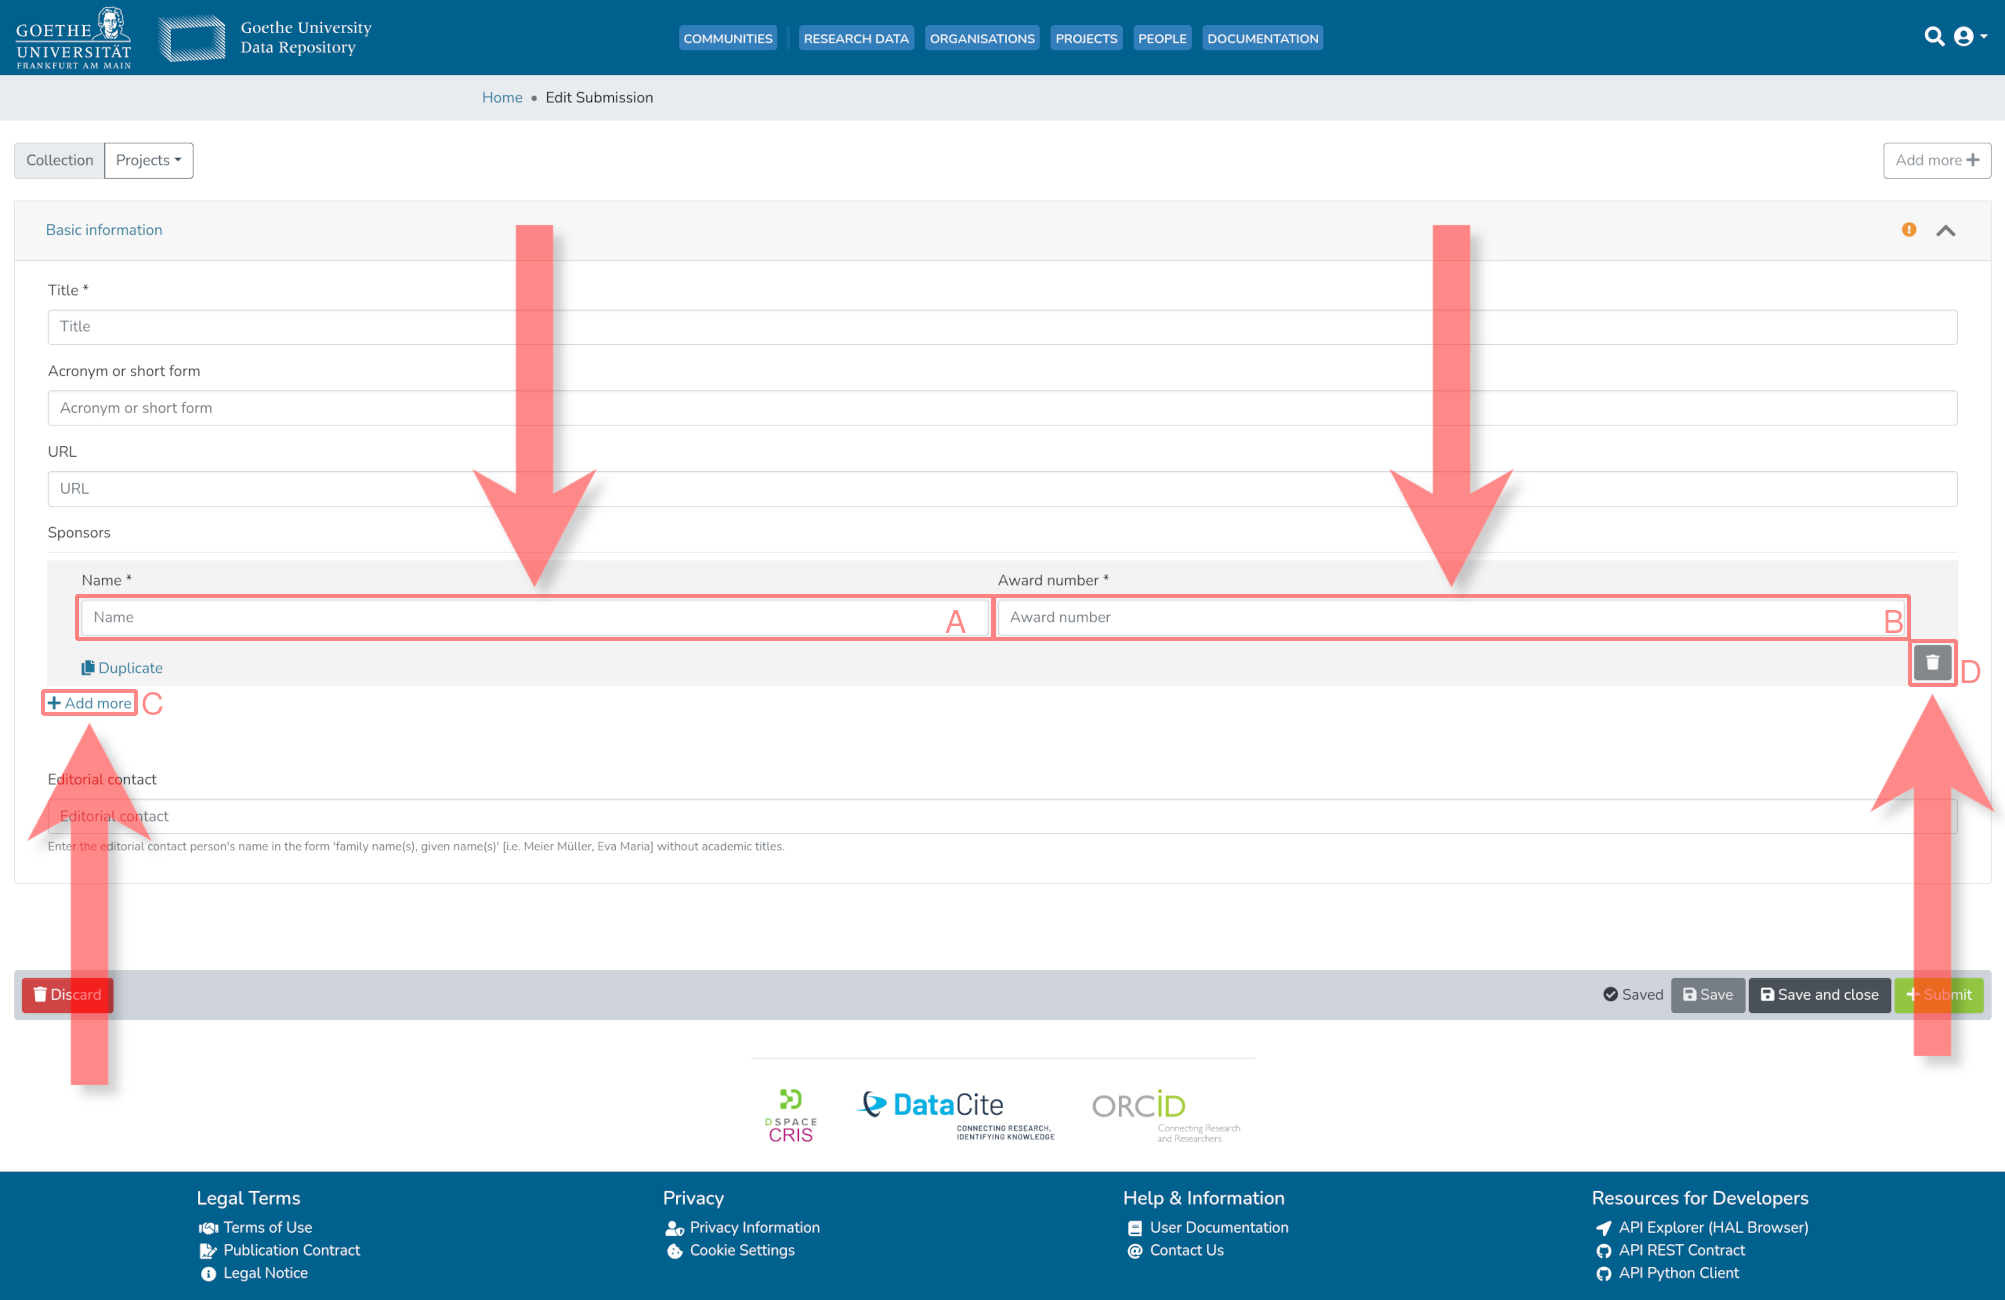
3.5. (OPTIONAL) Enter Editorial Contact Person
If there is a designated editorial contact person, they should be entered in the highlighted field.

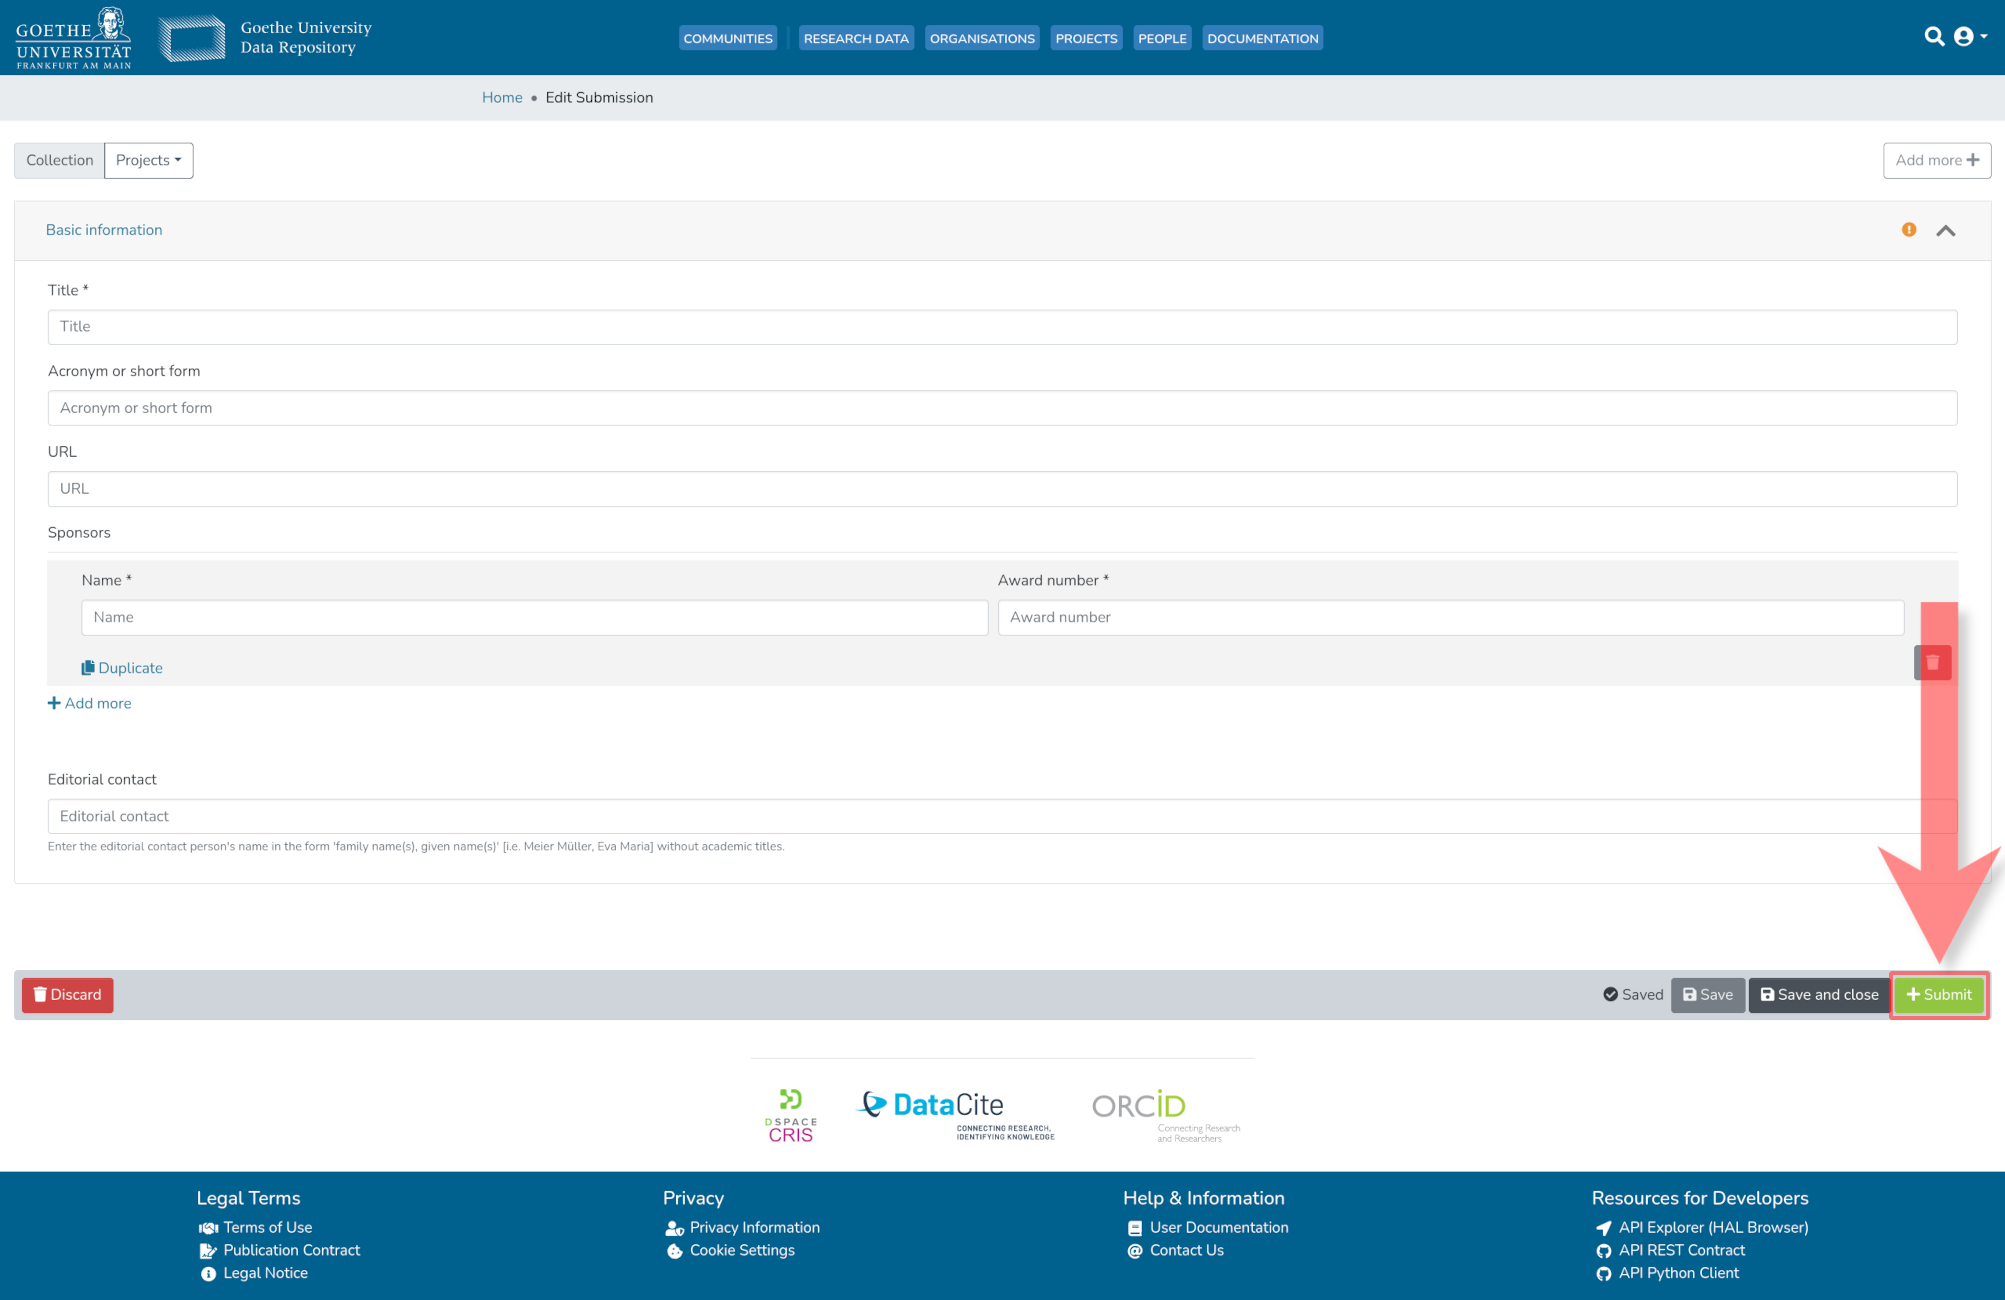
4. Submit the Submission Form
If all desired metadata has been provided, the marked element '+Submit' can now be selected. This will submit the submission to the editorial team.
Modify Personal Dataset
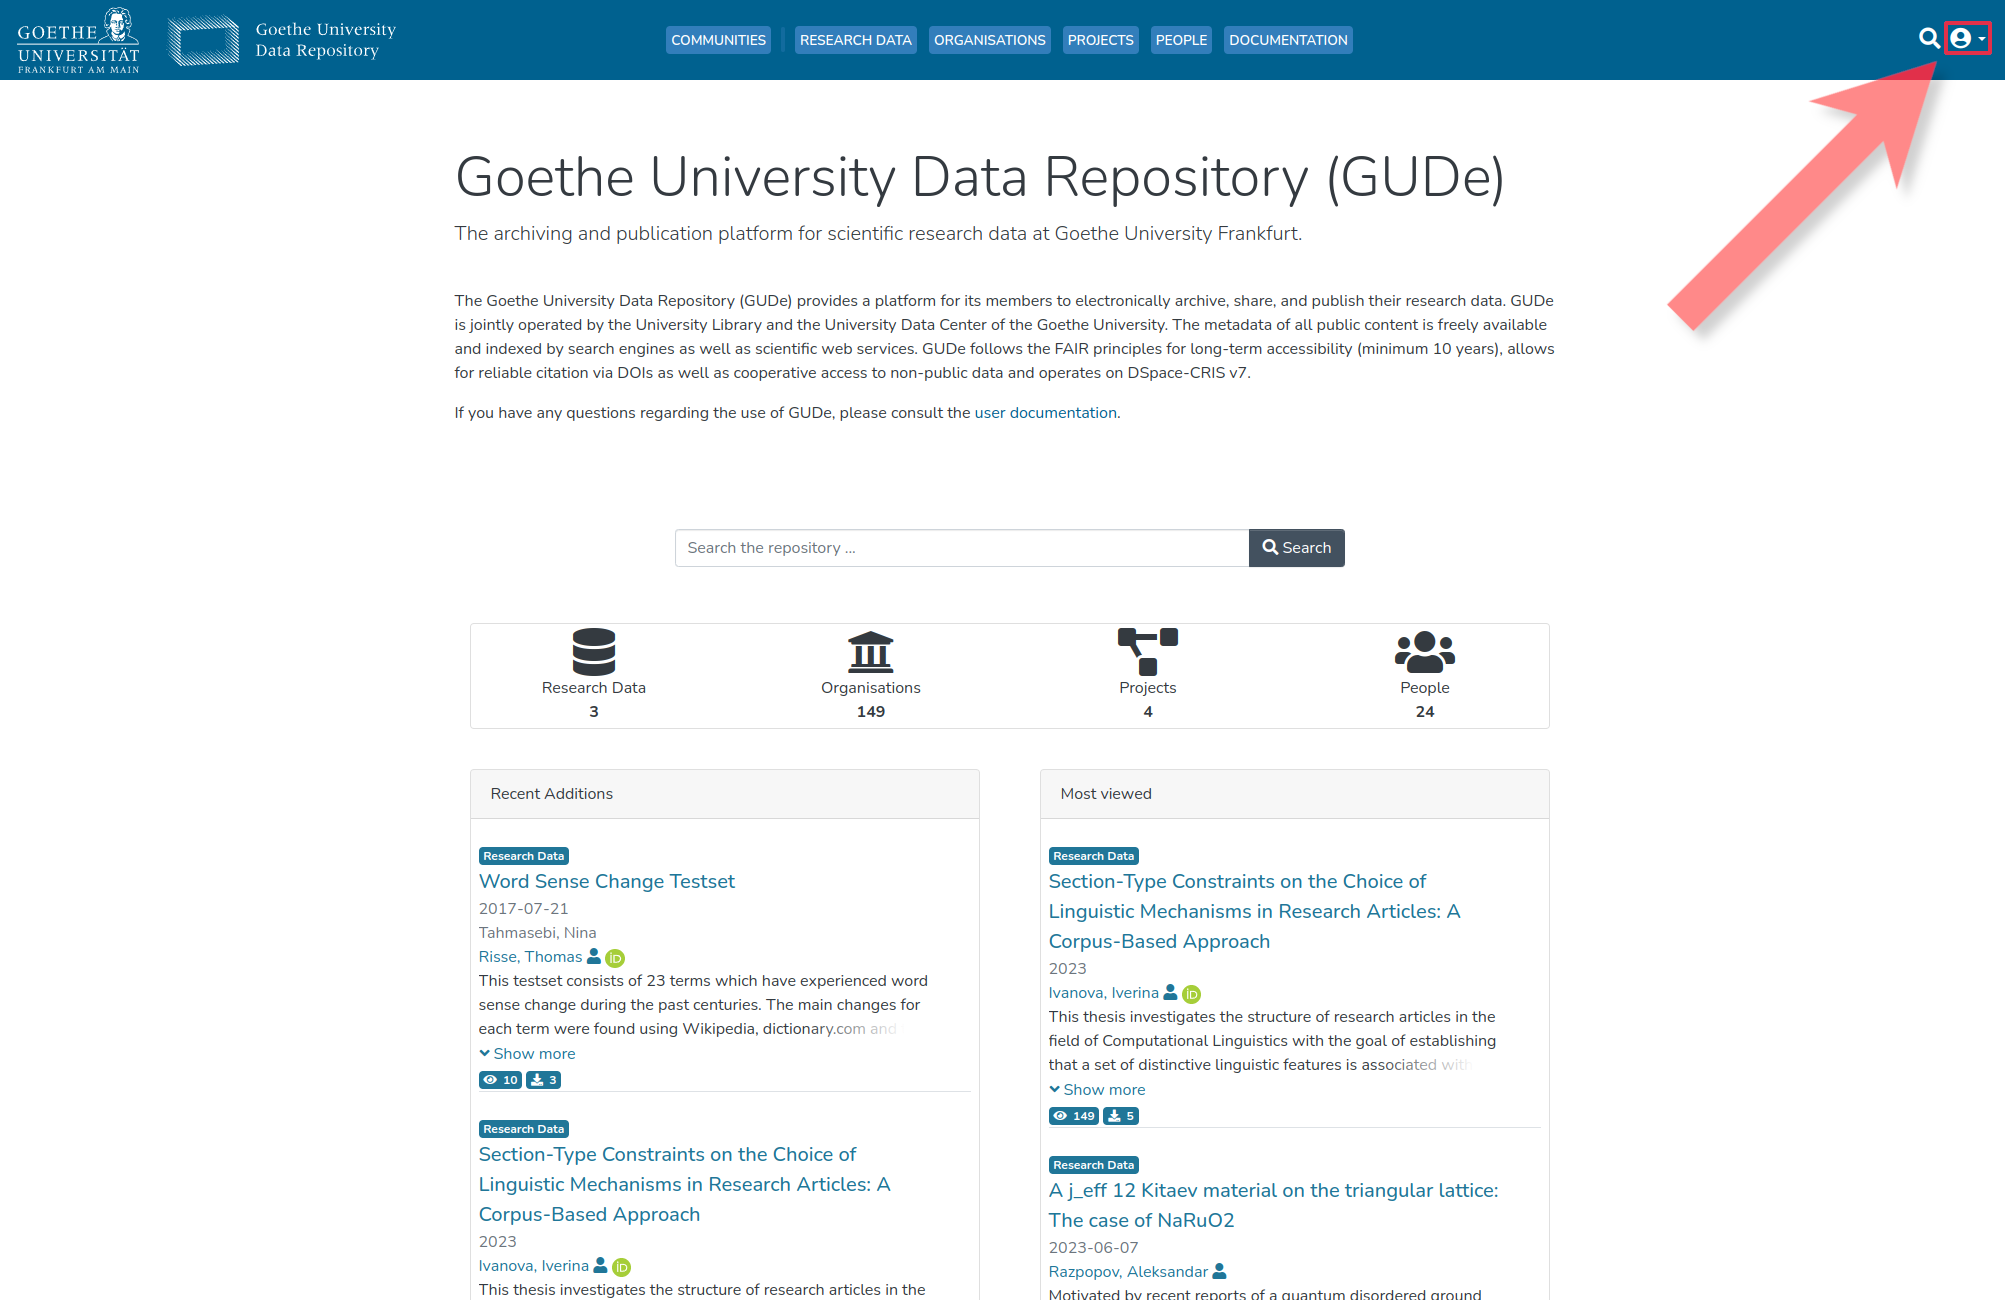
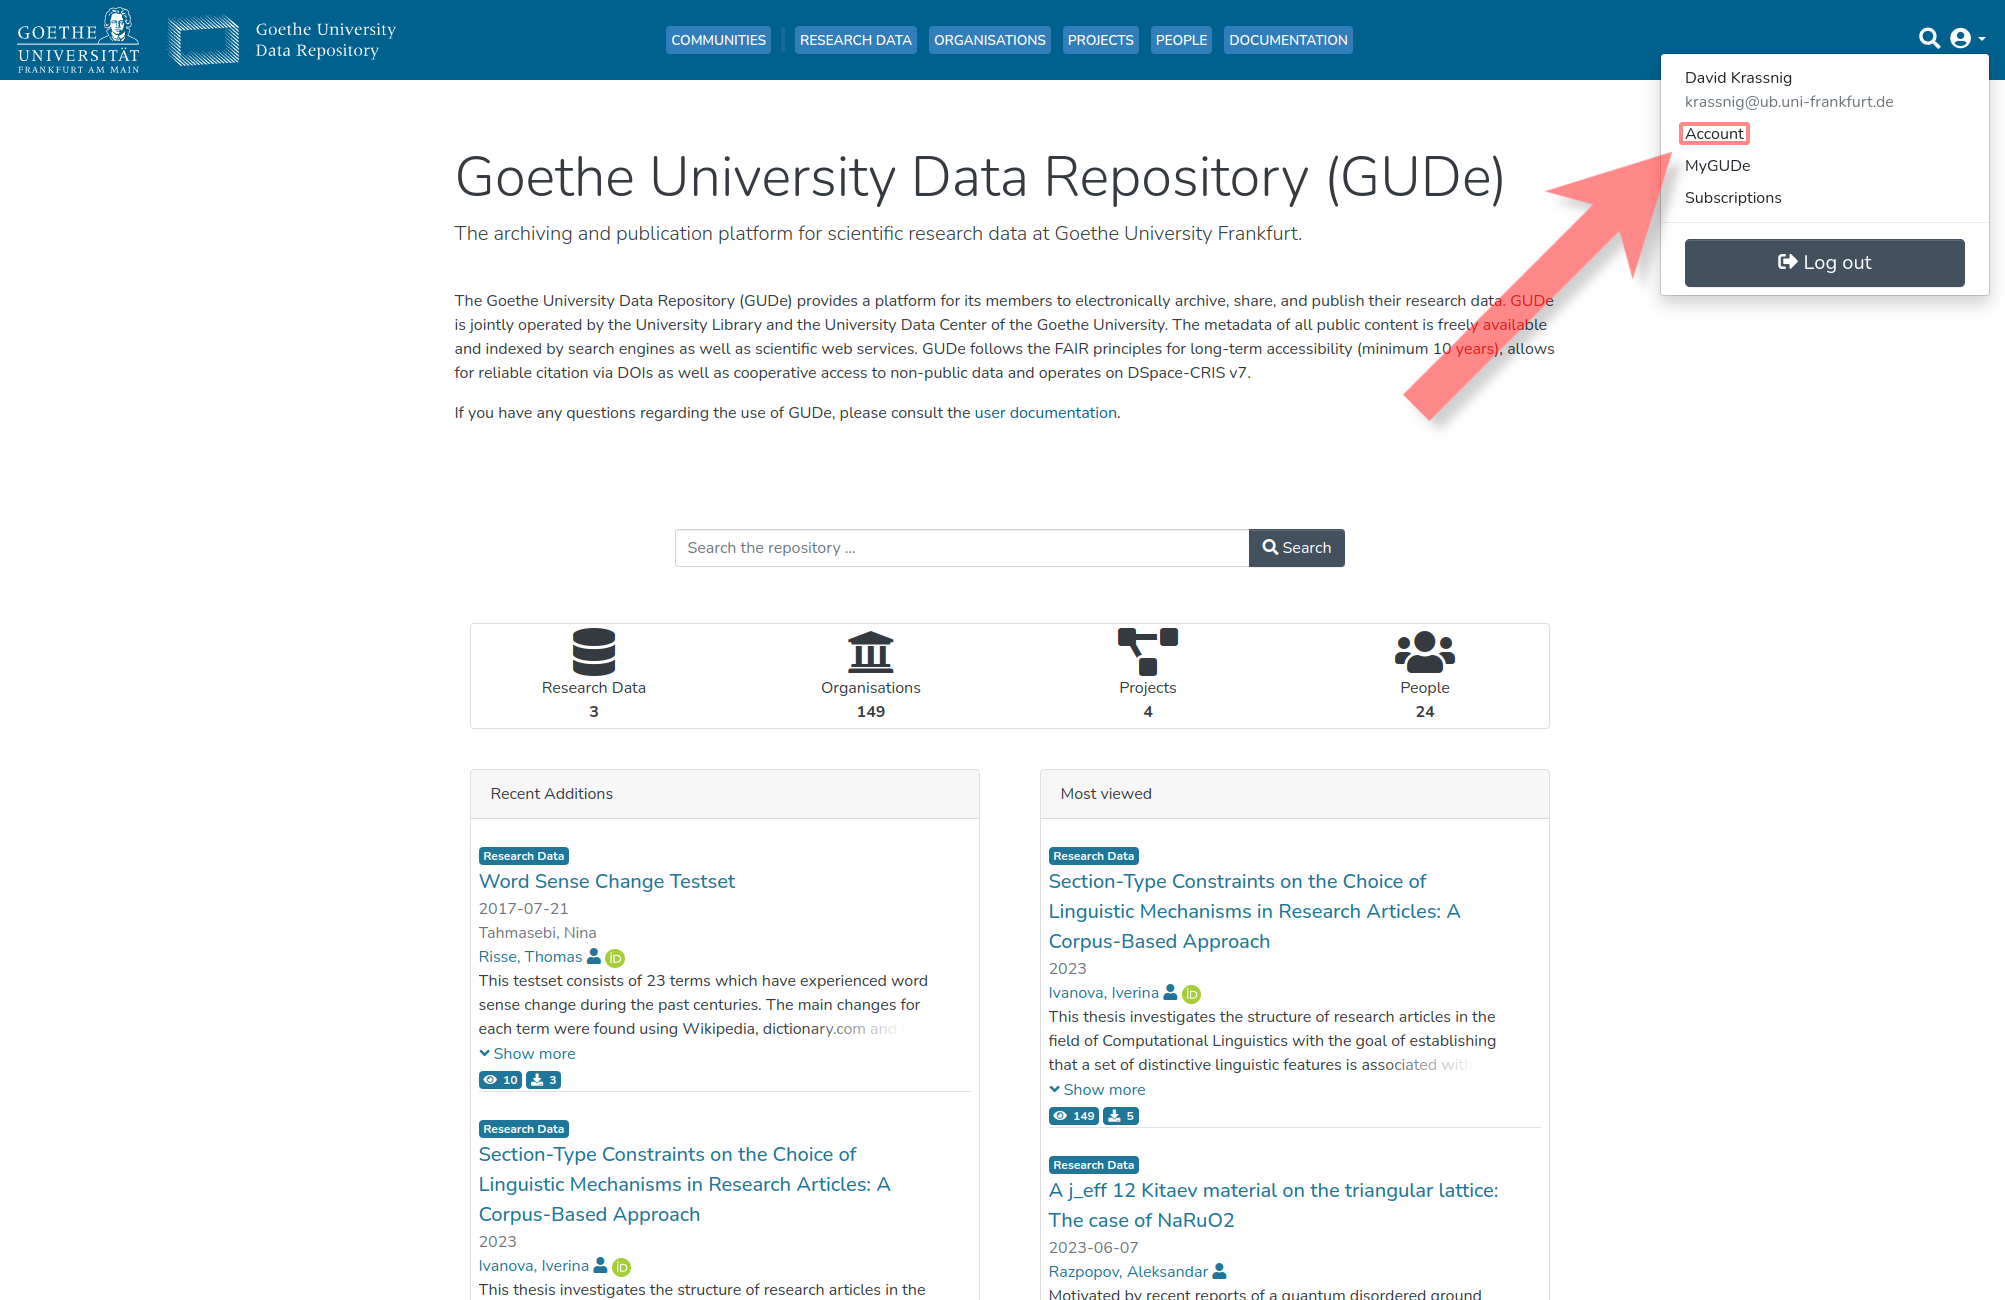
1. Navigate to 'Account'
1.1. Click on the profile icon at the top right
To access ones personal dataset, there are several ways. In this guide, we'll access the personal dataset through the account overview. To do this, one starts by clicking on the profile icon at the top right.
1.2. Select 'Account'
After clicking on the profile icon, a menu will open. Here, one selects 'Account.'
2. Navigate to the Profile/Personal Data Set
2.1. Understand the Difference between Account and Profile
Now ones account overview should open. It's important to note the distinction between account information in (A) and profile/personal dataset information in (B). Account information is used for signing in to GUDe or receiving communication from the GUDe system and is private. Profile/personal dataset information is publicly available on GUDe as a dataset about oneself and can be linked to various submissions.
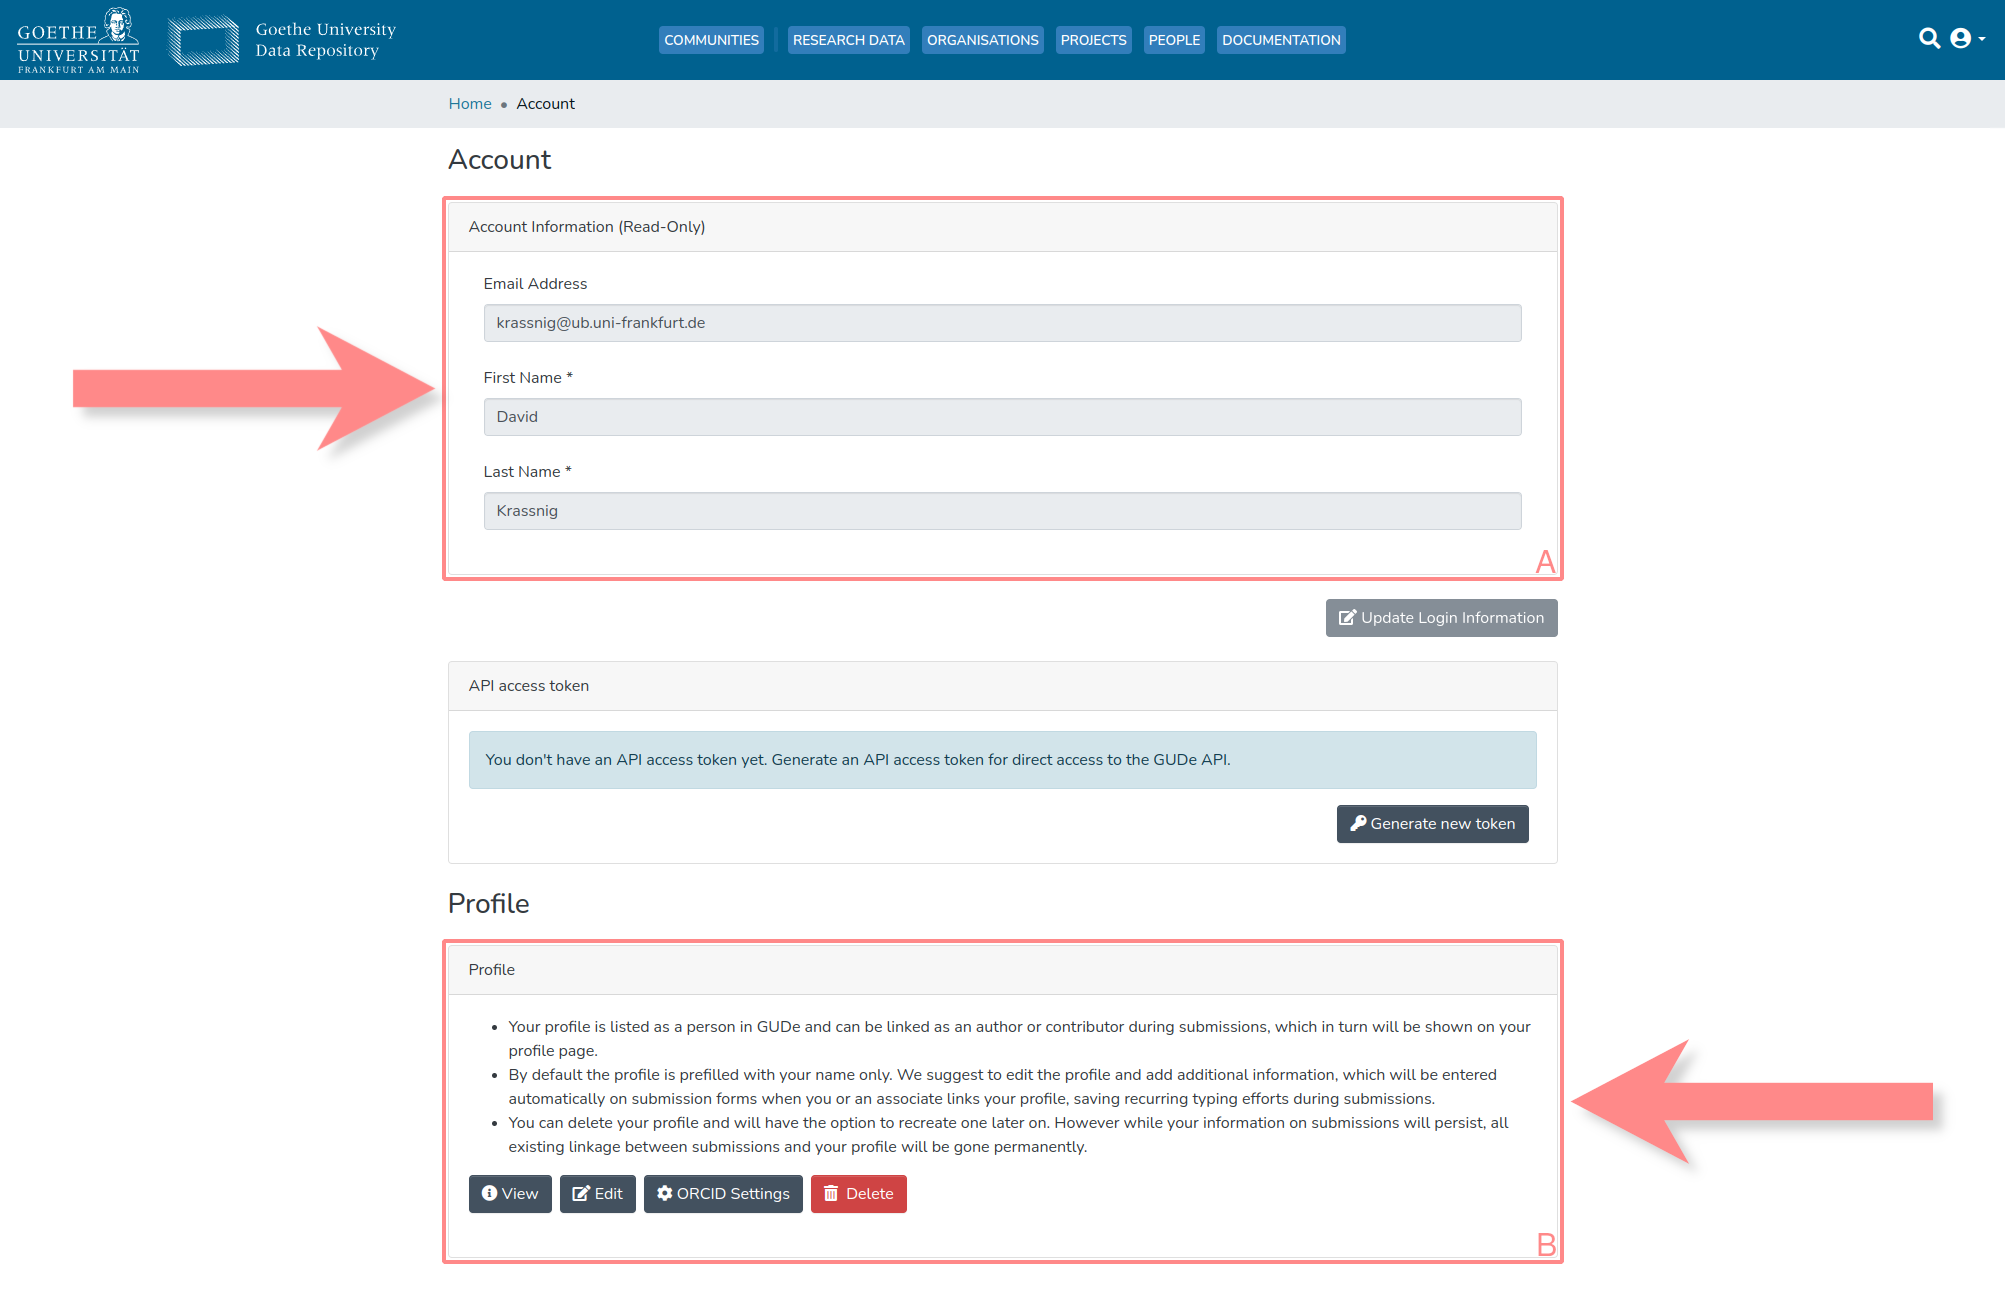
2.2. Click on 'Edit'
To edit ones personal dataset, one must click on the marked 'Edit' element.

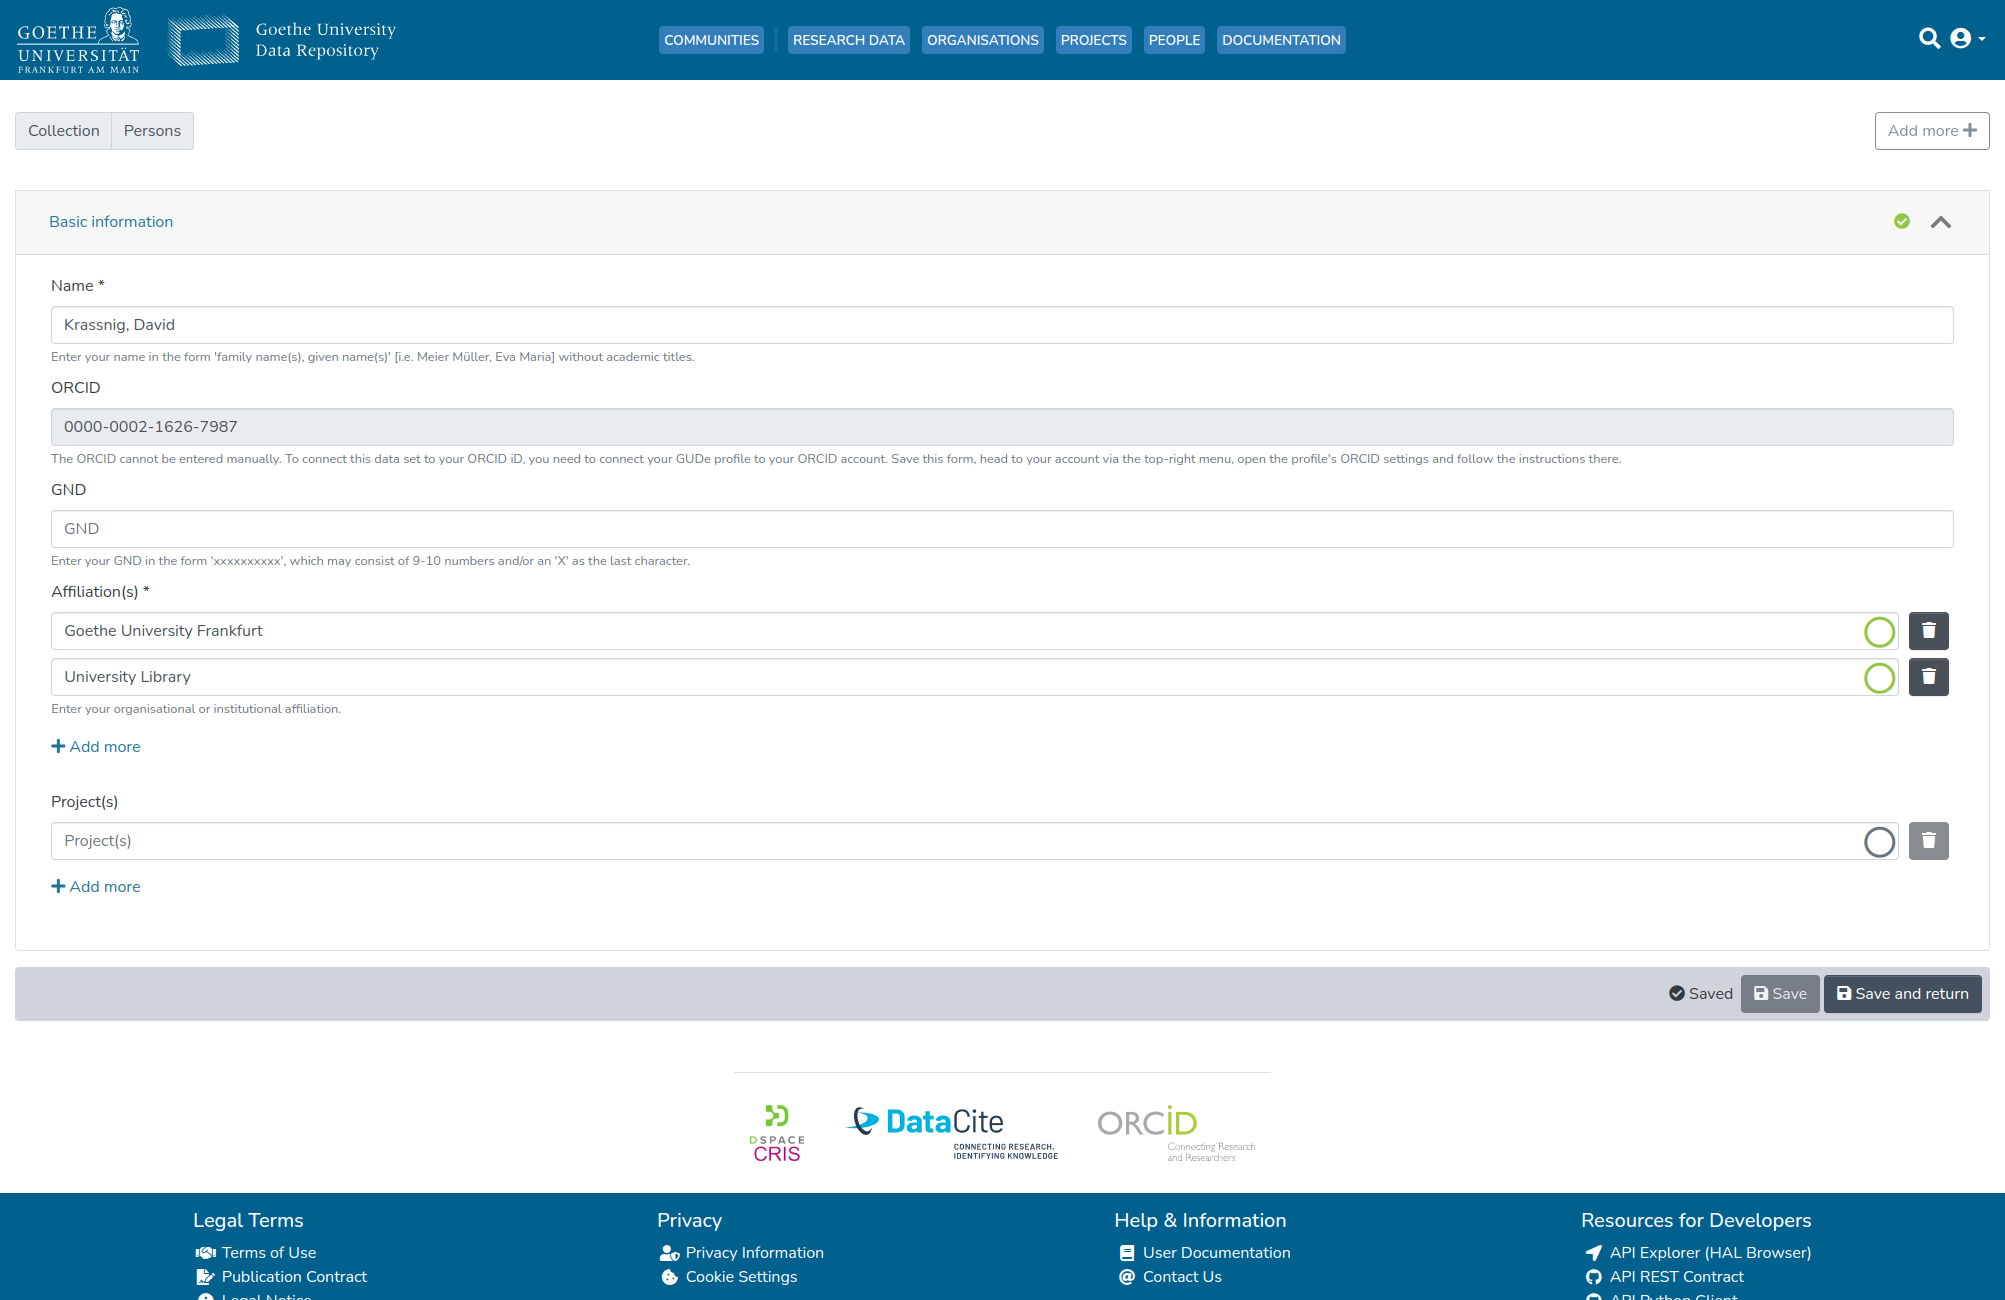
3. Edit Personal Profile Data
3.1. Change Ones Name
In the marked field, one has the option to change ones name. Names should be provided in the format 'Family Name(s), Given Name(s).' The names from ones GUDe account were used for the creation of the respective profile during the initial registration in GUDe.
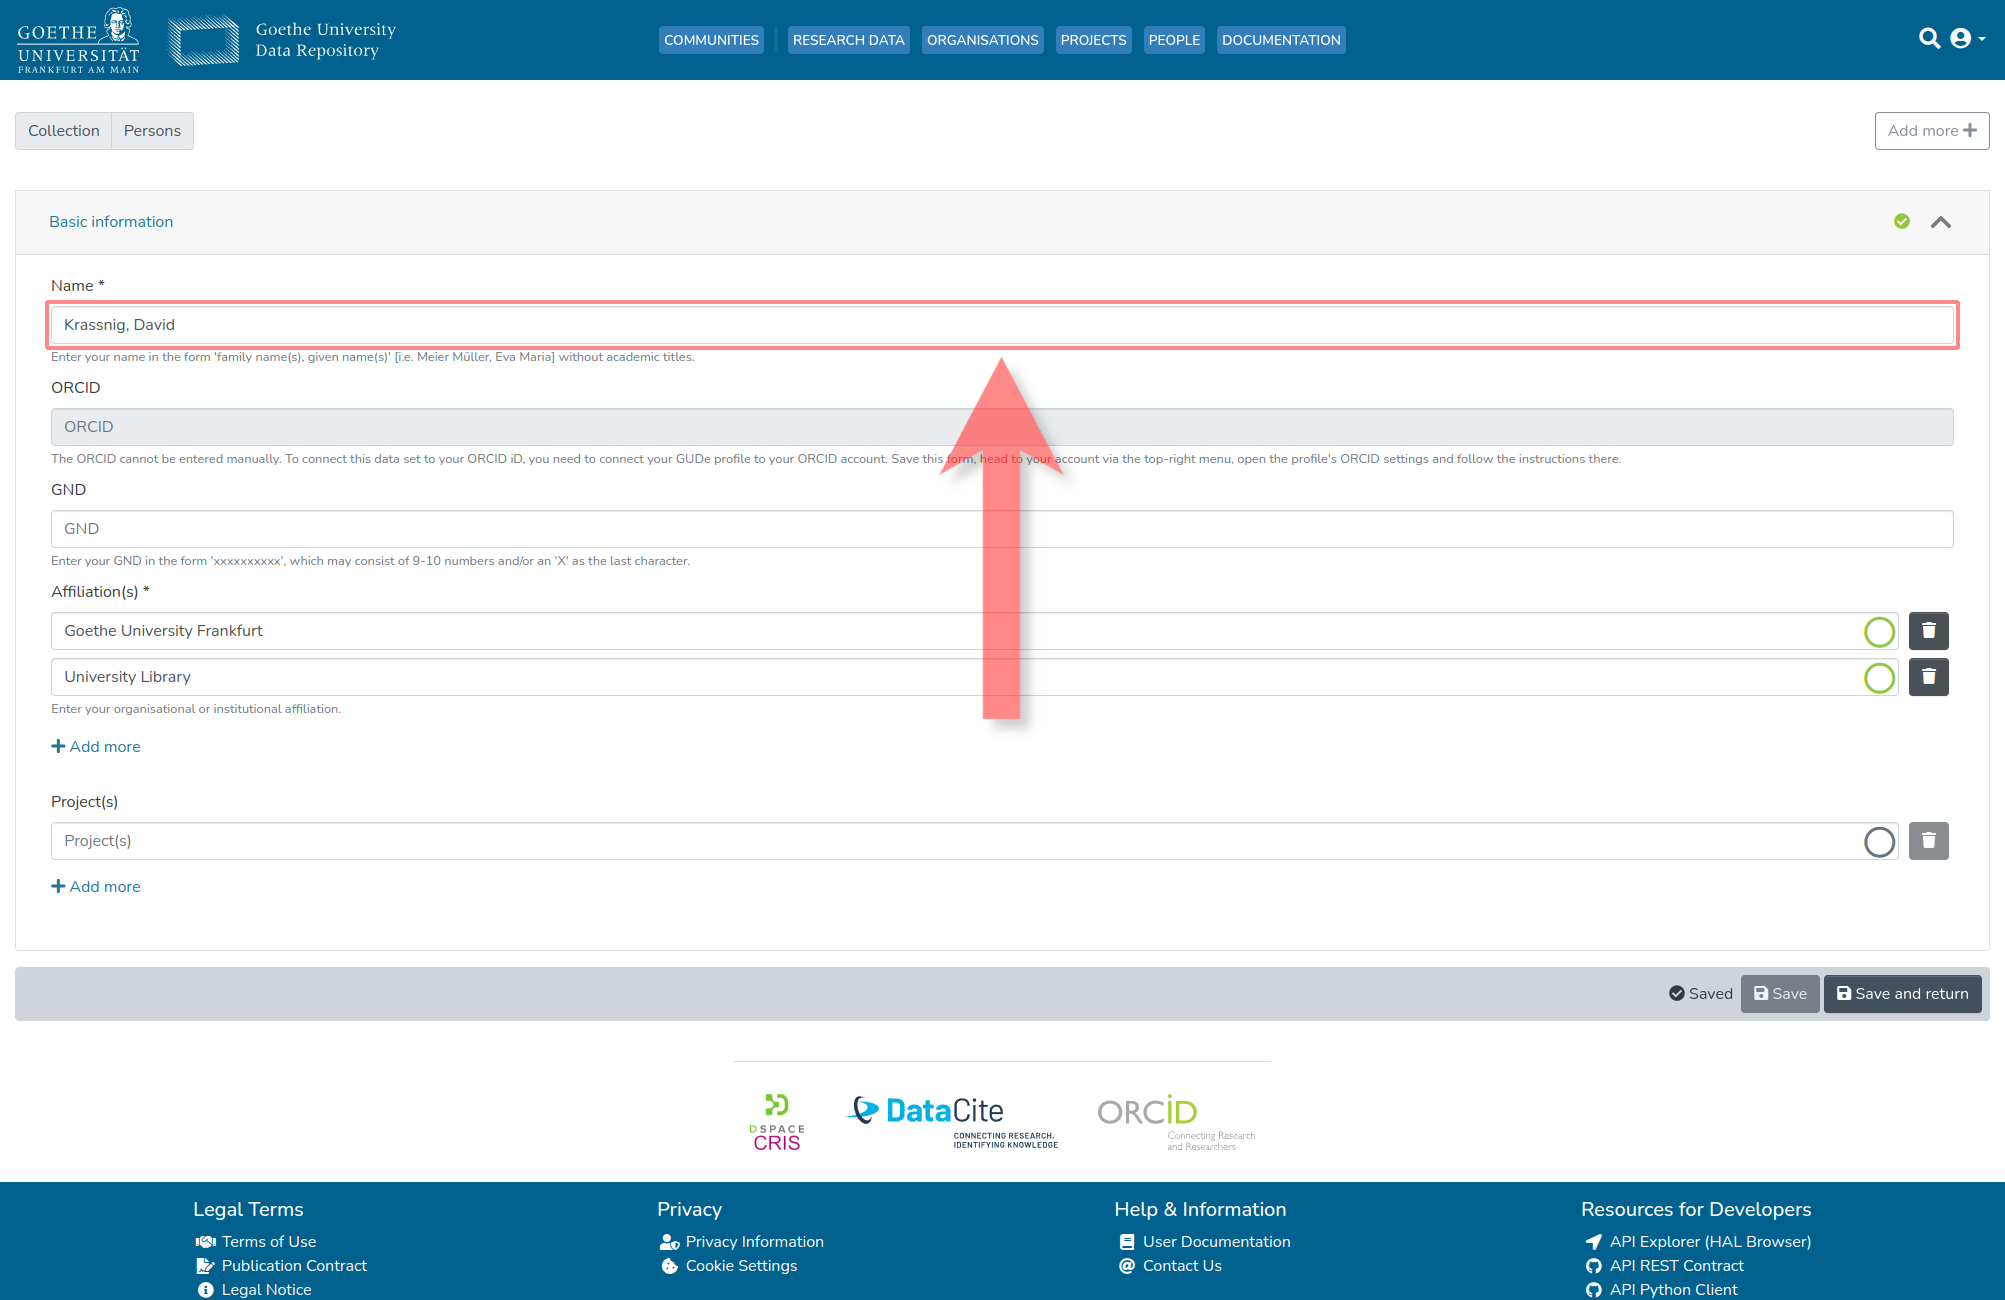
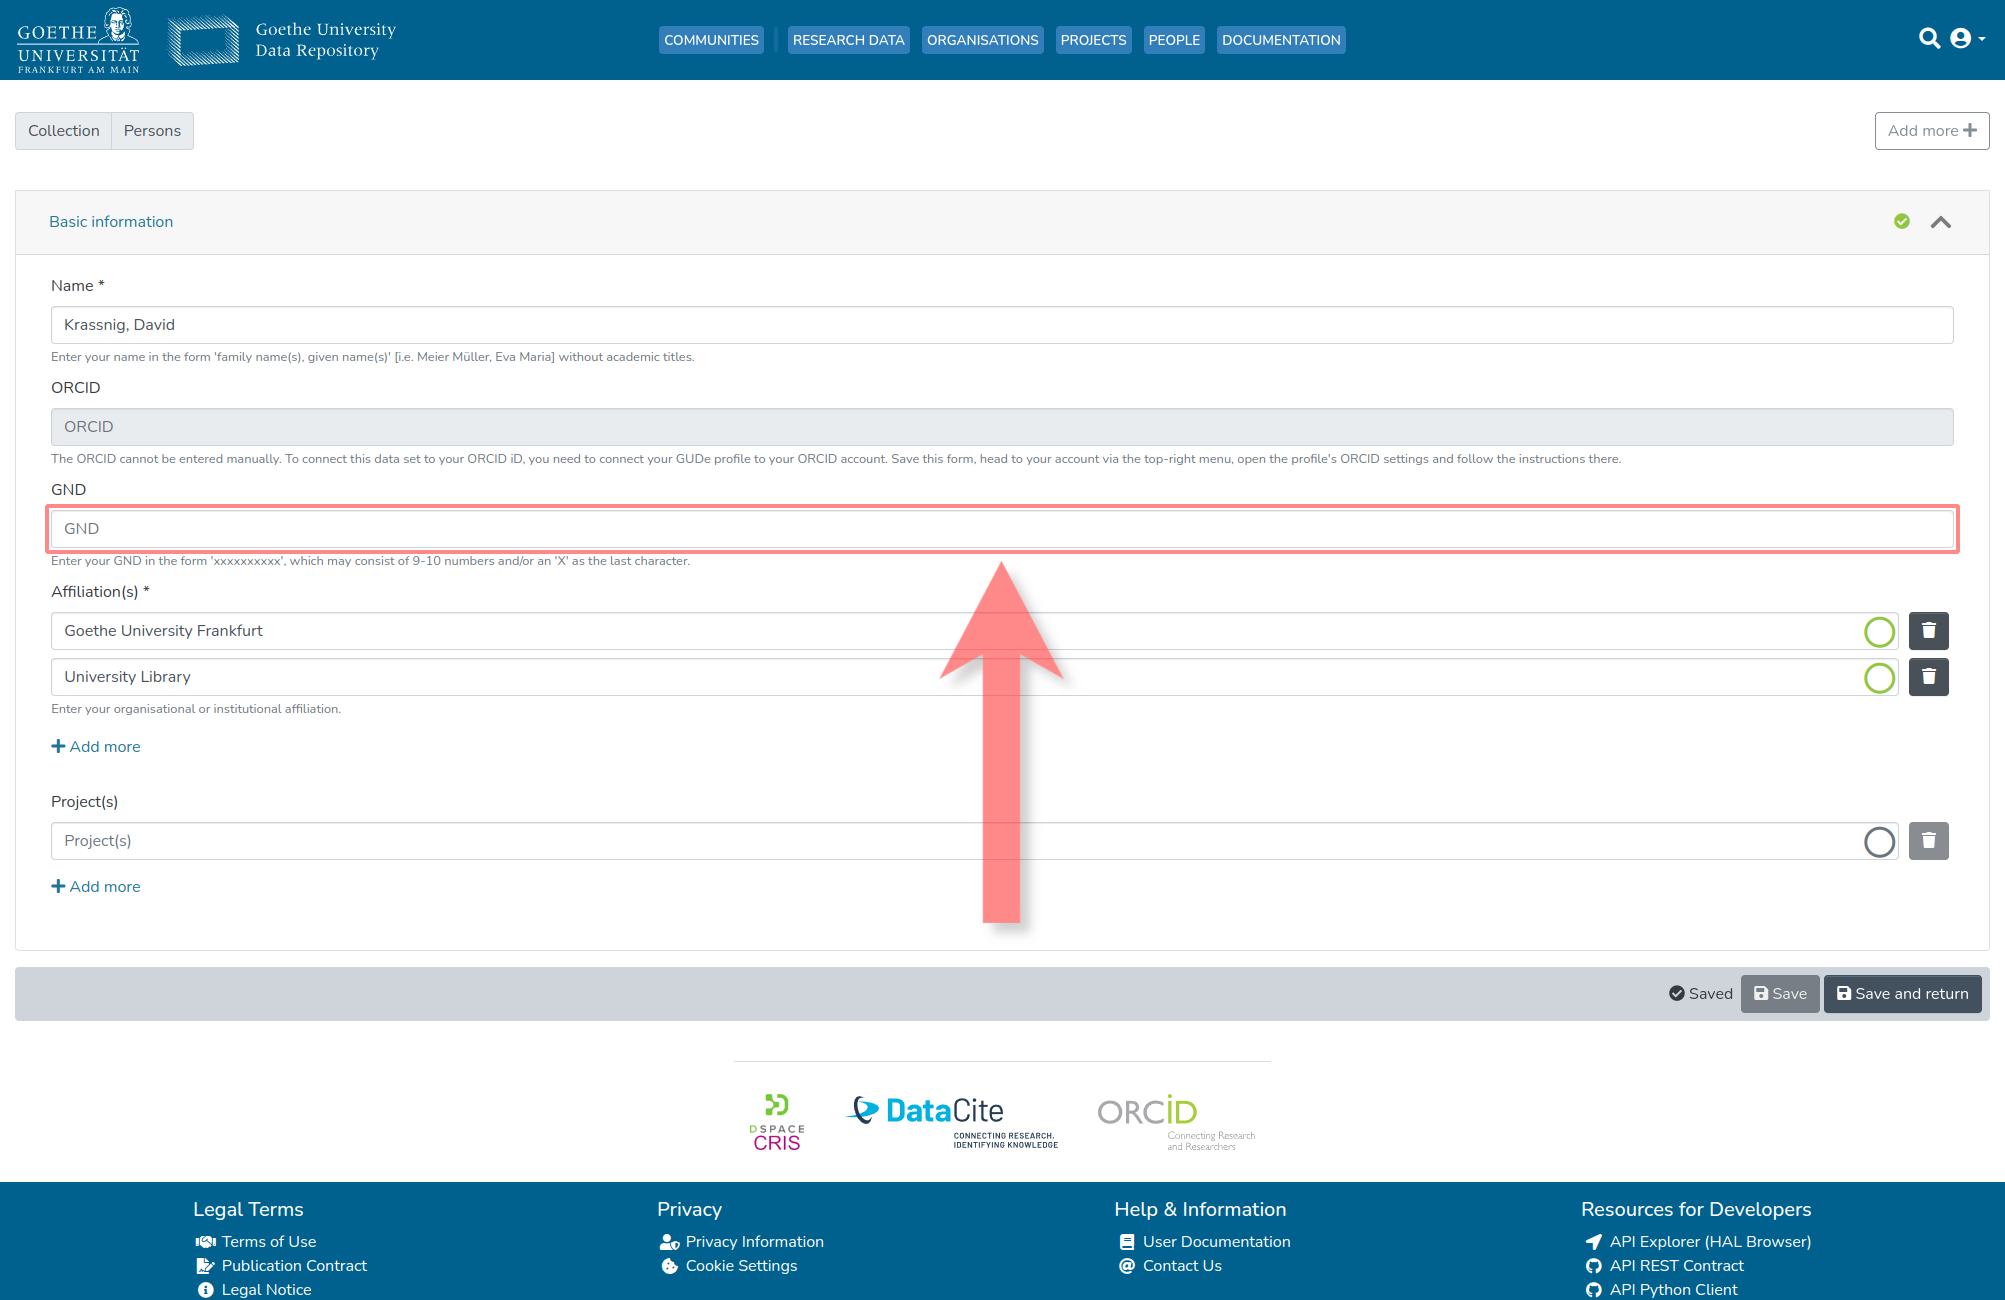
3.2. Provide Ones GND ID
In this marked field, one has the option to provide ones GND ID (the personal ID from the Integrated Authority File).
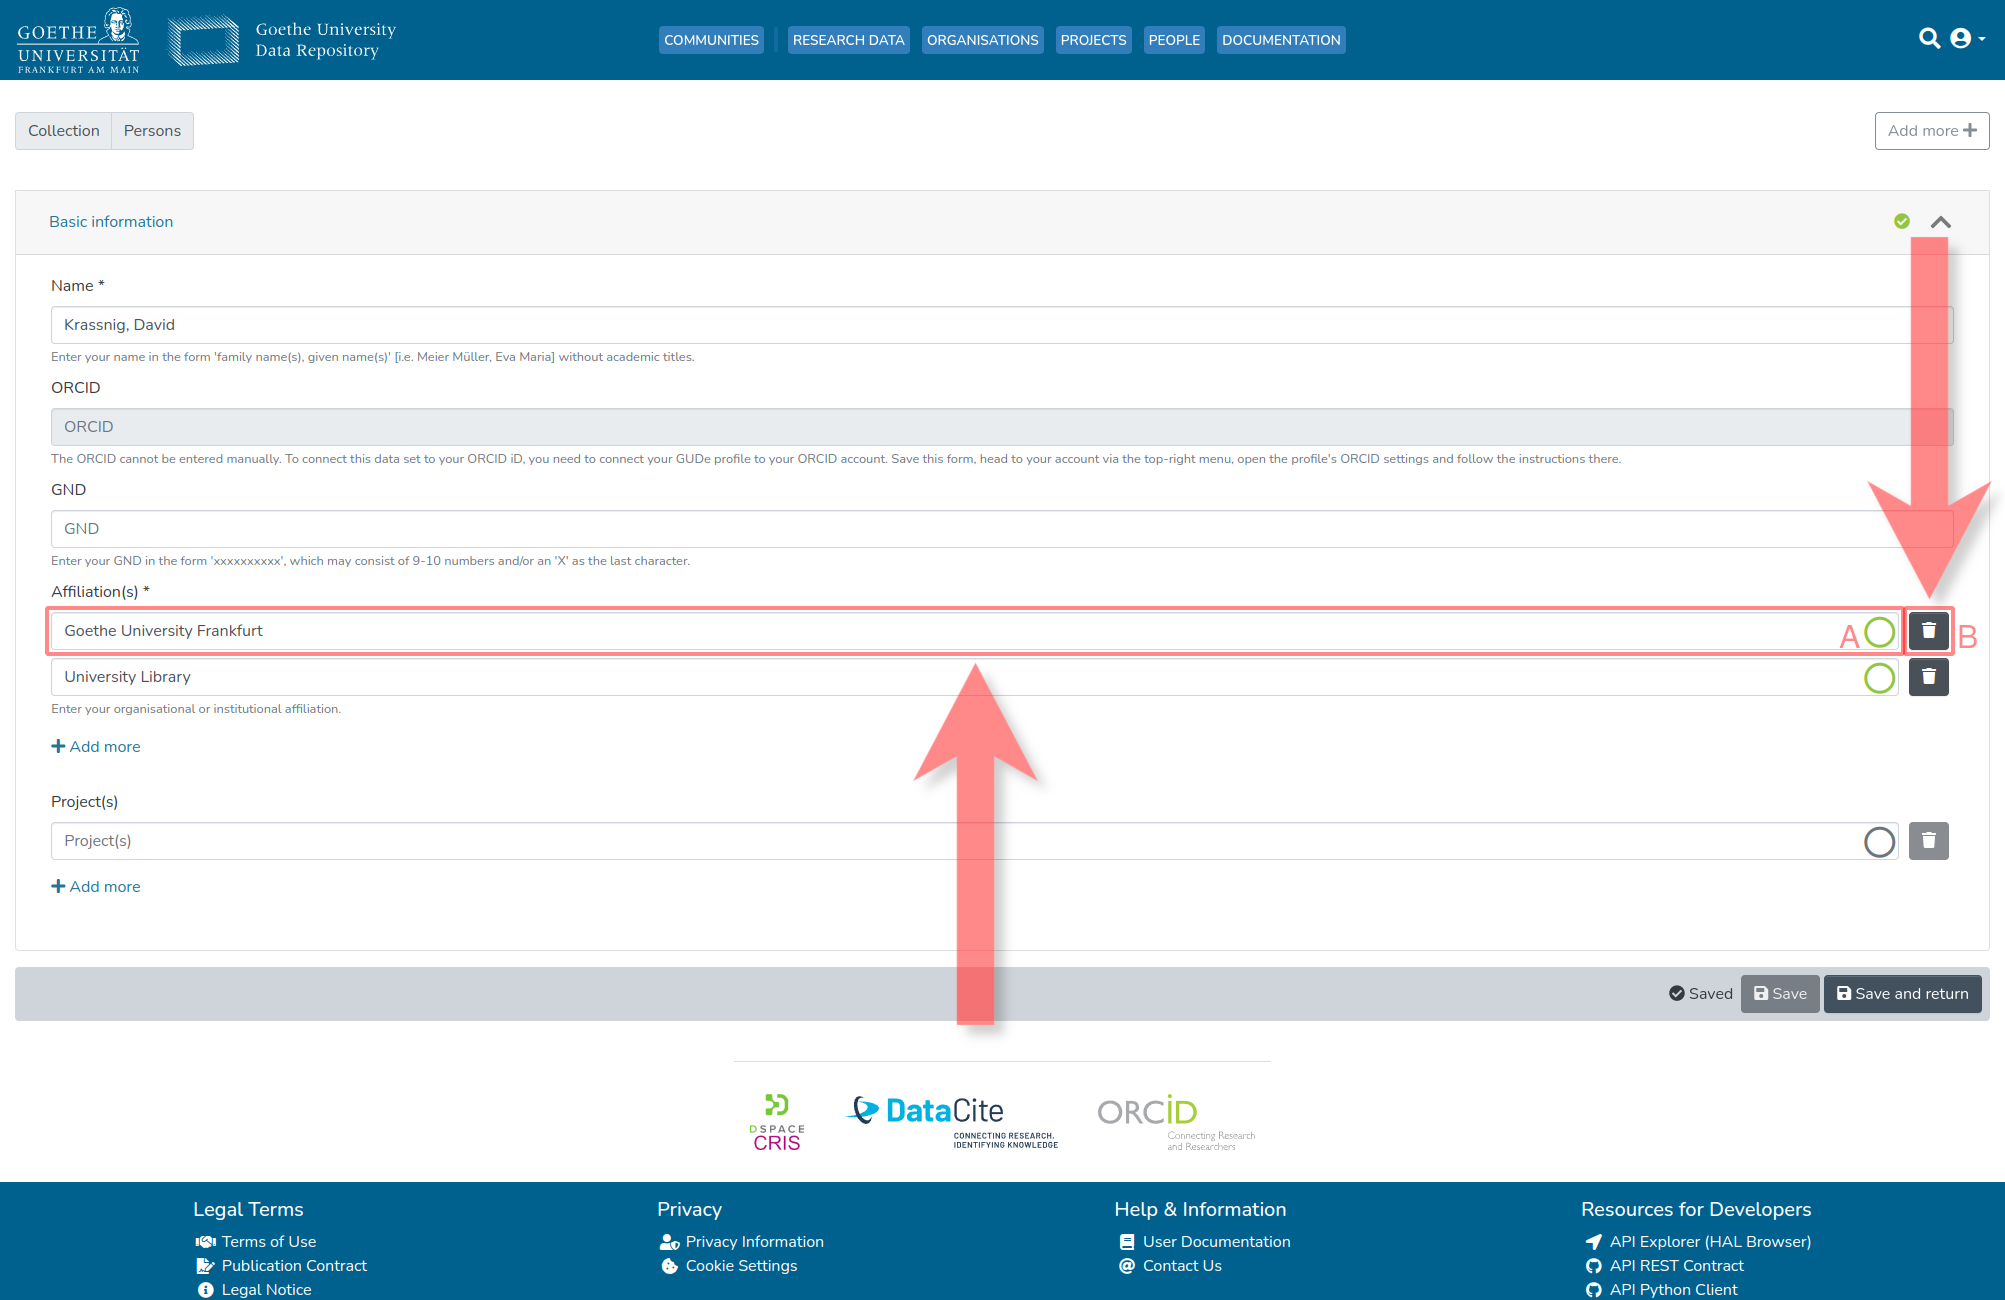
3.3. Provide or Edit Ones Affiliation(s)
To provide or edit ones affiliations, one can enter the full name of the associated organisational unit in the marked field (A). If there is a dataset in GUDe for the organisational unit, a successful link will be displayed on the right with a green circle. With element (B), one can delete a previously entered affiliation.
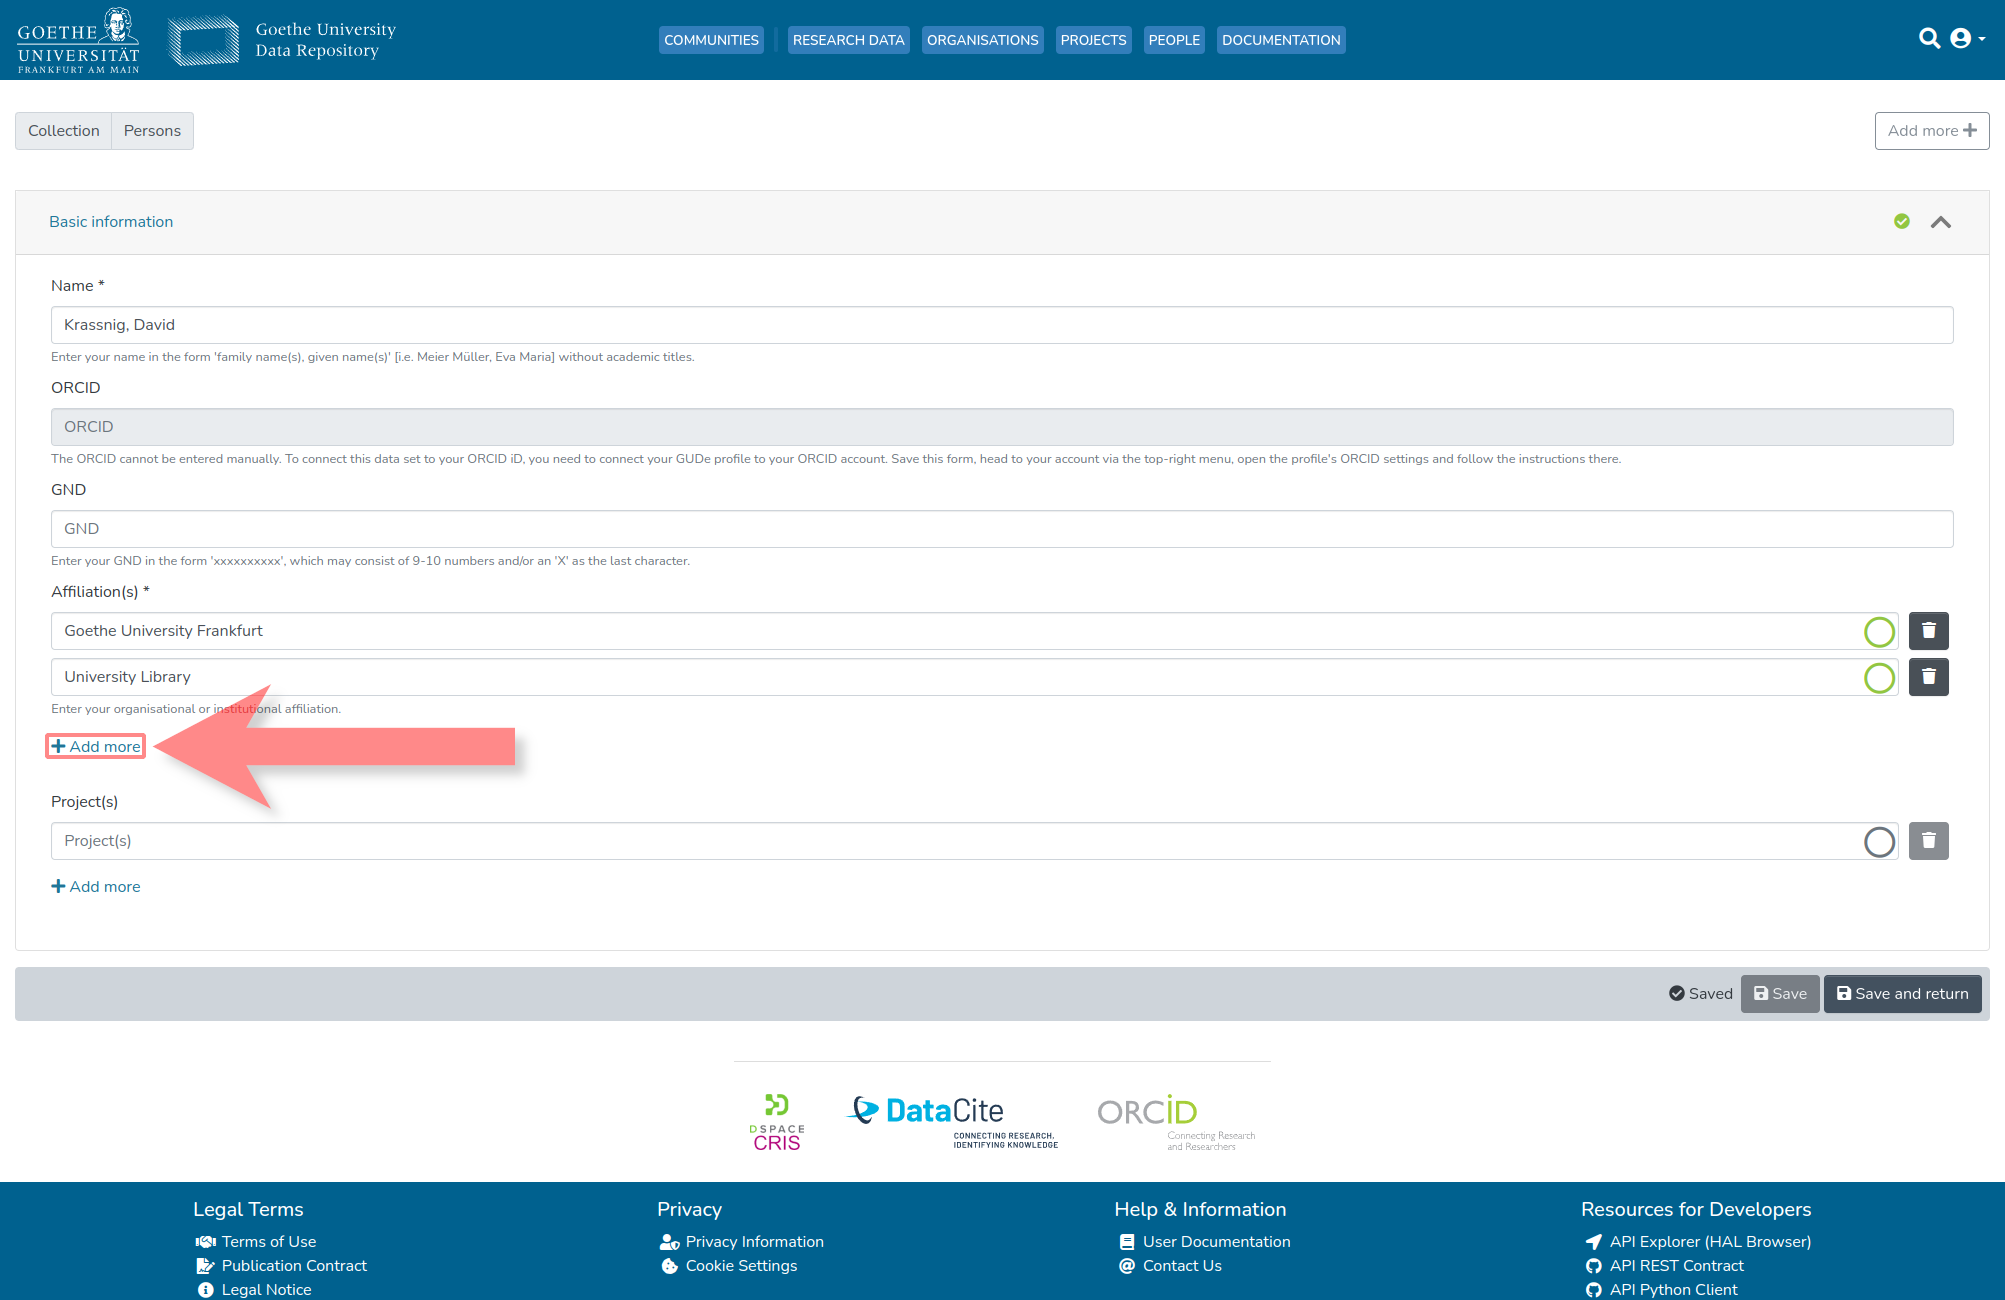
3.4. Add More Affiliations
To add more affiliations, one clicks on the marked element here. It's recommended to provide all relevant affiliations associated with ones profile.
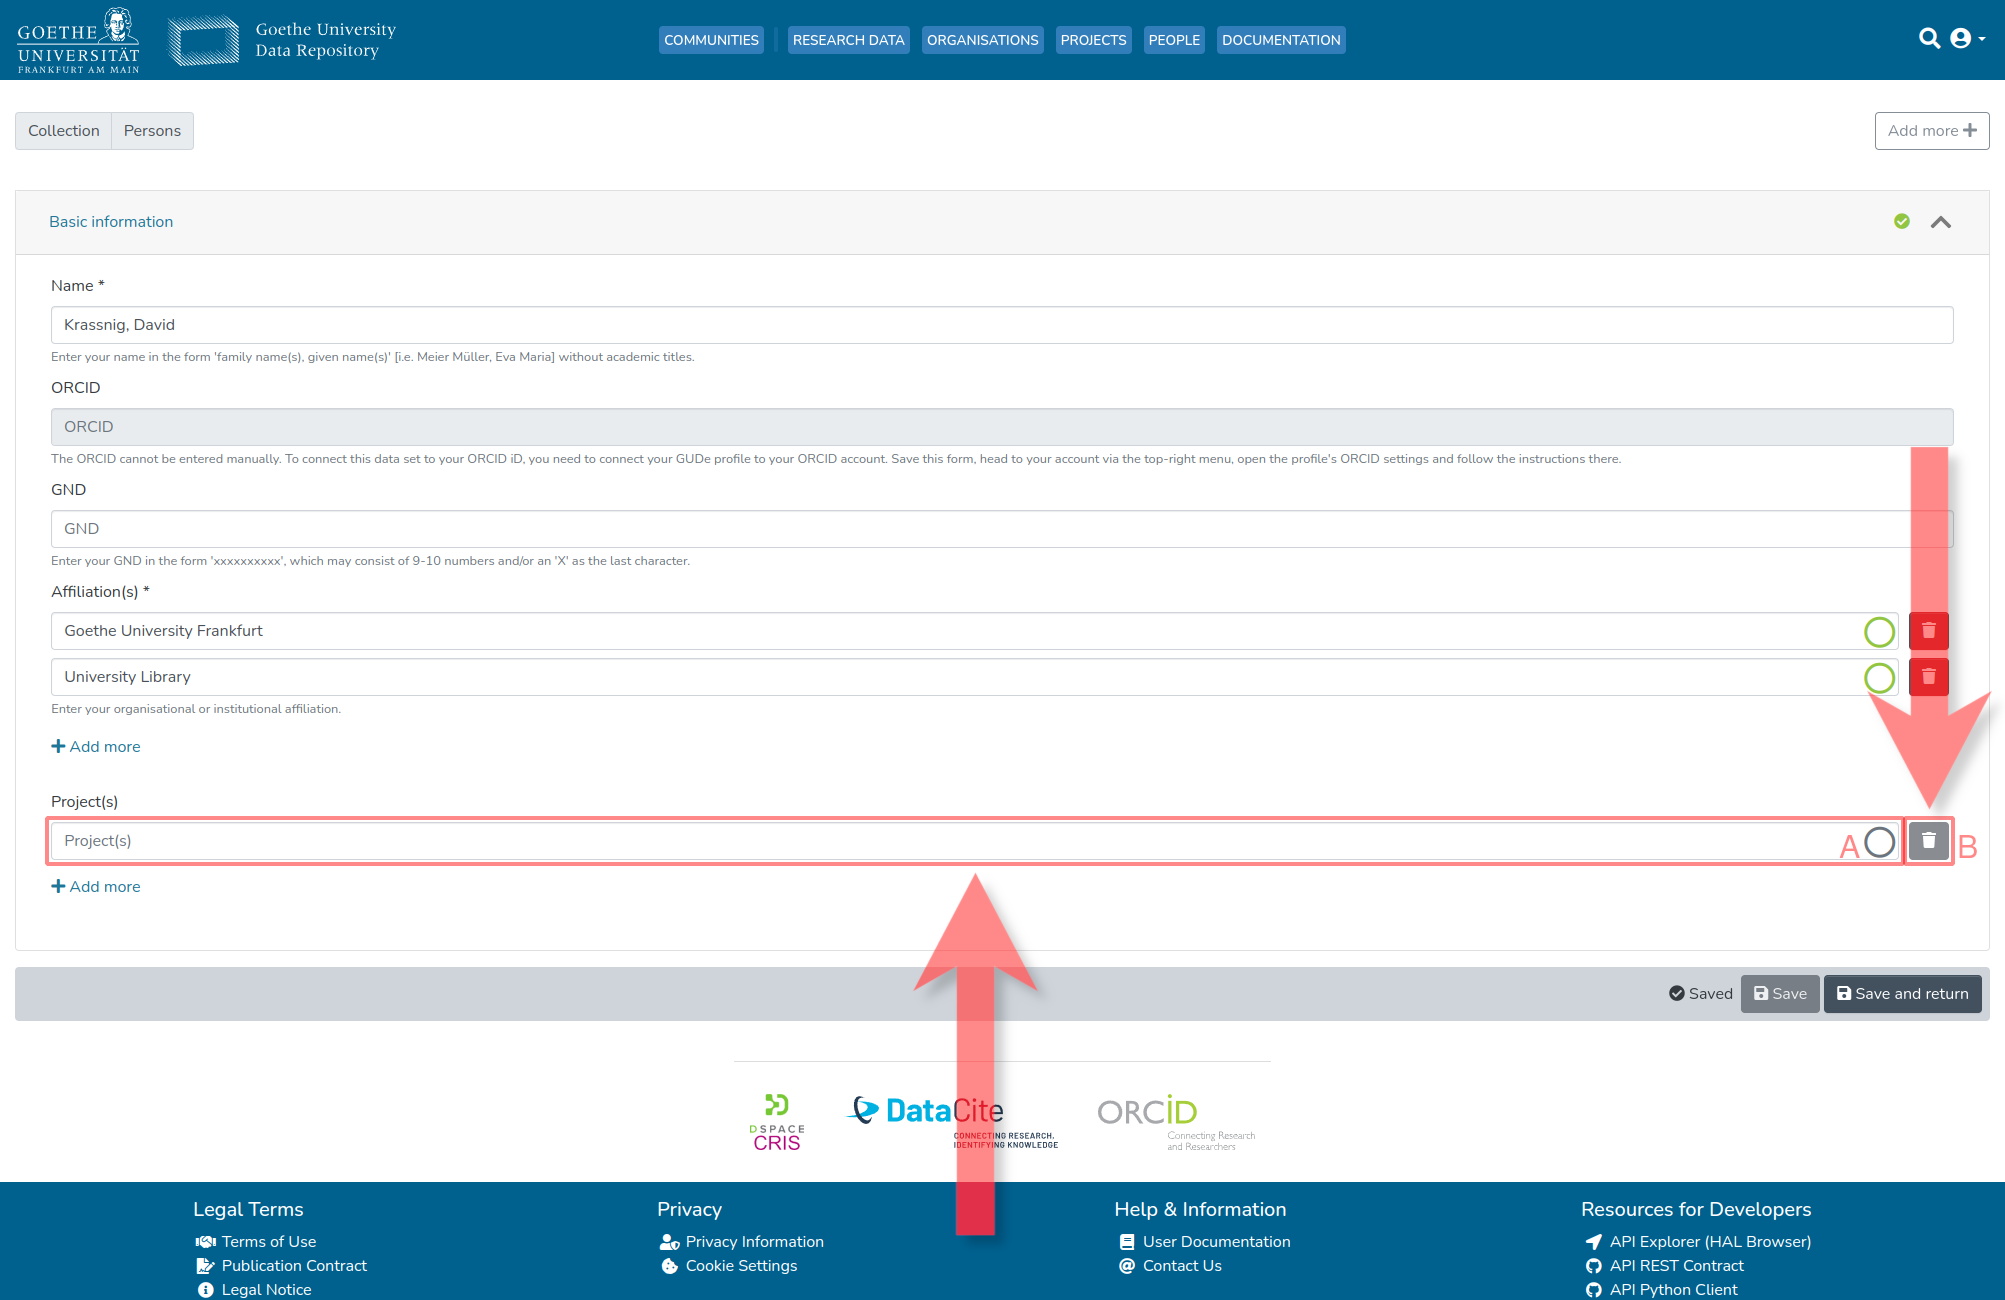
3.5. Provide or Edit Associated Projects
To provide or edit associated projects, one can enter the full name of the associated project in the marked field (A). If there is a dataset in GUDe for the project, a successful link will be displayed on the right with a green circle. With element (B), one can delete a previously entered project.
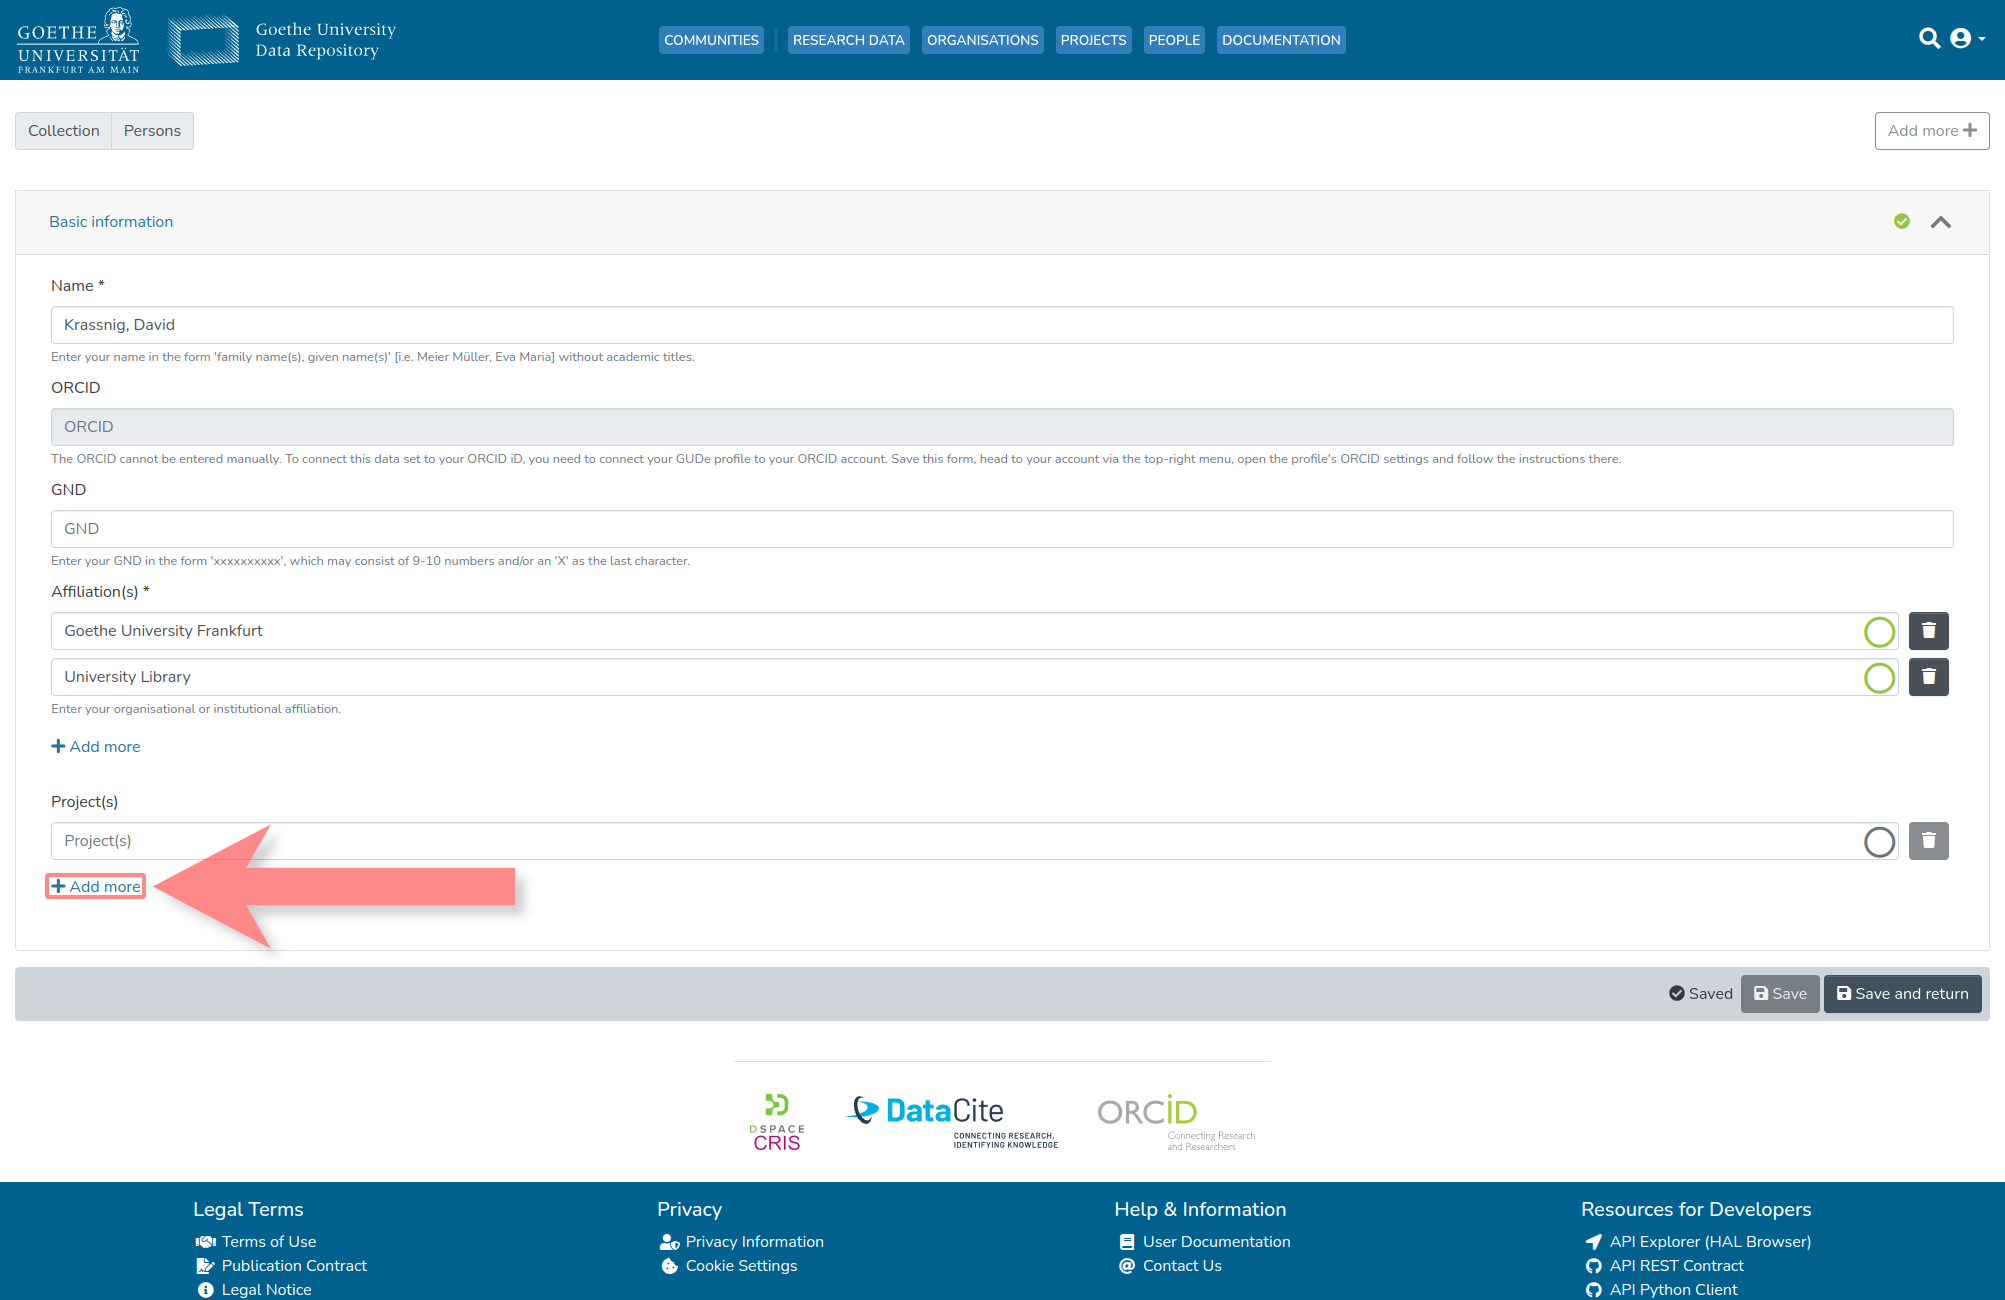
3.6. Add More Associated Projects
To add more projects, one clicks on the marked element here.
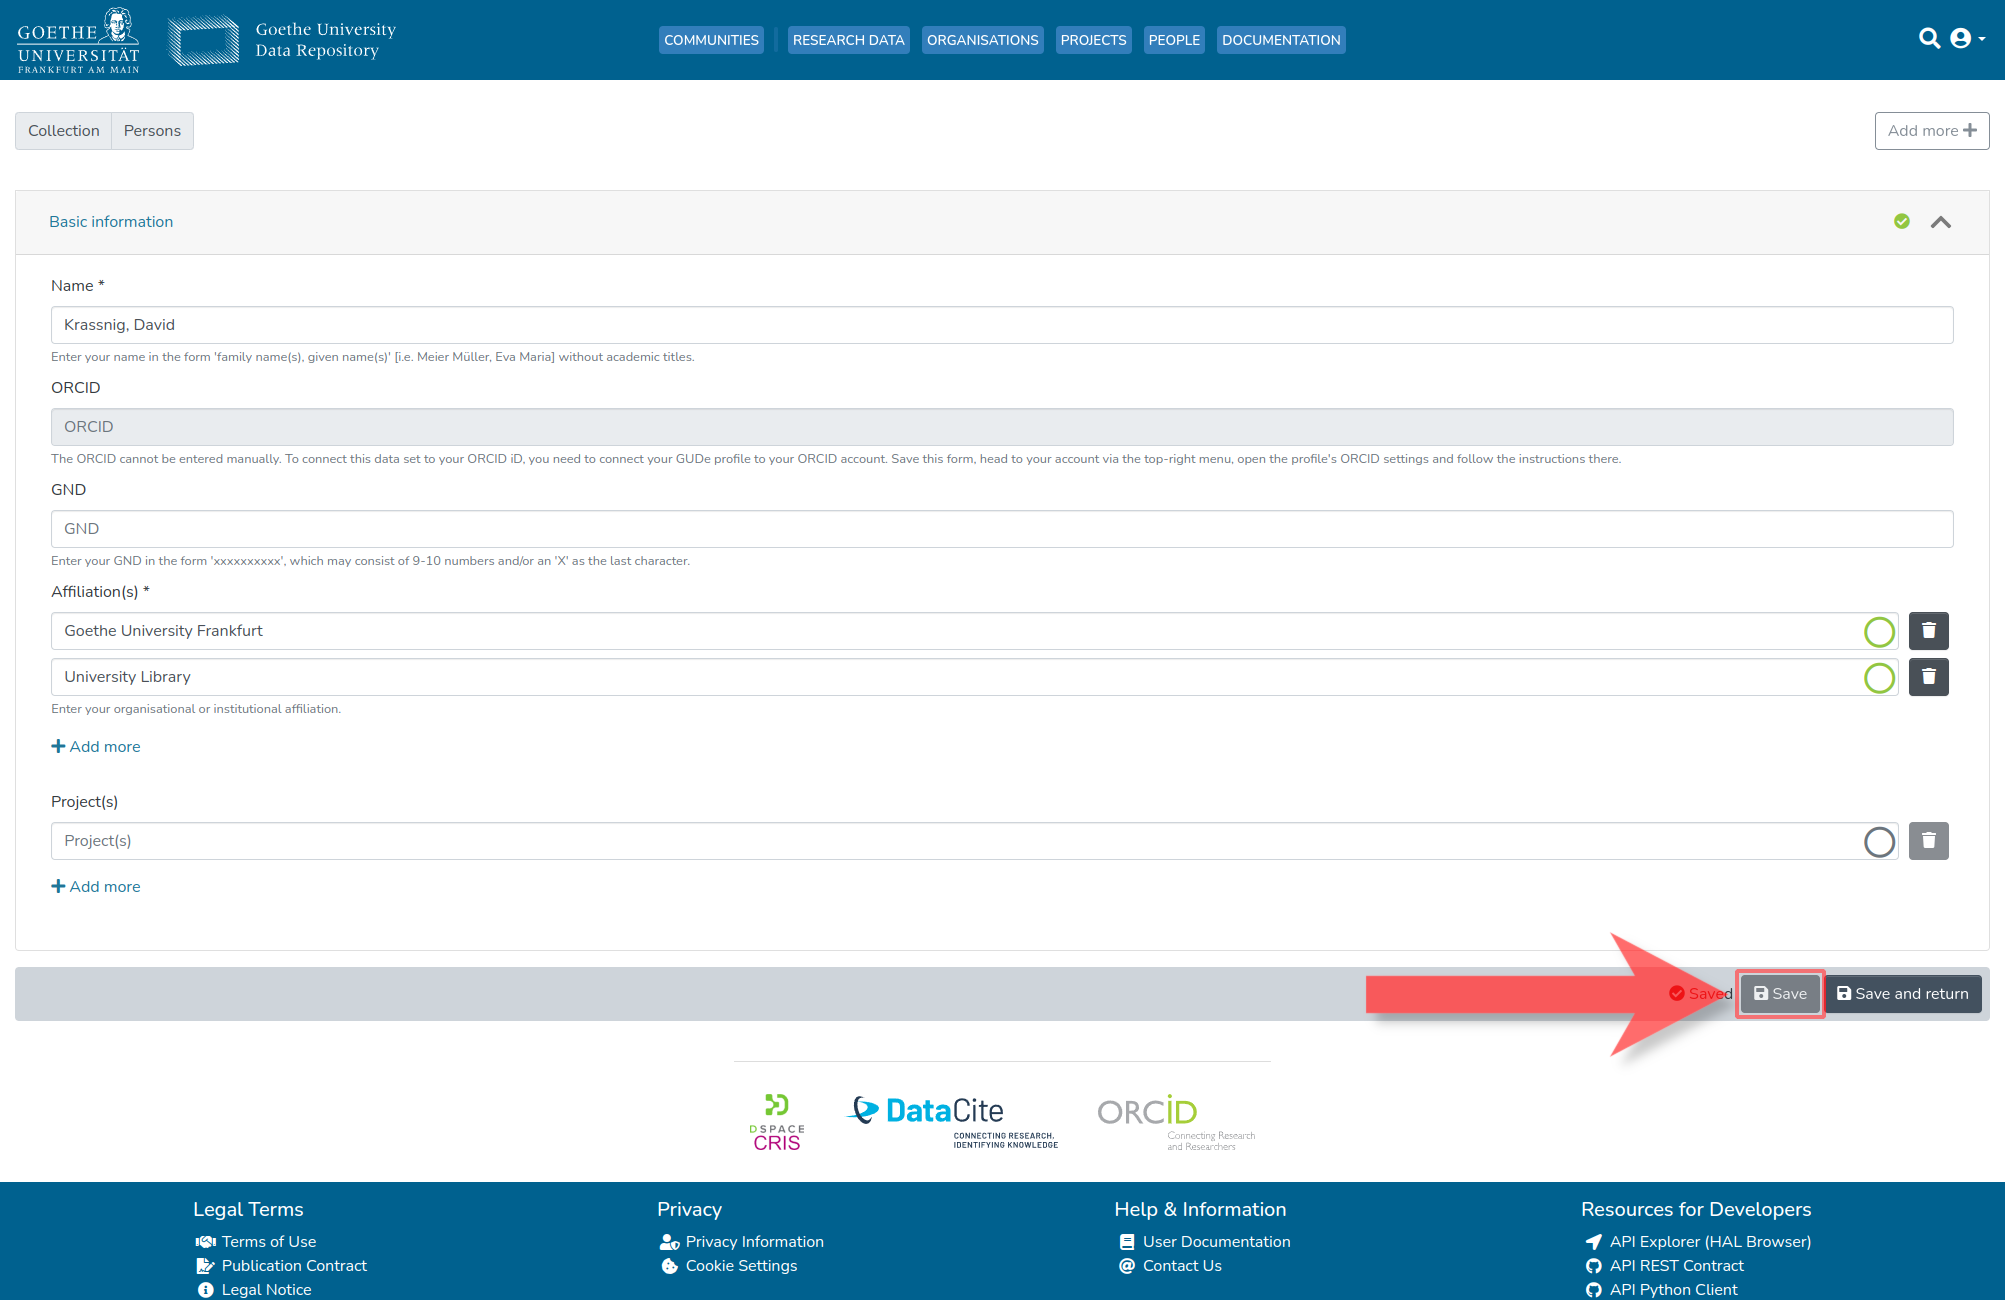
3.7. Save Changes
Once all desired changes are made, one clicks on the marked 'Save' element to permanently save the changes.
4. Adding ORCID
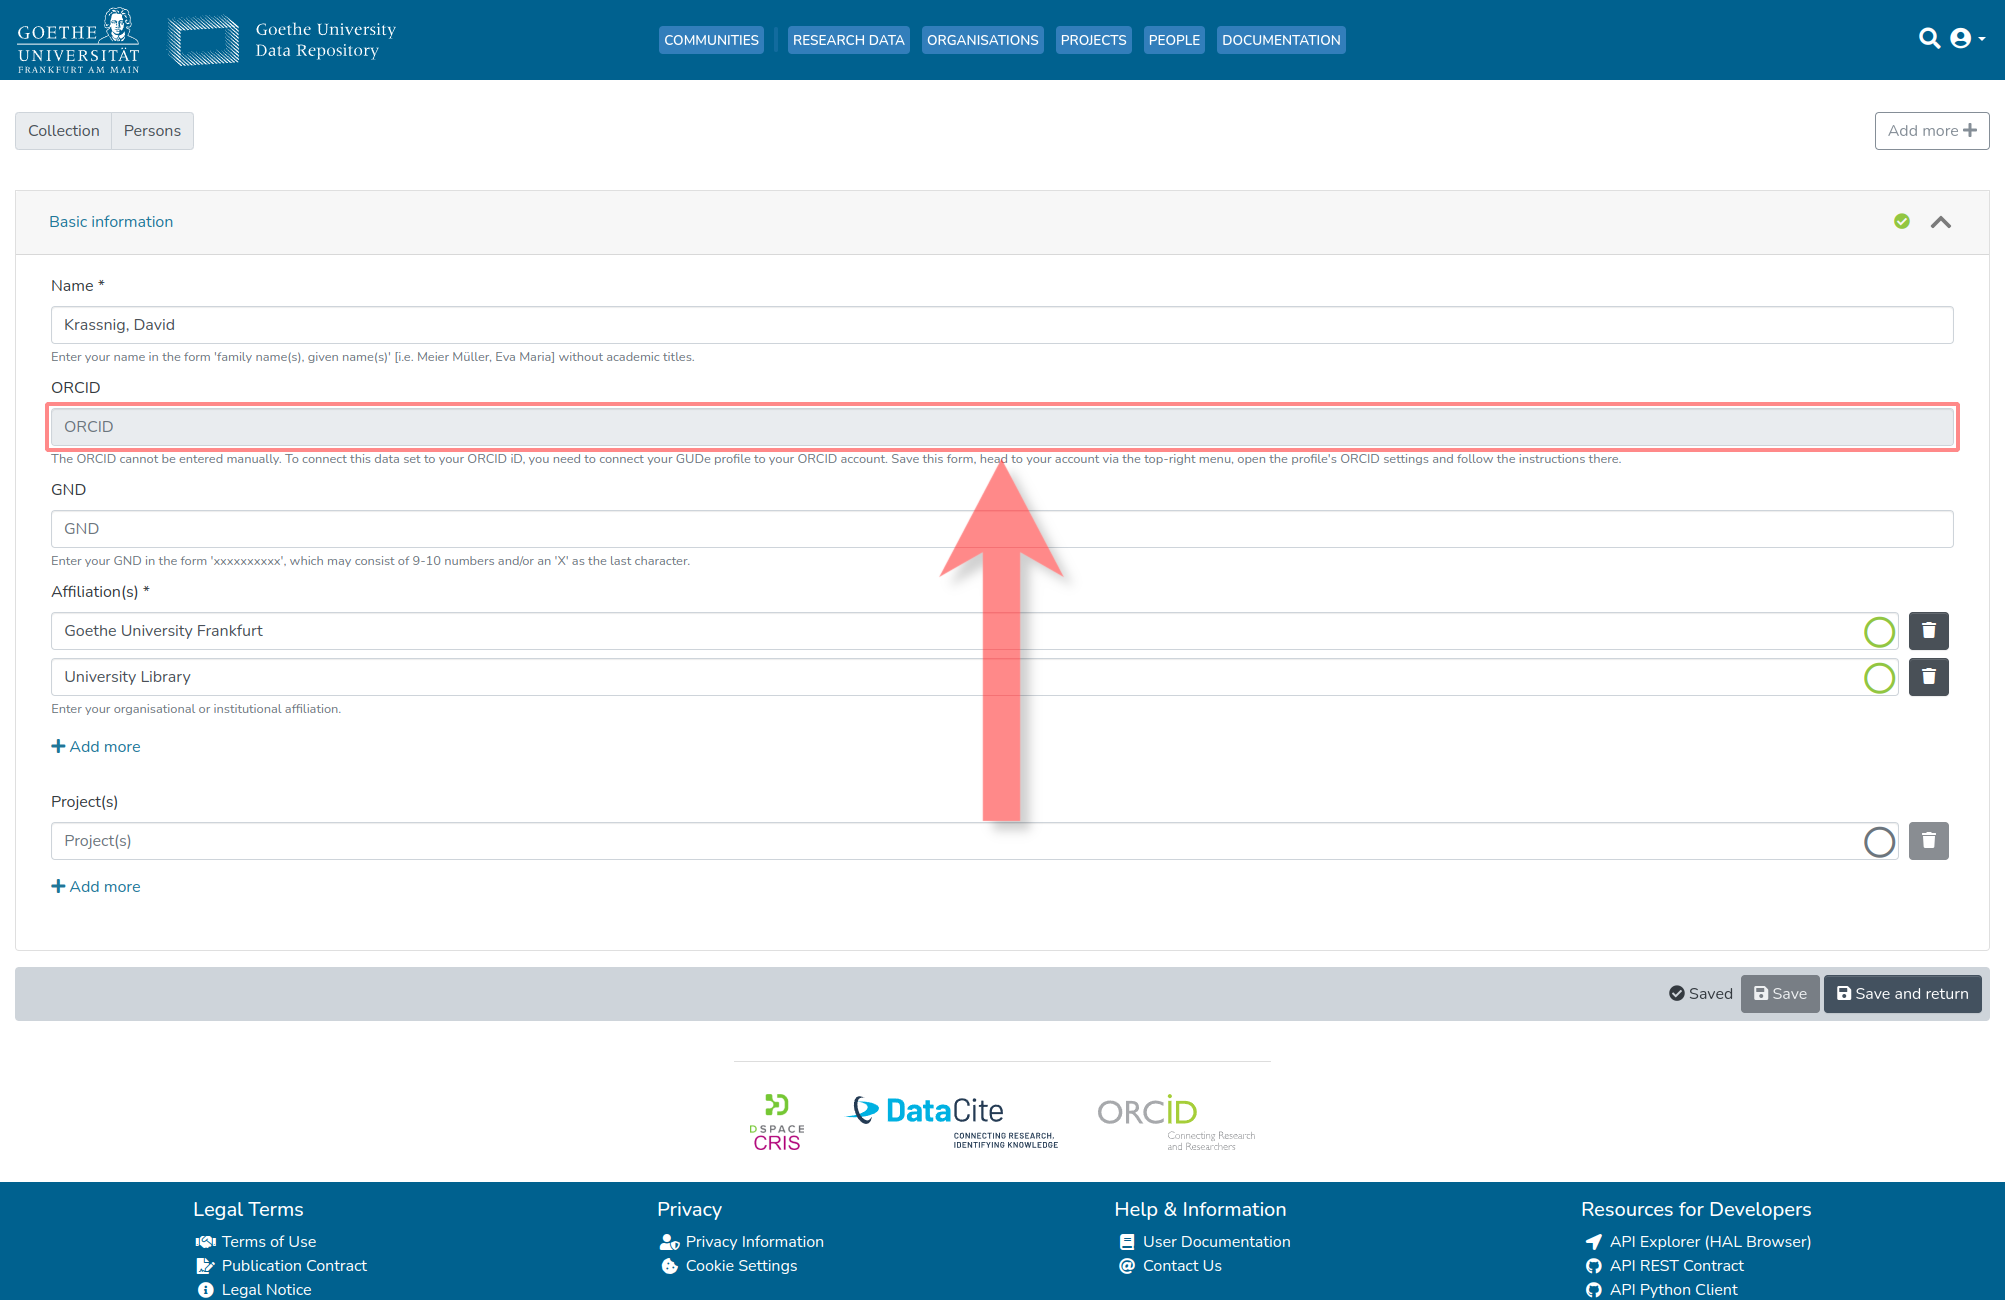
4.1. ORCID iD Cannot Be Manually Provided in the Profile
The ORCID iD cannot be manually provided in ones profile (hence the marked field is grayed out). To add ones ORCID iD to ones personal dataset, ones corresponding GUDe account must be linked with ones ORCID account.
4.2. Click on the Profile Icon at the Top Right
To do this, one starts by clicking on the profile icon at the top right.

4.3. Select 'Account'
This will open a menu. Here, one has to select 'Account.'

4.4. Click on 'ORCID Settings'
Next, one clicks on the 'ORCID Settings' element.

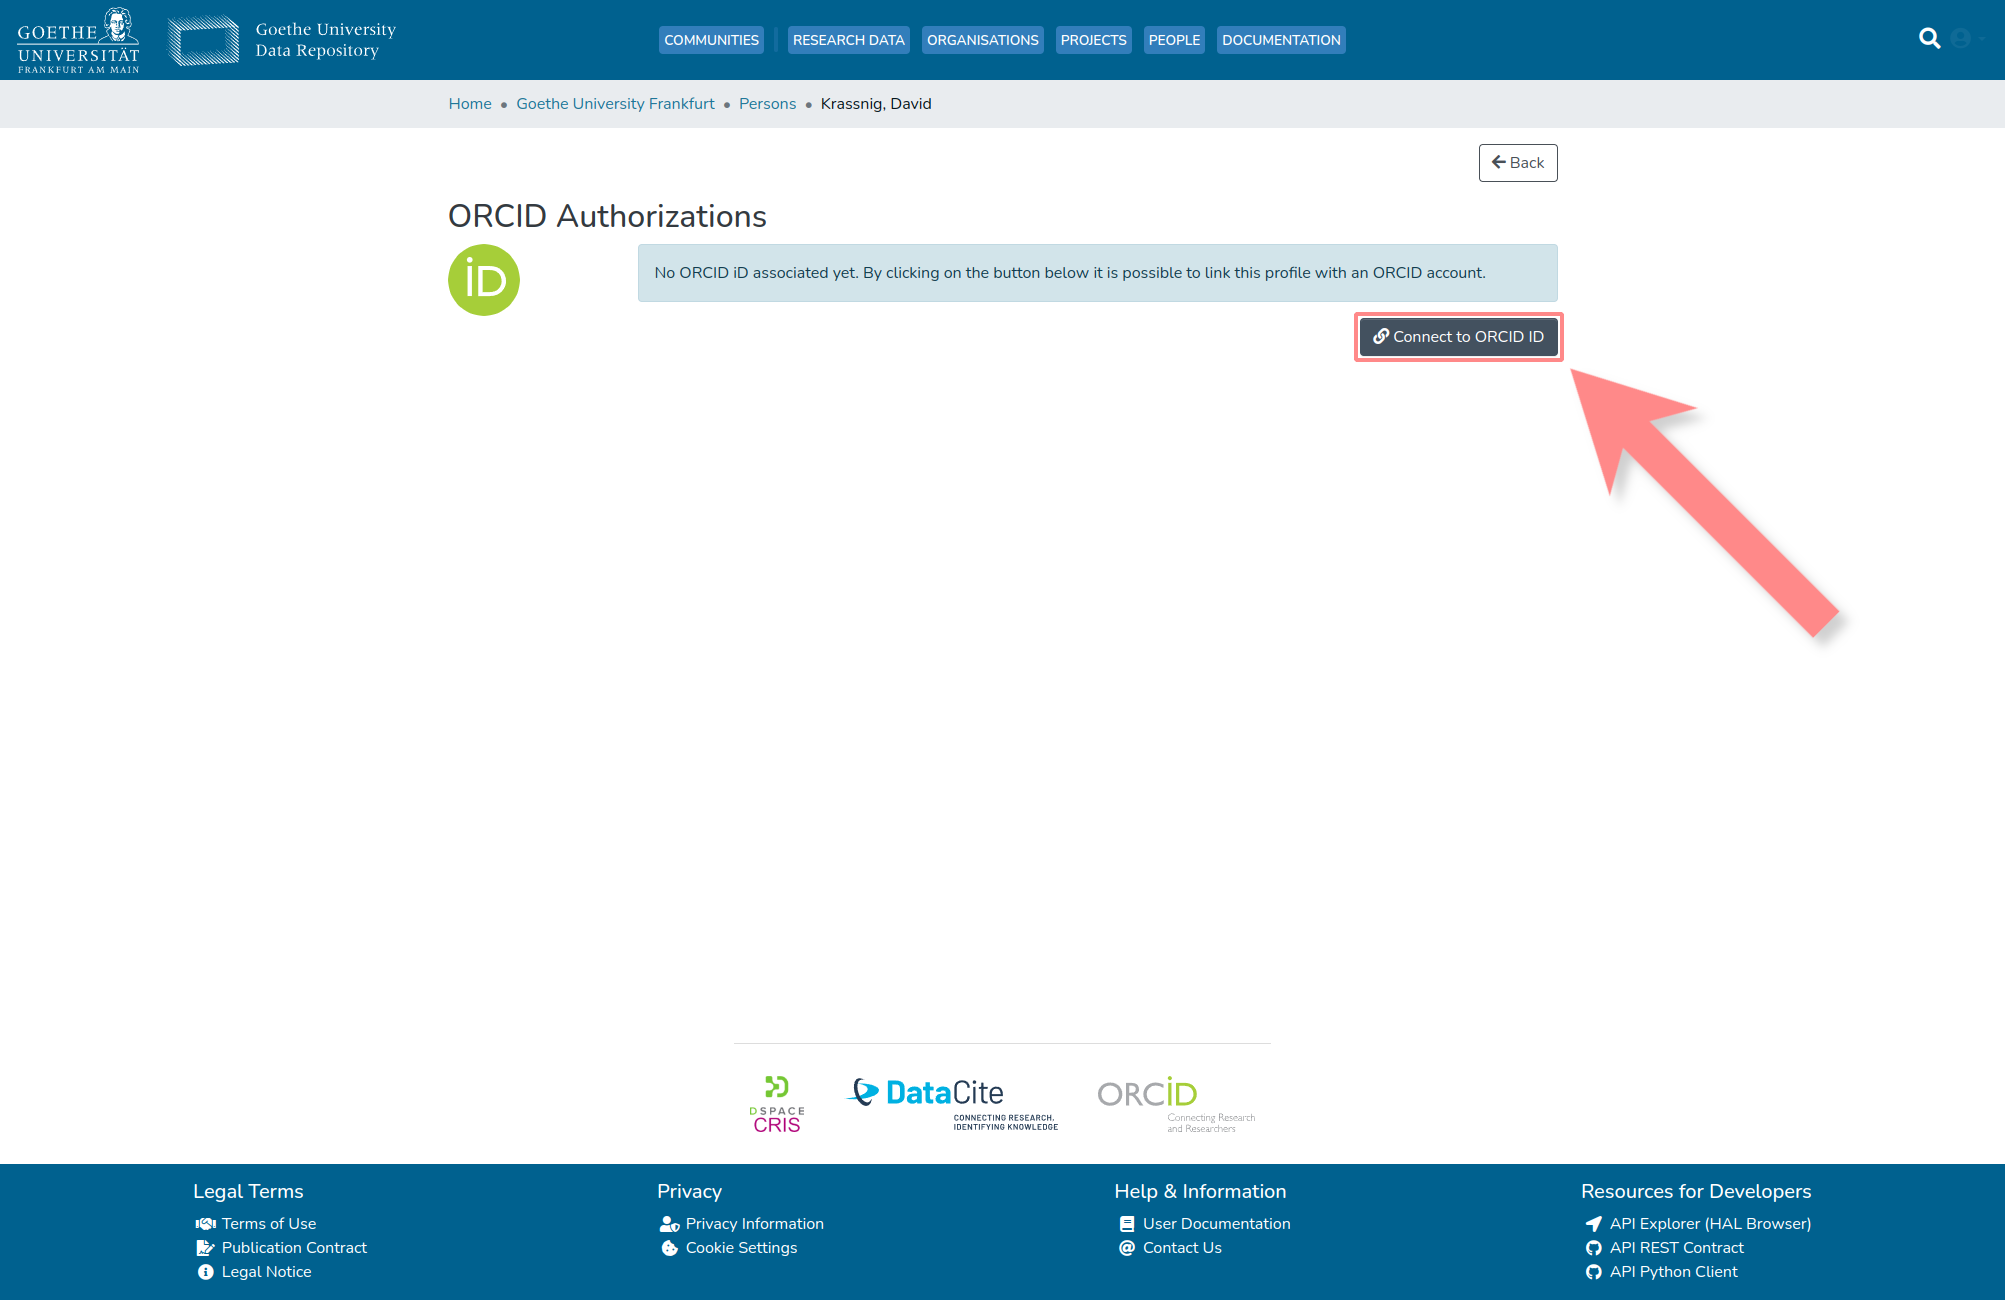
4.5. Click on 'Connect to ORCID iD'
To connect ones account to ORCID, one clicks on the marked 'Connect to ORCID iD' element.
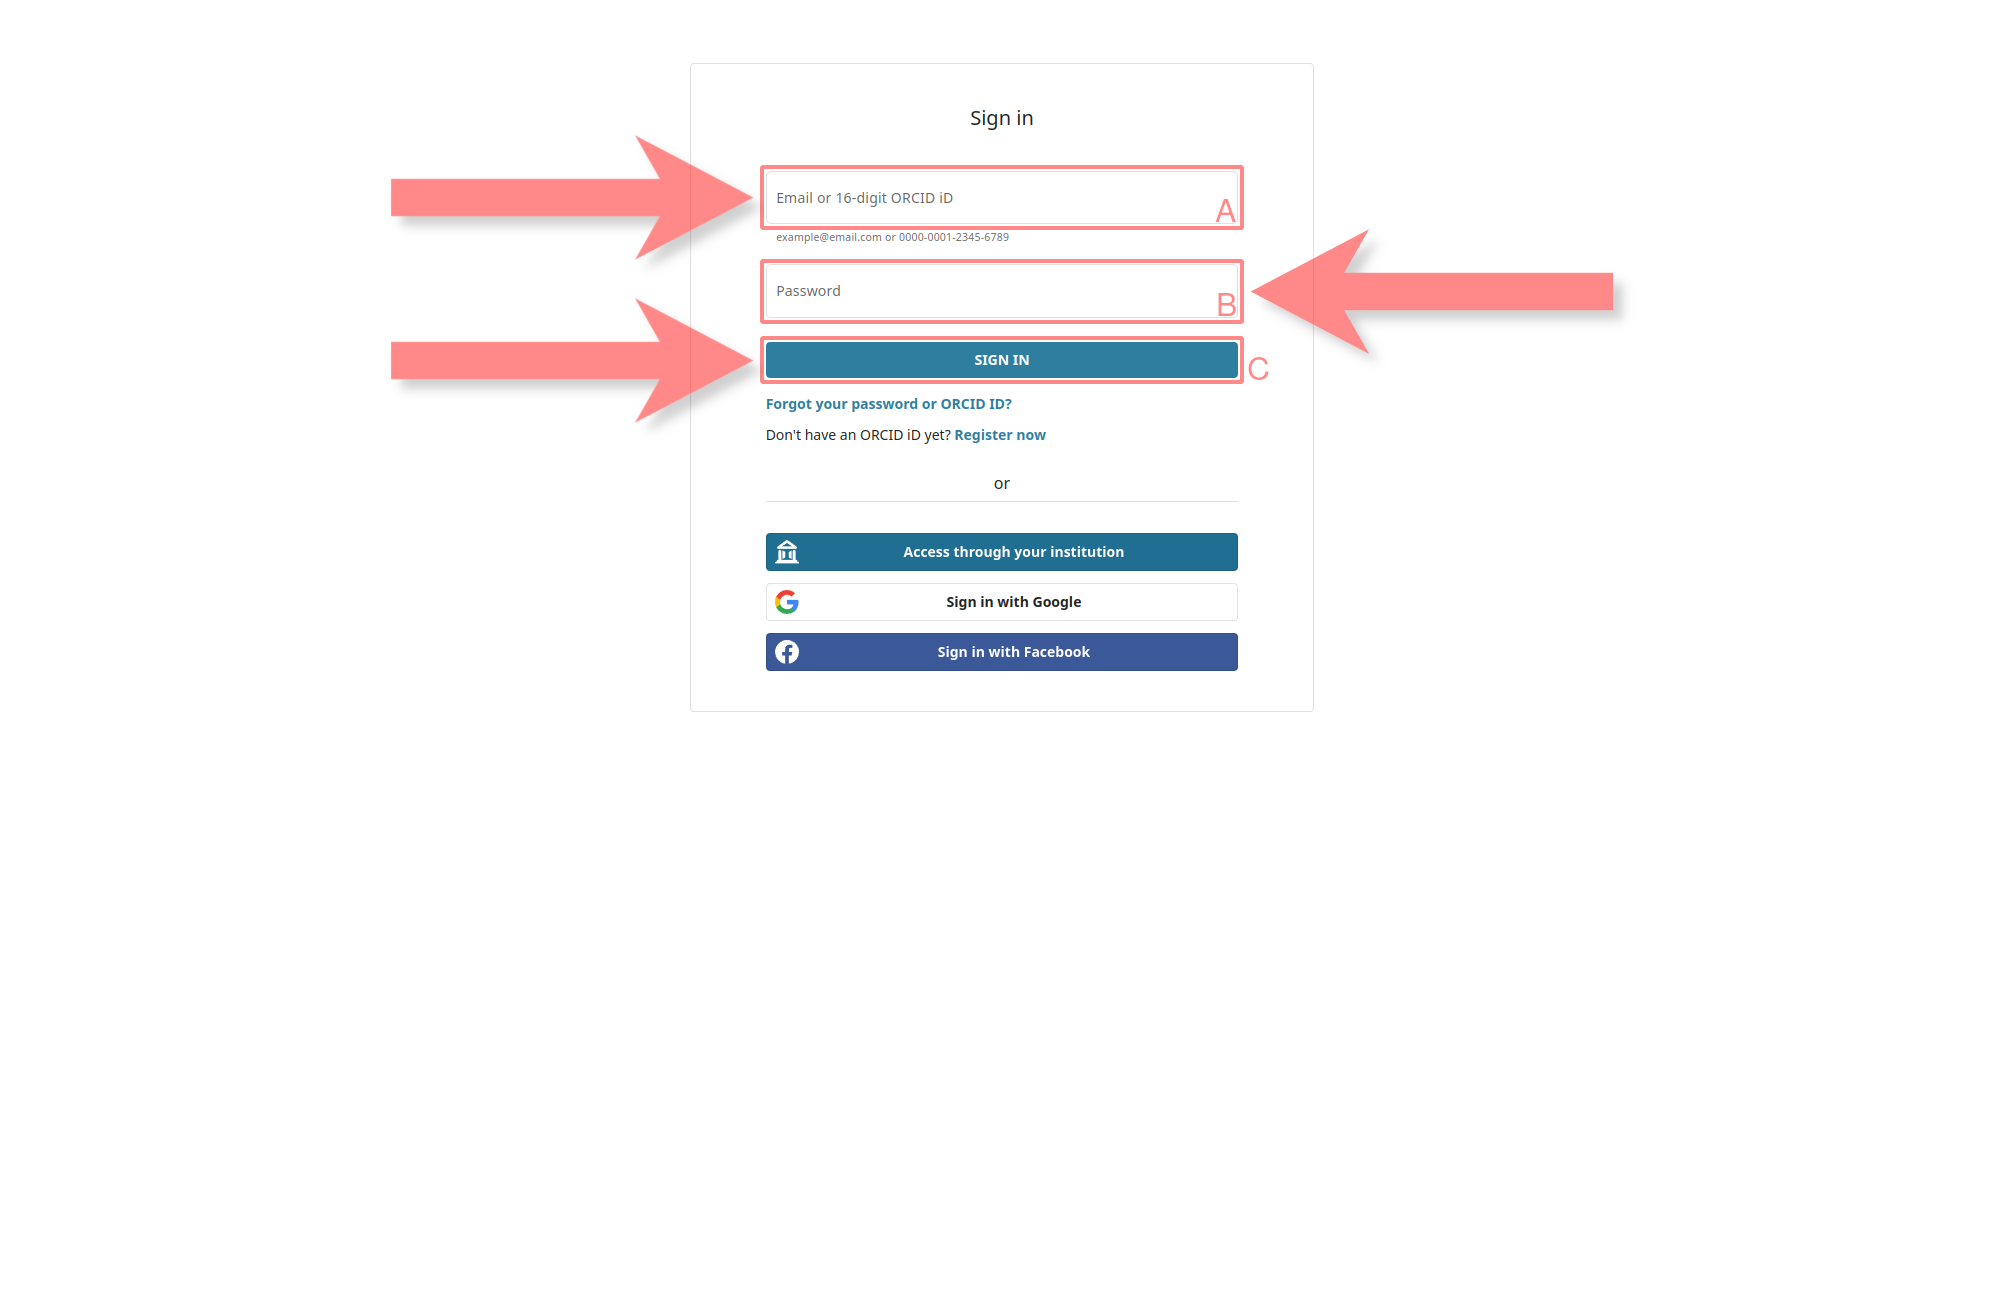
4.6. Enter the ORCID Account Data and Sign In
On the redirected webpage, one enters the ORCID login information into the marked fields (A) and (B), and then one uses the marked element (C) to sign in to ORCID.
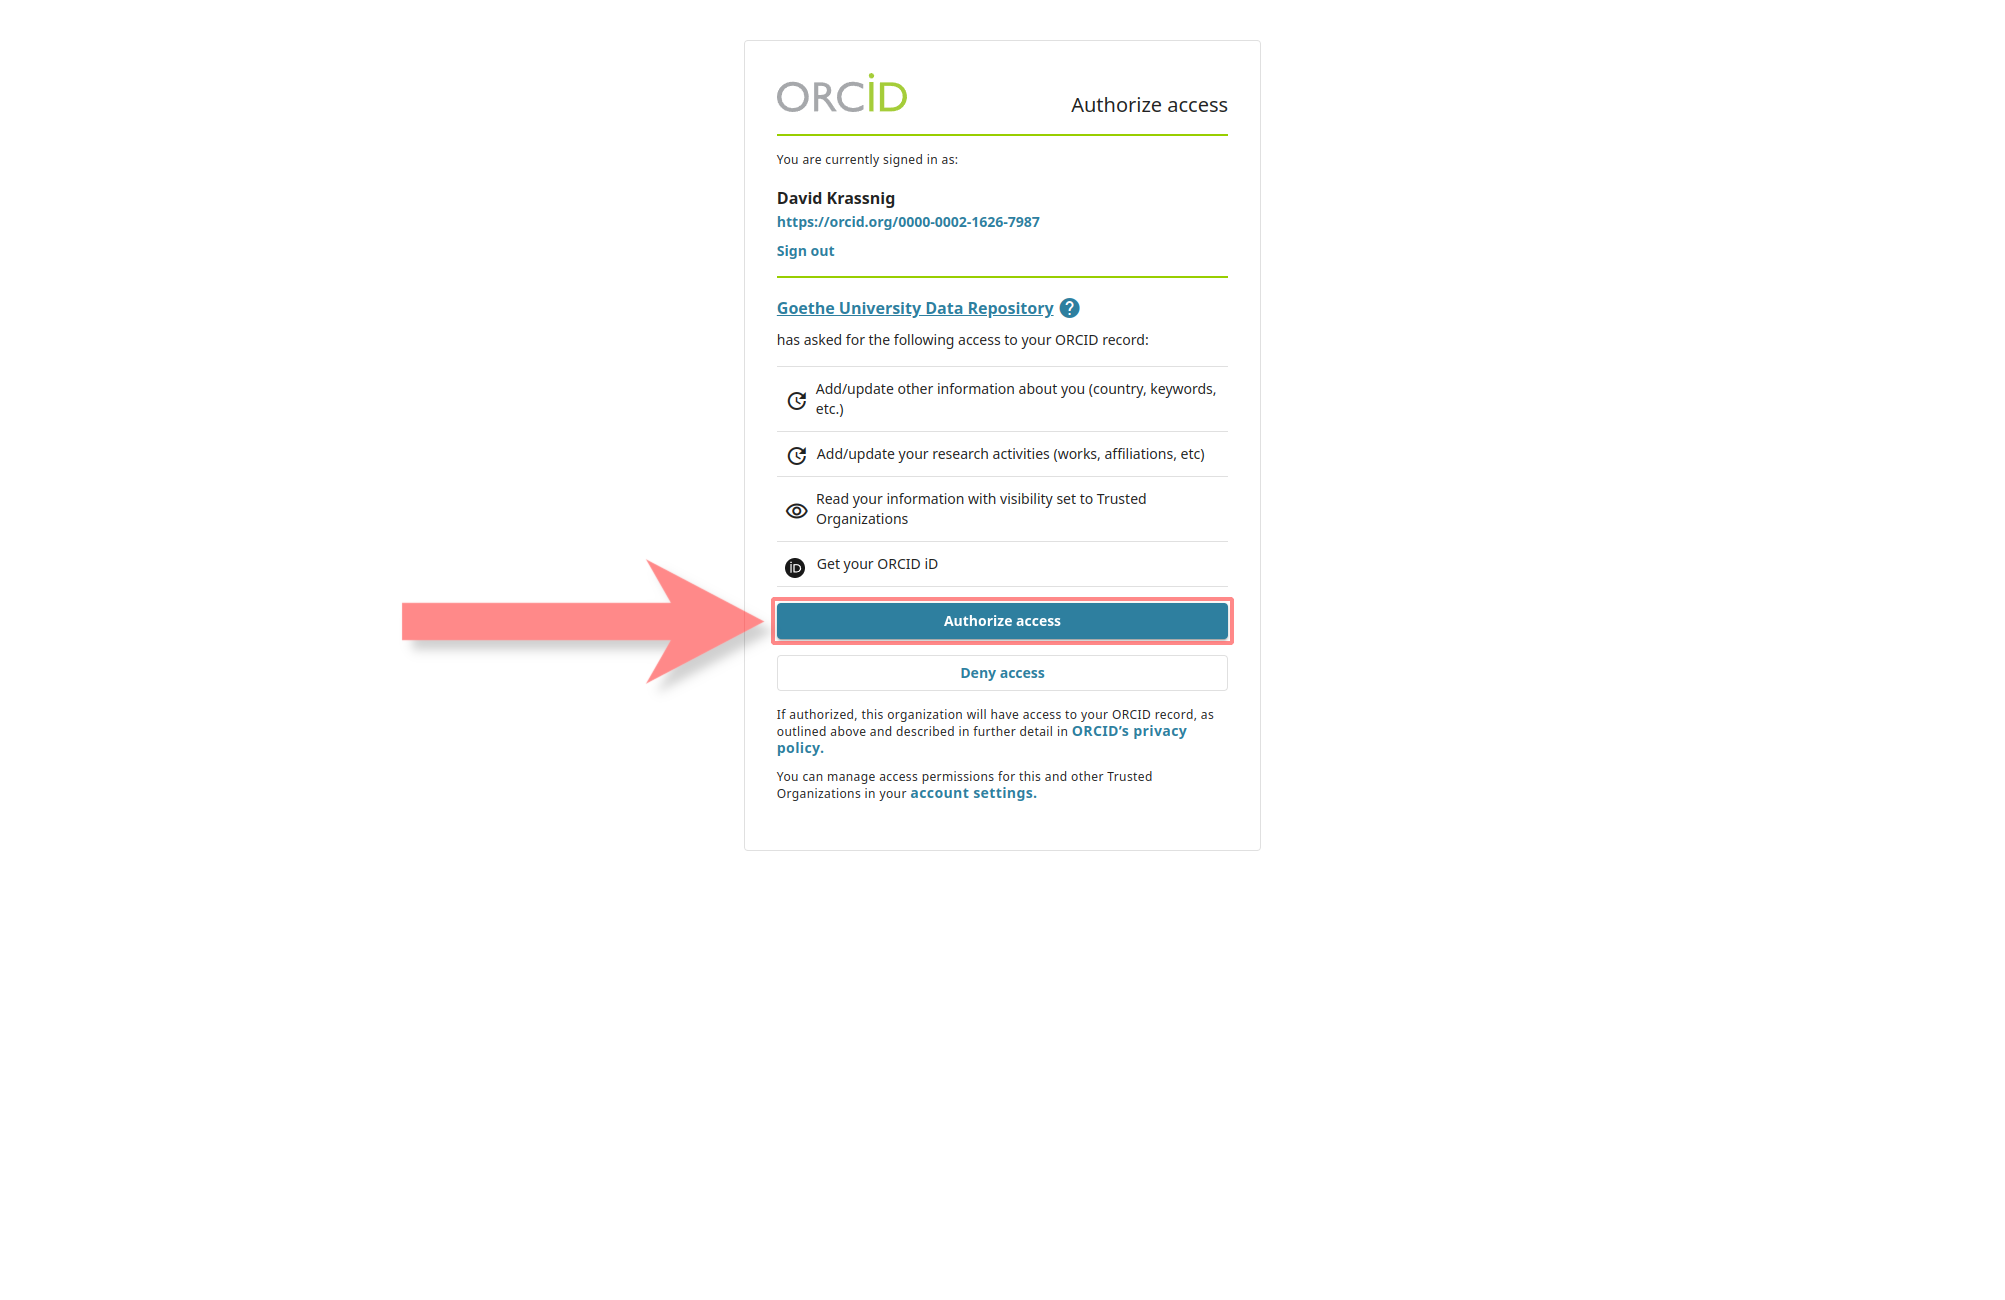
4.7. Authorize GUDe to Perform the Listed Activities in ORCID
Subsequently, a page will open, asking if one wants to grant GUDe certain permissions related to ORCID (as seen in the screenshot). To successfully link the two accounts, one selects the marked 'Authorize access' element.
4.8. Ones Profile Now Displays Ones ORCID iD
With this step, the two accounts should be successfully linked, and one can now see ones ORCID iD in ones profile.